目前,使用大型语言模型(LLMs)构建应用程序不仅复杂而且脆弱。典型的pipelines通常使用prompts来实现,这些prompts是通过反复试验手工制作的,因为LLMs对prompts的方式很敏感。因此,当您更改pipelines中的某个部分(例如LLM或数据)时,可能会削弱其性能—除非您调整prompts(或微调步骤)。
当您更改pipeline中的一部分时,例如LLM或数据,您可能会削弱其性能……
DSPy[1]是一个框架,旨在通过优先编程而不是prompt来解决基于语言模型(LM)的应用程序中的脆弱性问题。它允许您在更改组件时重新编译整个管道,以根据您的特定任务对其进行优化,而不是重复手动轮次的prompt工程。
虽然关于该框架的论文[1]早在2023年10月就已经发表了,但我是最近才知道的。在看了Connor Shorten的一个视频“DSPy解释!” 之后,我已经可以理解为什么开发者社区对DSPy如此兴奋了!
本文简要介绍了DSPy框架,涵盖了以下主题:
- 什么是DSPy(包括关于DSPy vs. LangChain vs. LlamaIndex和DSPy vs. PyTorch的讨论)
- DSPy编程模型:签名,模块,和提词器
- DSPy编译器
- DSPy示例:Naive RAG Pipeline
什么是DSPy
DSPy(“D declarative S self - improved Language P programs (in Python)”,发音为“dee-es-pie”)[1]是一个由斯坦福NLP研究人员开发的“基于基础模型的编程”框架。它强调编程而不是提示,并使构建基于lm的管道远离操作提示而更接近编程。因此,它旨在解决构建基于lm的应用程序中的脆弱性问题。
DSPy还通过将程序的信息流与每个步骤的参数(prompt和LM权重)分离,为构建基于LM的应用程序提供了一种更加系统化的方法。然后,DSPy将使用您的程序并自动优化如何为您的特定任务prompt(或微调)lm。
为此,DSPy引入了以下一系列概念:
- 手写的prompt和fine-tune被抽象并替换为签名(Signature)
- 更高级的prompt技术,如Chain of Thought或ReAct,被抽象并替换为Modules。
- 手动prompt工程是自动化的提示器(teleprompters)和DSPy编译器
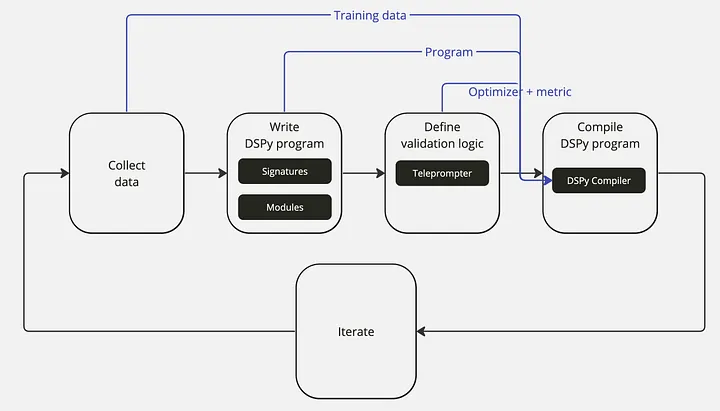
使用DSPy构建基于lm的应用程序的工作流程,在DSPy入门手册中进行了讨论,如下所示。它会让你想起训练神经网络的工作流程:

- 收集数据集: 收集程序输入和输出的一些示例(例如,问题和答案对),这将用于优化您的pipelines。
- 编写DSPy程序: 用Signature和Modules定义程序的逻辑以及组件之间的信息流来解决你的任务。
- 定义验证逻辑: 定义一个逻辑来使用验证度量和优化器(提词器)来优化你的程序。
- 编译DSPy程序: DSPy编译器将训练数据、程序、优化器和验证度量考虑在内,以优化您的程序(例如,prompt或fine-tune)。
- 迭代: 通过改进数据、程序或验证来重复这个过程,直到您对pipelines的性能感到满意为止。
以下是与DSPy相关的所有重要链接的简短列表:
- DSPy论文:DSPy:编译声明式语言模型调用到自改进管道 [1]
- DSPy GitHub: https://github.com/stanfordnlp/dspy
- 通过关注Omar Khattab来了解DSPy的最新情况。
DSPy与LangChain或LlamaIndex有何不同?
LangChain, LlamaIndex和DSPy都是帮助开发人员轻松构建基于lm的应用程序的框架。使用LangChain和LlamaIndex的典型pipelines通常使用prompts模板实现,这使得整个pipelines对组件更改非常敏感。相比之下,DSPy使构建基于LLM的pipelines远离操作prompts,更接近于编程。
DSPy中新引入的编译器在更改基于LLM的应用程序(如LLM或数据)中的部分时,消除了任何额外的prompt工程或fine-tuning。相反,开发人员可以简单地重新编译程序来优化pipelines以适应新添加的更改。因此,DSPy可以帮助开发人员以比LangChain或LlamaIndex更少的努力获得pipelines的性能。
虽然LangChain和LlamaIndex已经在开发者社区中被广泛采用,但DSPy作为一种新的替代方案已经在同一社区中引起了相当大的兴趣。
DSPy是如何与PyTorch相关的?
如果你有数据科学背景,当你开始使用DSPy时,你会很快注意到它的语法与PyTorch相似。DSPy论文[1]的作者明确指出PyTorch是一个灵感来源。
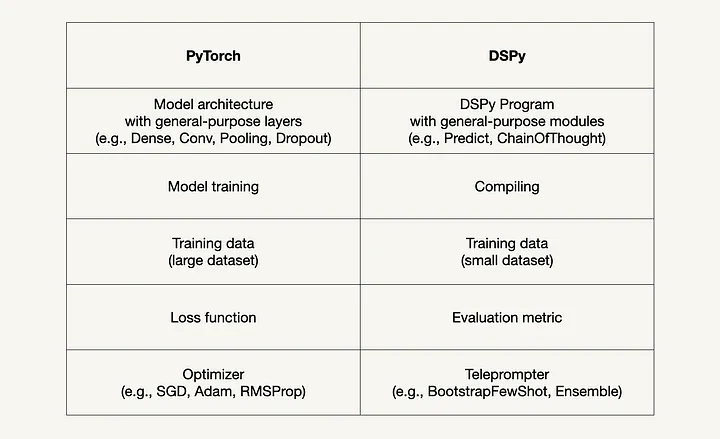
与PyTorch类似,在PyTorch中,通用层可以在任何模型体系结构中组合,在DSPy中,通用模块可以在任何基于lm的应用程序中组合。此外,编译DSPy程序(其中DSPy模块中的参数是自动优化的)类似于在PyTorch中训练神经网络,其中使用优化器训练模型权重。
下表总结了PyTorch和DSPy之间的相似之处:
DSPy规划模型
本节讨论DSPy编程模型引入的以下三个核心概念:
签名(Signatures):抽象prompt和fine-tune
DSPy程序中对LM的每个调用都必须具有自然语言签名(signature),以取代传统的手写prompt。签名是一个简短的函数,它指定一个转换做什么,而不是如何提示LM去做(例如,“使用问题和上下文并返回答案”)。
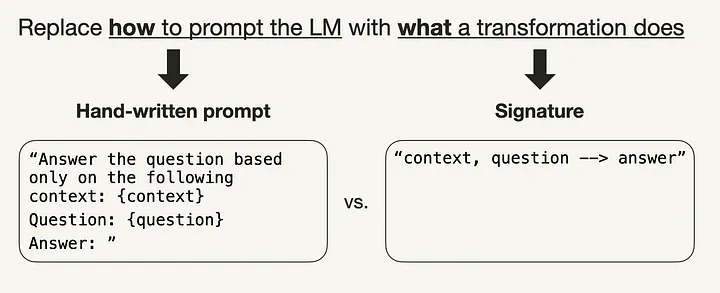
DSPy签名取代手写prompt。
签名是最小形式的输入和输出字段的元组。
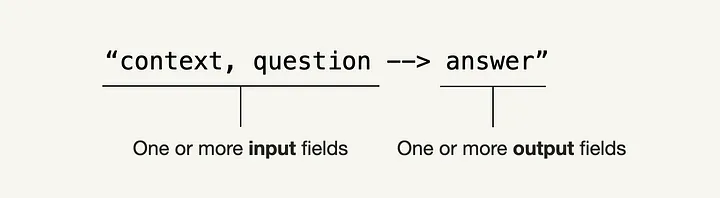
最小DSPy签名的结构
下面,您可以看到一些简写语法签名的示例。
1 | "question -> answer" |
在许多情况下,这些速记语法签名就足够了。但是,在需要更多控制的情况下,还可以使用以下表示法定义签名。在这种情况下,签名由三个元素组成:
- LLM要解决的子任务的最小描述,
- 输入字段的描述
- 输出字段的描述。
下面,您可以看到签名上下文的完整符号, context, question -> answer:
1 | class GenerateAnswer(dspy.Signature): |
与手写提示相比,签名可以通过为每个签名引导示例编译成自完善和自适应管道的prompt或fine-tune。
模块(Module):抽象提示技术
您可能熟悉几种不同的提示技巧,例如添加Your task is to ...之类的句子。或“You are a ...”在提示开头,思维链(“让我们一步一步地思考”),或者在提示结尾添加 "Don't make anything up" 或“Only use the provided context”这样的句子。
对DSPy中的模块进行模板化和参数化,以抽象这些提示技术。这意味着它们用于通过应用提示、微调、增强和推理技术使DSPy签名适应任务。
下面,您可以看到如何将签名传递给ChainOfThought模块,然后使用输入字段context和question的值进行调用。
1 | # Option 1: Pass minimal signature to ChainOfThought module |
下面,您可以看到ChainOfThought模块最初如何实现签名"context, question -> answer"。如果您想自己尝试一下,可以使用lm.inspect_history(n=1)来打印最后一个提示符。

在撰写本文时,DSPy实现了以下六个Module:
dspy.Predict:处理输入和输出字段,生成指令,并为指定的signature创建模板。dspy.ChainOfThought:继承了Predict模块,并增加了“ Chain of Thought “处理的功能。dspy.ChainOfThoughtWithHint:继承了Predict模块,并增强了ChainOfThought模块,增加了提供推理提示的选项。dspy.MultiChainComparison:继承了Predict模块,并增加了多链比较的功能。dspy.Retrieve:从检索器模块检索段落。dspy.ReAct:旨在组成思想,行动和观察的交错步骤。
您可以将这些模块从 dspy.Module继承的类串联起来。这些类还提供了两个方法。你可能已经注意到与PyTorch的语法相似:
__init__(): 声明使用的子模块。forward(): 描述已定义的子模块之间的控制流。
1 | class RAG(dspy.Module): |
上面的代码段在RAG()类中定义的模块之间创建了以下信息流:
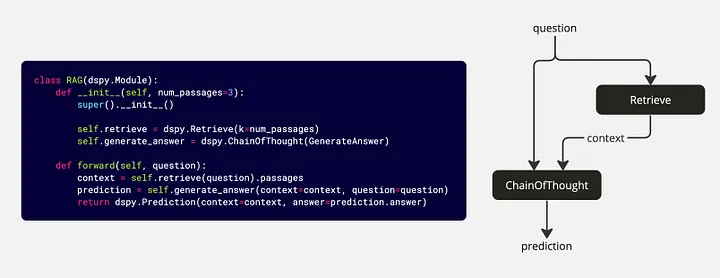
提词器(Teleprompters):自动提示任意管道
提词器(Teleprompters)作为DSPy程序的优化器。它们采用一个度量,并与DSPy编译器一起学习引导并为DSPy程序的模块选择有效的提示。
1 | from dspy.teleprompt import BootstrapFewShot |
在撰写本文时,DSPy实现了以下五个提词器:
dspy.LabeledFewShot:定义预测器使用的k个样本数。dspy.BootstrapFewShot:引导Few-Shot。dspy.BootstrapFewShotWithRandomSearch:继承了BootstrapFewShot提词器,并为随机搜索过程引入了额外的属性。dspy.BootstrapFinetune:t将提词器定义为用于微调编译的BootstrapFewShot实例。dspy.Ensemble:创建多个程序的集成版本,将不同程序的各种输出减少到单个输出。
还有SignatureOptimizer和BayesianSignatureOptimizer,它们在zero/few-shot 设置中改善模块中签名的输出前缀和指令。
不同的提词器在优化成本和质量等方面提供了不同的权衡。
DSPy Compiler
DSPy编译器将在内部跟踪您的程序,然后使用优化器(提词器)对其进行优化,以最大化给定的指标(例如,提高质量或成本)。优化取决于你使用的LM类型:
- LLMs:构建高质量的few-shot prompt
- 用于较小的lm:训练自动fine-tune
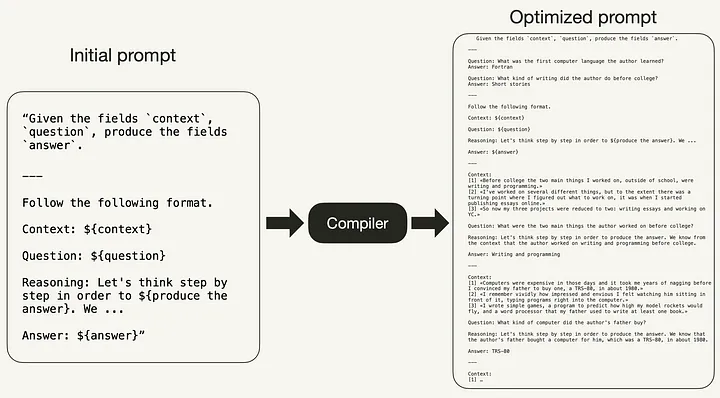
这意味着DSPy编译器会自动将模块映射到prompt、调优、推理和增强的高质量组合。[1]在内部,编译器在输入上模拟各种版本的程序,并引导每个模块的示例跟踪以进行自我改进,以优化到您的任务的管道。这个过程类似于神经网络的训练过程。
例如,虽然初始提示前面创建的ChainOfThought模块可能是任何LM理解任务的良好起点,但它可能不是最佳提示。如下图所示,DSPy编译器优化了初始提示,从而消除了手动提示调优的需要。
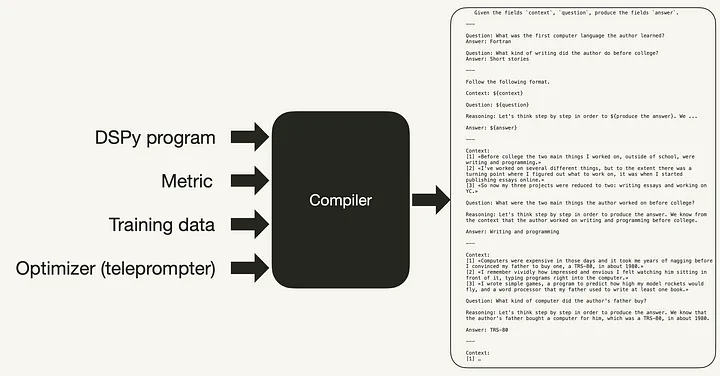
编译器接受以下输入,如下面的代码和图像所示:
- 程序,
- 提词器,包括定义的验证度量,以及
- 一些训练样本。
1 | from dspy.teleprompt import BootstrapFewShot |
DSPy Example: 朴素的RAG pipeline
现在您已经熟悉了DSPy中的所有基本概念,让我们将它们放在您的第一个DSPy pipeline中。
检索增强生成(retrieve -augmented generation, RAG)目前在生成式人工智能领域非常流行。所以,我们搭配一个快速、简单的RAG管道开始学习DSPy才有意义。
对于Jupyter Notebook形式的端到端管道,我建议查看DSPy GitHub存储库中的Intro Notebook或Connor Shorten的Getting Started with RAG in DSPy Notebook。
前提条件:安装DSPy
要安装dspy-ai Python包,可以简单地 pip安装它。
1 | pip install dspy-ai |
Step 1: 安装
首先,您需要设置LLM和检索模型(RM):
- LLM: 我们将使用OpenAI的
gpt-3.5 turbo,你将需要一个OpenAI API密钥。要获得一个,您需要一个OpenAI帐户,然后在API密钥下“创建新的秘密密钥”。 - RM: 我们将使用Weaviate,一个开源的矢量数据库,我们将填充额外的数据。
让我们从使用来自LlamaIndex GitHub存储库 (MIT许可)的一些示例数据填充外部数据库开始。您可以用您自己的数据替换这部分。
1 | !mkdir -p 'data' |
接下来,我们将把文档拆分为单个句子,并将其摄取到数据库中。为了简单起见,我们将使用本文中嵌入的Weaviate,您可以免费使用它,而无需注册API密钥。请注意,在使用Weaviate时,使用一个名为”content“的属性来摄取数据是很重要的。
1 | import weaviate |
现在,您可以在全局设置中配置LM和RM。
1 | import dspy |
Step 2: 数据收集
接下来,我们将收集一些训练示例(在本例中是手工注释的)。与训练神经网络相比,你只需要几个例子。
1 | # Small training set with question and answer pairs |
Step 3: 编写DSPy程序
现在,您已经准备好编写第一个DSPy程序了。这将是一个RAG系统。首先,您需要定义签名context, question -> answer ,如Signatures所示,称为GenerateAnswer :
1 | class GenerateAnswer(dspy.Signature): |
在定义了签名之后,您需要编写一个自定义的RAG类,它继承自dspy.Module。在__init__():方法中,您声明相关模块,在forward()方法中,您描述模块之间的信息流。
1 | class RAG(dspy.Module): |
Step 4: 编译DSPy程序
最后,您可以定义提词器并编译DSPy程序。这将更新ChainOfThought模块中使用的提示符。在这个例子中,我们将使用一个简单的BootstrapFewShot提词器。
1 | from dspy.teleprompt import BootstrapFewShot |
现在你可以调用你的RAG管道了,如下所示:
1 | pred = compiled_rag(question = "What programming language did the author learn in college?") |
从这里开始,您可以评估结果并迭代过程,直到您对管道的性能感到满意为止。关于评估的详细说明,我建议查看DSPy GitHub存储库中的Intro Notebook或Connor Shorten的Getting Started with RAG in DSPy Notebook。
总结
本文简要介绍了DSPy框架[1],这是目前生成人工智能社区感到兴奋的。DSPy框架引入了一组概念,将构建基于lm的应用程序从手工提示工程转移到编程。
在DSPy中,传统的提示工程概念被以下内容所取代:
- Signatures取代手写提示,
- Modules取代特定的提示工程技术,以及
- Teleprompters and the[DSPy Compiler) (https://towardsdatascience.com/intro-to-dspy-goodbye-prompting-hello-programming-4ca1c6ce3eb9#a471)取代手工迭代的提示工程。
在介绍了DSPy概念之后,本文将带您通过一个简单的RAG管道示例,使用OpenAI语言模型和Weaviate矢量数据库作为检索器模型。
原文:https://towardsdatascience.com/intro-to-dspy-goodbye-prompting-hello-programming-4ca1c6ce3eb9