来个Midjourney 5.1的prompt参数一纸禅
当前版本:v5.1(包含niji 5)
后续会不断更新
1 | 基础Prompt剖析: |
关于Midjourney的其他文章:
- 原创Midjourney使用教程
- Midjourney(v5.1) Prompt深度剖析,创造有灵魂的图
- Midjourney高级技巧的极简教程
- 使用GFPGAN将Midjourney生成的人脸精细化
- 使用Midjourney制作专业级LOGO


土猛的员外
来个Midjourney 5.1的prompt参数一纸禅
当前版本:v5.1(包含niji 5)
后续会不断更新
1 | 基础Prompt剖析: |
关于Midjourney的其他文章:
TorchV AI支持试用!
如您有大模型应用方面的企业需求,欢迎咨询!


原文:Anatomy of Midjourney Promps: In-Depth Study for effective Prompting Strategies — V5.1 examples
作者:Michael King
译者:这是一个非常“平易近人”的Midjourney教程,非常适合对作图有要求的同学一步一步开始自己的Midjourney之旅。
你是否曾经发现自己盯着Midjourney的空白画布,手指悬停在键盘上,让我问自己:“我应该问这个东西什么?”

我也曾经有过同样的经历,朋友。就像站在一个售卖艺术品的自动贩卖机前一样,但你需要喂它文字而不是硬币。而且并非所有的词语都可以使用,你必须选择正确的单词,并按照正确的顺序排列。这有点像施法一样。有时候你会中大奖,获得比你想象中更美丽、更完美的杰作;但另外一些时候,它可能和问一个魔球没有什么区别。
这个被称为“Midjourney prompting”的功能实际上是一个谜团。这真正是一种舞蹈,在您和AI之间进行交互。您用文字引导着AI生成图像,并共同创造出独特的东西。但步骤并不总是清晰明了:您应该要求简单地描述,a sunset over the ocean(海洋上落日)?还是更加详细地描绘画面以期待AI能够将其呈现出来?或者尝试采取结构化方法,如电影导演指挥镜头?
然后难免需要微调——哦!微调!转眼之间,您正在调整此处单词、那里短语;接下来发生了什么事情呢?您已经修改了提示内容很多次,以至于它几乎无法被识别。但当您最终获得那张令人惊叹的图像时,这一切都是值得的。
那么,你如何破解这个谜题?如何掌握Midjourney Prompt的艺术?我有一些见解要与您分享,这是从许多与AI的深夜交互中获得的。所以请继续关注,因为事情即将变得有趣。
好的,让我们开始吧。想象一下,你站在控制台前,眼睛盯着那个空白画布。手指悬停在键盘上,然后敲出一个简单的单词:“chair(椅子)”。听起来很基础,对吧?但这好歹是个不错的开始。
现在,为了增加趣味性,你决定将混沌度调到50。为什么是50呢?因为我发现中等程度的混沌设置可以引入足够多的不确定性以保持事情有趣。这就像给你的餐点加一点辣酱——不会烧掉你的味蕾,但只要能让舌头感到刺痛就行了。
在这种情况下,“混沌参数”是我们秘密武器。它是万能卡牌、意外元素。它使得人工智能说:“chair(椅子)?好啊!看看我能做些什么!”相信我,在处理人工智能时,稍微变化一下也可以大有裨益。
Prompt:chair --c 50
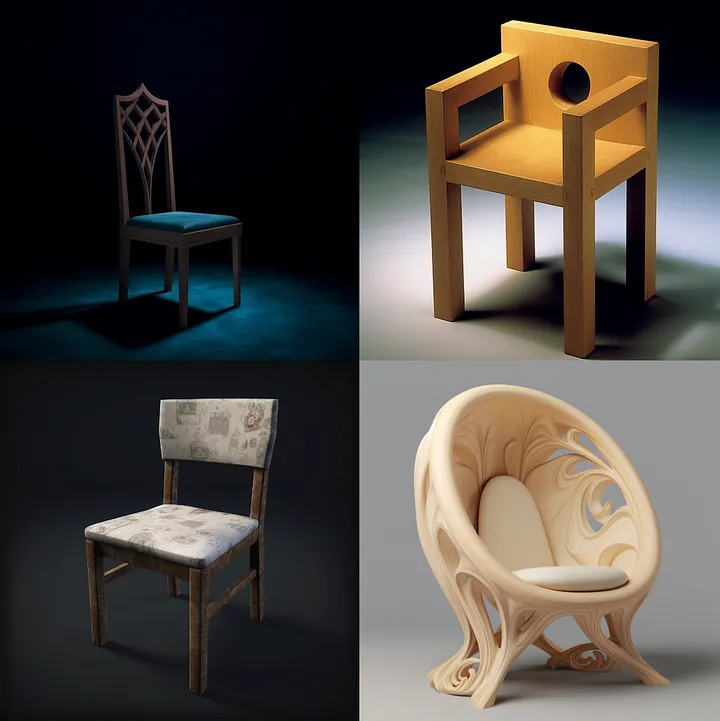
那么,我们按下回车键,靠在椅子上等待。最终我们得到的是……没错,这就是一把椅子。但它有点像让厨师给你做三明治,结果拿到的只是一片面包和一块奶酪。当然了,从技术上来说这确实算作三明治,但不完全符合你的期望吧?
这就是midjourney prompt的问题所在。如果指令过于模糊不清,则需要AI自行填补空缺部分。虽然AI具备很多技能,但并不能读取人类思想。
因此,让我们更加具体地描述需求吧!我们要对椅子进行改造——涂上新漆!那么颜色呢?为什么不选绿色呢?它既大胆又充满活力,并且代表着生命之色。而且顺便提一下:绿色也正好是我的最爱。
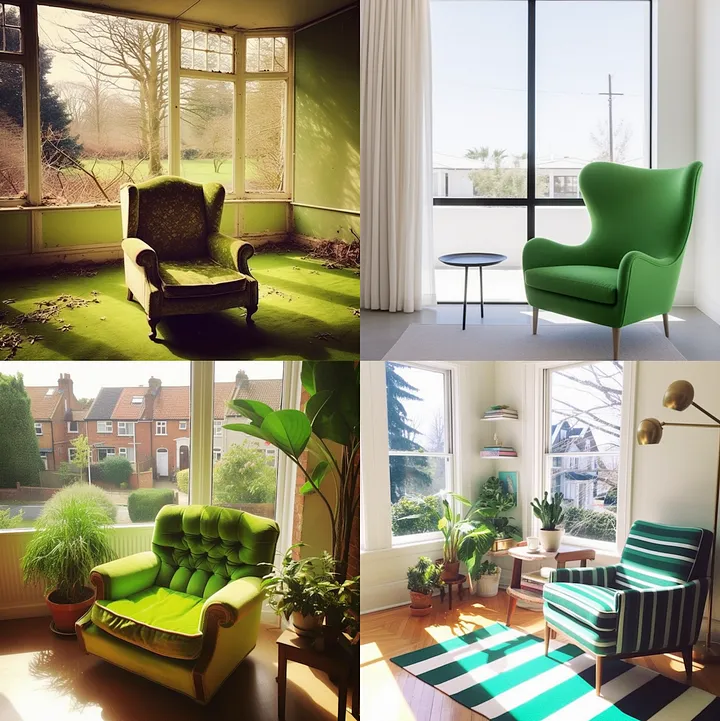
Prompt:green chair --c 50
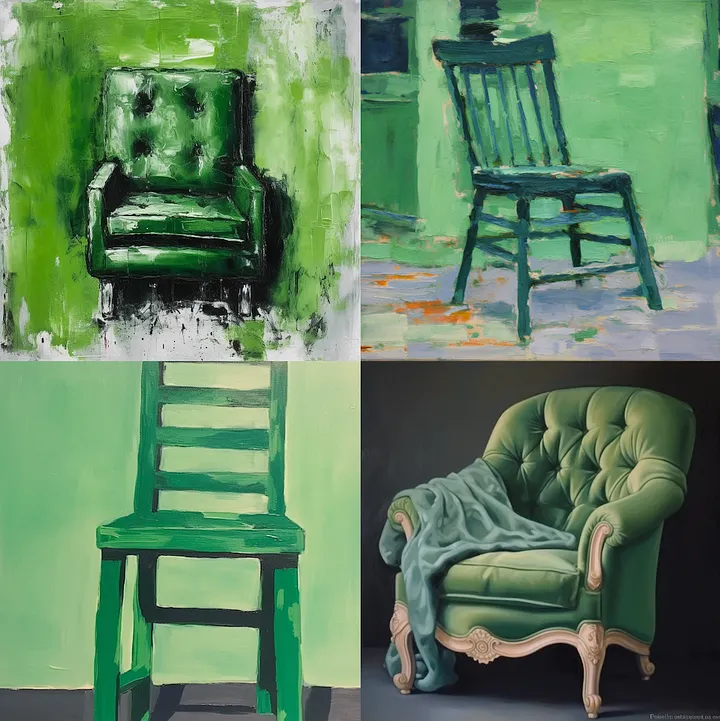
好的,让我们看看我们得到了什么。啊,是的,我们有绿色的椅子。但它们到处都是!其中一些看起来像从印象派画作中撕下来的,而另一个则清晰明了,就像高分辨率照片一样。这就像一个名为“Green Chairs: A Study in Chaos(绿色椅子:混沌之研究)”的野性、折衷主义艺术展览。很有趣,但不完全符合我们的目标。
你知道吗,在Midjourney Prompt方面有个问题。这有点像与一个天才但略微健忘的艺术家打交道。你必须清楚地表达你想要什么,否则他们会自己创造出新奇别致的东西。虽然这可能会带来一些惊人的惊喜,但也可能让你摸不着头脑,并且纳闷自己怎么会得到一个立体主义解释绿色椅子。
所以回到绘图板上——或者说键盘上吧。我们想要一张绿色椅子的照片,而不是画作。我们追求现实主义风格,在这里可以感受、触摸和坐在上面的真实存在感。“再试一次”准备好了吗?让我们开始吧…
Prompt:green chair | photography --c 50
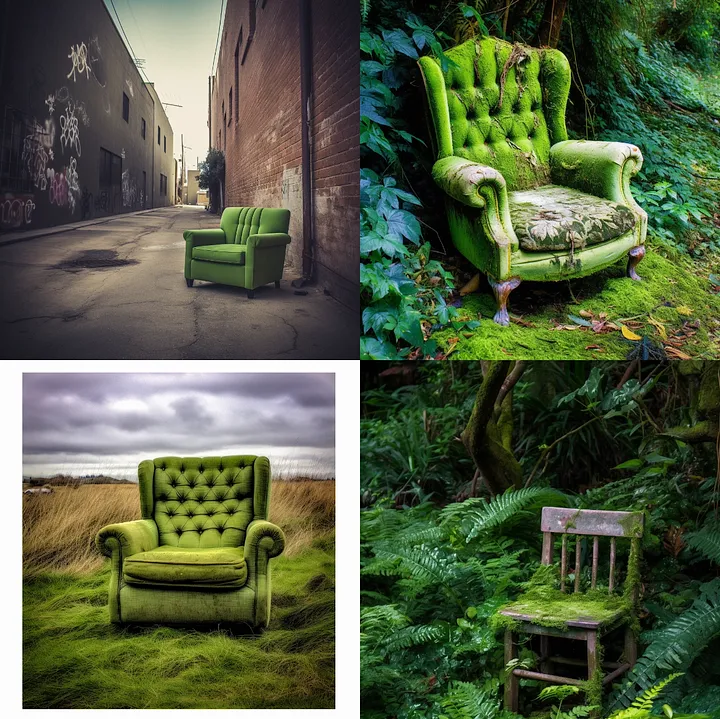
哇,这是什么?一把绿色的椅子竟然出现在农田中央?这可真是不寻常。再看那一把孤零零地坐在空旷街道上的绿色椅子,就像一个超现实主义梦境中的场景。得承认AI确实有着非凡的想象力。
但尽管我很享受这个意外之旅,它并不完全符合我们最初设定的目标。就好比点了一份比萨饼却收到了美食汉堡包,虽然看起来很诱人,但并不是你口感所期待的。
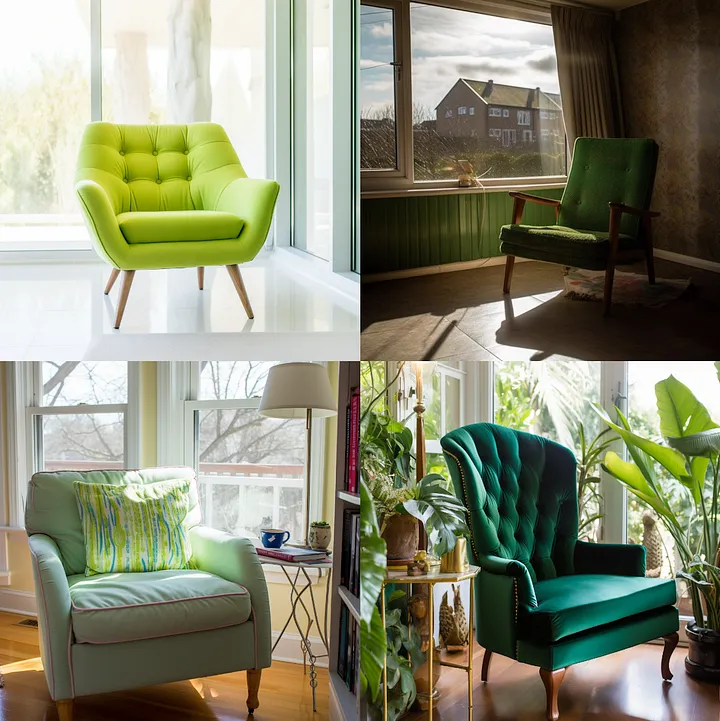
因此,我们要回归正题。让我们带着这把绿色椅子踏上新旅程,在家庭生活中心留下它温馨舒适的身影吧!想象一个舒适温馨、壁炉边火苗跳动、柔软地毯铺满整个房间……而在其中央,则摆放着我们那张迎人且舒适无比的绿色椅子。这才是我们要为AI艺术家描绘出来的场景。
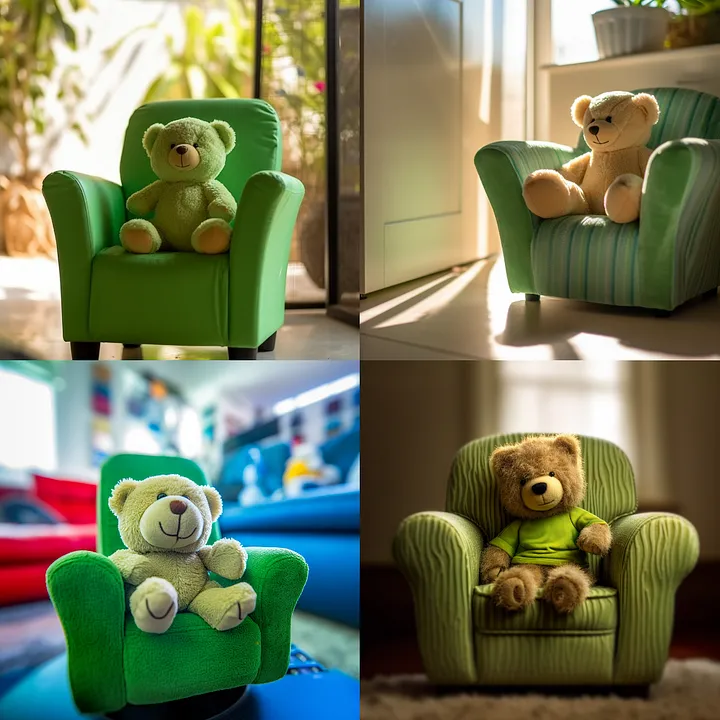
Prompt:green chair | photography | living room --c 50
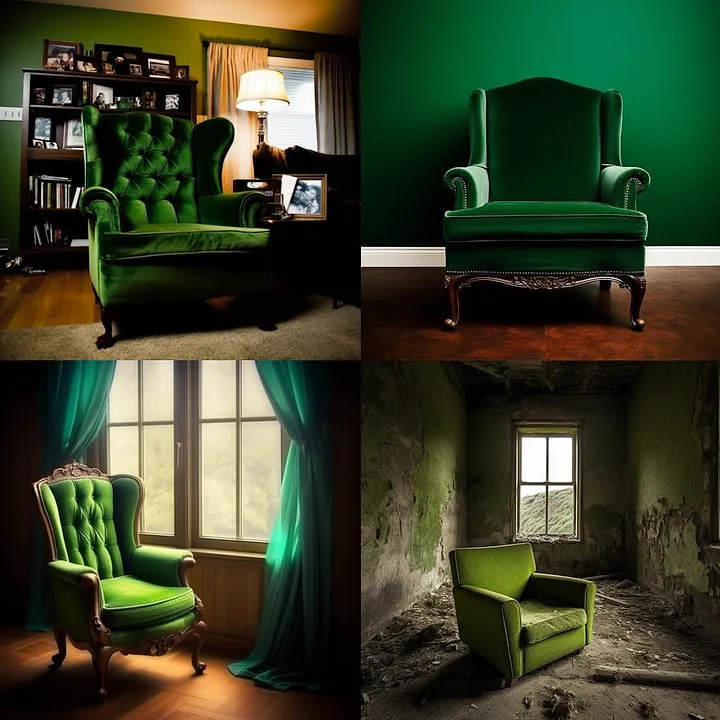
啊,成功了!我们在客厅里放上了绿色的椅子。感觉好像我们正在取得进展,不是吗?但等等,这有点…暗,不是吗?就像我们在半夜闯入自己的客厅一样。它有点神秘的氛围,就像一个悬疑惊悚片的开场一样。无疑很引人入胜,但并不是我们所想象中邀请人们来到家里的形象。
你知道这个场景需要什么吗?阳光的洒落。透过窗户射进来明亮而温暖的光线,在地板上投下长长的阴影。一个舒适角落,在那里你可以蜷缩着读一本好书,阳光在书页上跳动。
所以让我们再试一次好吧?我们将增加亮度,并注入“bright daylight(明亮白天)”的光芒来为场景带来活力。就像导演调整灯光以设置完美情境。
Prompt:green chair | photography | living room | bright daylight --c 50
现在我们开始谈论了!我们的绿色椅子,在明亮的阳光下晒着,真的开始显眼起来。它有一种积极的氛围和能量,以前是没有的。但是…还缺少一些东西。这个东西可以让它从“好”变成“很棒”。
所以,我告诉你一个小秘密。你知道吗?我们的Midjourney AI艺术家可以模仿相机拍摄效果!不是名人,而是相机模型。没错!它可以模仿不同相机模型独特的特点,为您的图像增添特殊风格。
想象一下吧。每台相机都有自己独特捕捉世界方式,“个性”,如果您愿意这么说。有些可能会给您提供清晰、高清晰度图像;其他则可能使您拥有怀旧、略微模糊质感图片。
那么,让我们来测试一下Midjourney AI吧!我们将输入两个新提示语句,并分别对应不同相机模型进行仿制处理:尼康D850和经典Polaroid即时成像相机——前者因其锐利、鲜艳图像而闻名于世;后者则因其柔软、梦幻般的质感而广受认可。
Prompt:green chair | photography | living room | bright daylight | Camera: Nikon D850 --c 50
Prompt:green chair | photography | living room | bright daylight | Camera: Polaroid --c 50
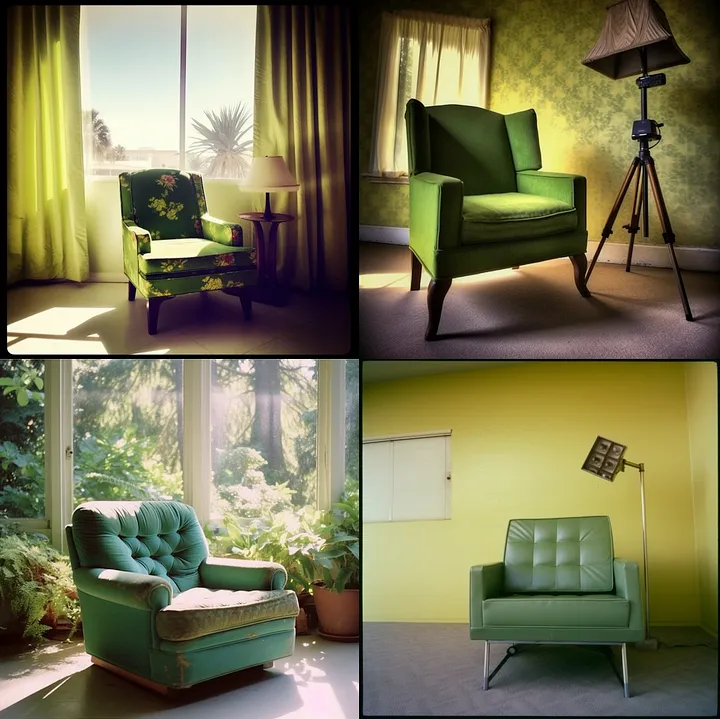
现在这才像样!我们的绿色椅子,通过两个不同相机的镜头捕捉,每一个都为图像增添了自己独特的风味。就像我们给一件杰作添加了最后的润色。但你知道吗?我还没有准备好放下我的画笔。
为什么只停留在一把绿色椅子上呢?让我们为场景增加更多生气吧!让我们再加入另一个角色来丰富故事情节。对于我们的绿色椅子来说,有什么比泰迪熊更好的配合者呢?这是经典组合,就像花生酱和果冻、电影和爆米花。
想象一下:明亮阳光下沐浴着温暖舒适感觉家庭氛围中,泰迪熊舒适地栖息在我们的绿色椅子上。这是一个唤起人们温馨、舒适、家庭感觉场景。就像我们不仅创造了一幅图像,而且创造了一个记忆。
那么让我们重新开始吧! 我们不只是进入了兔子洞里面,在泰迪熊洞里也要深入探索。准备好为我们的杰作增添更多魔力了吗?让我们开始吧……
Prompt:teddy bear on a green chair | photography | living room | bright daylight | Camera: Nikon D850 --c 50
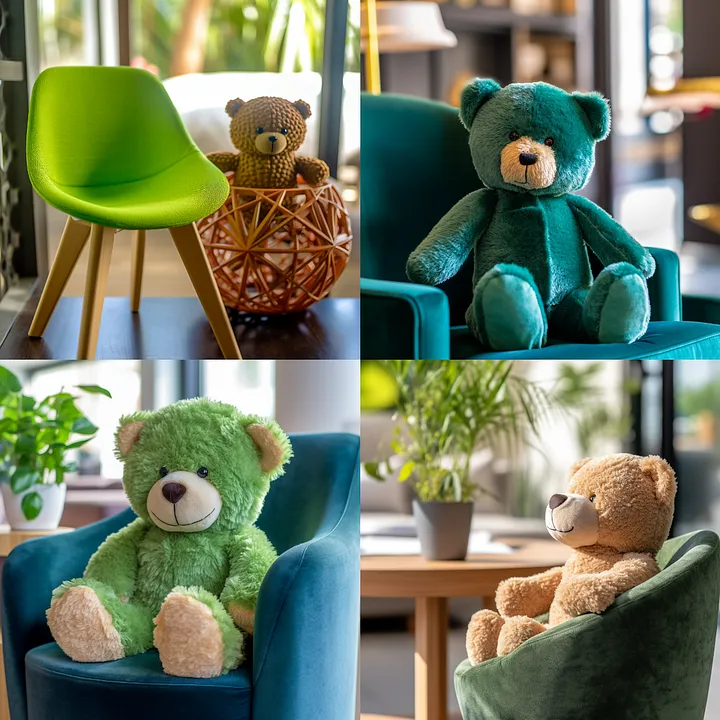
嗯,这很有趣。我们要求一把带小熊的绿色椅子,但是我们得到了一把带小熊的蓝绿色(turquoise)椅子。就像点了一个青苹果却拿到了蓝莓一样,接近但不完全正确。
但你知道吗?这就是整个过程的美妙之处。它充满不可预测性、惊喜和挑战你的思维方式。虽然我们的椅子可能经过了“蓝绿镇(Turquoise Town)”的弯路,但这也是旅程中必须经历的部分。
所以,我们将再次调整提示内容。但这次,我们不仅会调整颜色,还会玩转视角。想想看吧!观察事物的方式可以彻底改变你对它的看法。
Prompt:teddy bear on a green chair | photography | living room | bright daylight | Camera: Nikon D850 | low angle view | --c 50
现在这才像话!从新的角度看,我们的绿色椅子和泰迪熊真正开始活起来了。就像我们自己走进了场景,亲眼目睹一样。但是,既然已经到了这一步,为什么要停下呢?
让我们给场景增加一点戏剧性、特效的调味吧。还有什么比水滴更具戏剧性呢?想象一下,在明亮的阳光下每个水滴反射出闪耀光芒,窗户上雨滴轻柔地拍打声音,绿色椅子和泰迪熊带来舒适温馨感觉。就好像我们正在创造自己的小电影场景。
Prompt:teddy bear on a green chair | photography | living room | bright daylight | Camera: Nikon D850 | low angle view | Effects: water drops --c 50
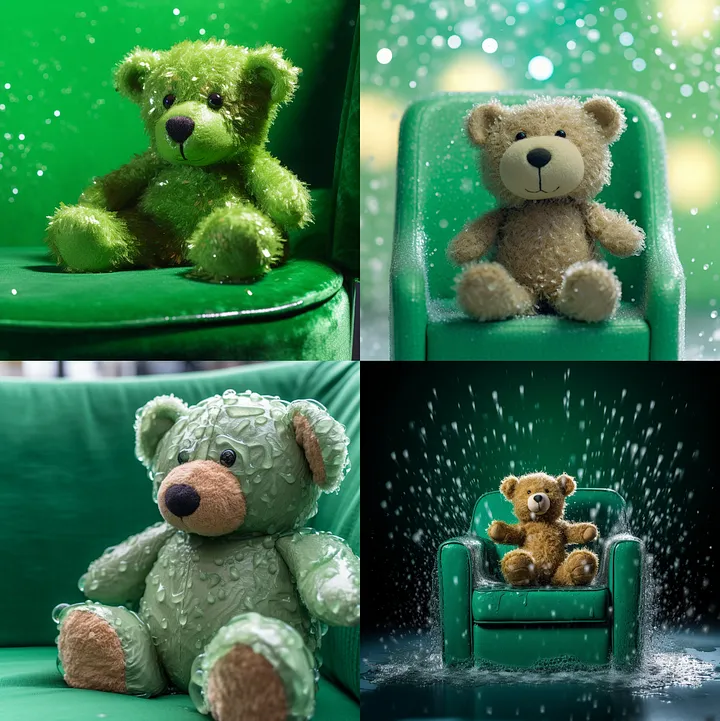
哇,真的起作用了。我们的绿色椅子场景现在加上了水滴,看起来非常棒。但是你知道吗?我想再推动一下创新边界。
让我们向Midjourney AI艺术家投掷另一个曲线球。我们有绿色椅子、泰迪熊、日光、新鲜视角和水滴。但是让我们再加点料吧!怎么样,在这个场景中添加一些落叶呢?
想象一下,明亮的彩叶飘落,随着它们的降落捕捉到光芒。我们的场景不再只是简单地展示一个椅子图像,而是变成了生活片段,充满了色彩、运动和能量。就好像我们正在为AI创造注入生命。
Prompt:brown teddy bear on a green chair | photography | living room | bright daylight | Camera: Nikon D850 | close-up view | Effects: water drops | surrounded by falling leaves --c 50
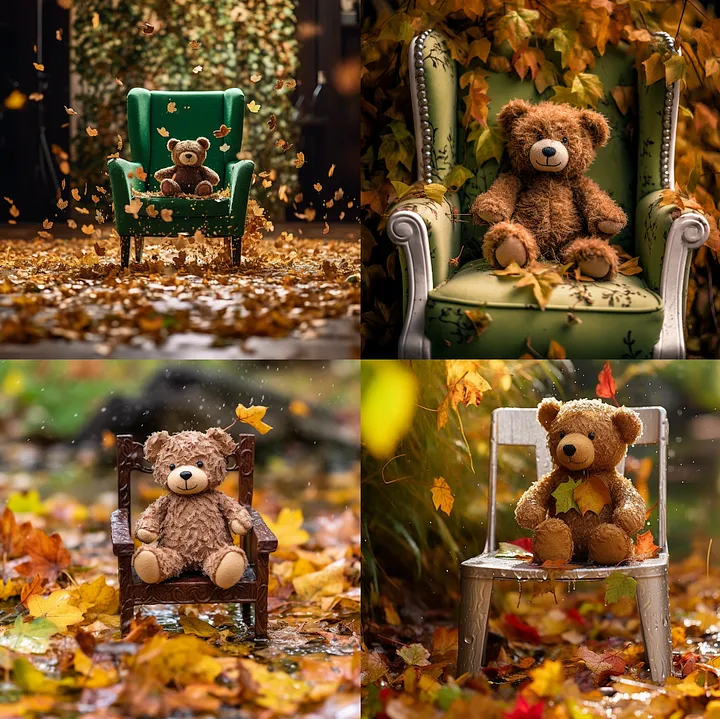
哇,这不是一道令人眼前一亮的景象吗?树叶飘落,阳光透过枝叶洒下来,水滴溅起涟漪……这里有着丰富多彩的视觉和声音。但等等……我们的绿色椅子变得不再那么绿了。还有,难道里面不应该有一个客厅吗?
你看,这就是中途提示的问题所在。它就像赶集场上放羊儿一样棘手。你必须关注所有细节,否则事情很快就会失控。
但别担心。我还有一个法宝——“stylize(美化参数)”。把它想象成导演剪辑版。它让我们可以微调场景,并确保每个细节都符合我们的要求。
而且我们并不只是稍微调整一下。“stylize(美化)”值将被提高到1000!这就像给AI艺术家喊话:“让我们的愿景变为现实!”
因此,请回到键盘前准备好:绿色椅子、泰迪熊、日光、新鲜视角、水滴和落叶以及最大限度地提高stylize的数值——准备好看接下来会发生什么了吗?我知道我准备好了。
Prompt:teddy bear on a green chair | photography | living room | bright daylight | Camera: Nikon D850 | close-up view | Effects: water drops | surrounded by falling leaves --c 50 --s 1000

大家看到了吗!这就是我们一直追求的完美画面。有绿色的椅子,小熊玩具,阳光、水滴和落叶……就像我们经历了一次视觉之旅,最终抵达目的地。Midjourney真是太棒了。
那么这里有什么要点呢?当你开始Midjourney时,可能没有明确的想法。没关系!只需加入一个简短提示词或两个单词,并看看它会带给你什么灵感。就像坐上过山车而不知道将去何方一样刺激。
但也许你属于计划型人格。你已经在脑海中形成了清晰的愿景和画面。在这种情况下,您需要从较长的提示开始,例如四五个单词。然后随着进展逐渐添加更多元素作为构建模块,在每个步骤中都能看到您所创建内容正在成形、演变并越来越精致。
但是,请注意:一旦得到完美图像,请勿停止尝试新事物!删除某些元素或添加其他元素可能会带来意外结果——请参见下面的图片示例:我们移除了小熊玩具和绿色椅子,看看我们得到了什么——一个全新的杰作!
归根结底,成功的Midjourney提示都是关于实验和探索。从小处开始,并逐渐建立您的想法。逐个修改参数并观察图像如何演变。这是一次发现、创造和乐趣之旅。
那么,准备好开始自己的Midjourney了吗?我已经准备好了!让我们开始创作吧
Prompt:photography | living room | bright daylight | Camera: Nikon D850 | close-up view | Effects: water drops | surrounded by falling leaves --c 50 --s 1000 --ar 16:9

关于Midjourney的其他文章:
TorchV AI支持试用!
如您有大模型应用方面的企业需求,欢迎咨询!
原文:An advanced guide to writing prompts for Midjourney ( text-to-image)
作者:Lars Nielsen

Midjourney生成的图像,文本Prompt:beautiful, fantasy city unreal engine
对于那些还没有听说过Midjourney的人,这里是一个简短介绍:Midjourney是一款文本到图像生成应用程序,类似于OpenAI的DALLE-2和Stable Diffusion的DreamStudio,它使用互联网上发现的大量图片(约6.5亿张)来根据提供的文本提示生成令人惊叹的图像。目前处于测试阶段 - 但每周都在添加更多功能…未来还有很多想象空间!(当前他们的AI引擎为v5.1)
如果您使用 midjourney 应用程序,则会知道您在文本中越详细描述,输出结果就越生动独特。用户通常使用原始和直接的提示词语,例如:a cowboy wearing a tuxedo on the moon(一个穿着礼服在月球上骑马的牛仔)”,将生成这样的内容:

但是除了简单的原始prompt文本之外,还有更多选项可以创建可预测和一致的图像输出!
以下是您可以生成图像变体的一些方法以及相应的高级设置:(每个设置的详细信息在列表下方)
简而言之,您的风格受到所选关键词的影响——您可以指定选择何种类型的风格——此图显示了风格类型的广泛分类。

提供一组与“style”(风格)相关的prompt关键词,可以根据您选择的风格类型创建不同的输出。以下是一些基于您可能想要选择为样式的艺术形式/设计/艺术家/流派的关键词和子类型:

您还可以将艺术家指定为样式输出。以下是一些相同prompt的示例:
1 | /imagine horse galloping at sunset painting Andy Warhol style |


2. stylize the output(美化输出)
您可以添加设置--s <某个数字>(表示样式)
以下图片来自相同的提示 - 低和高风格化选项。
1 | /imagine firefighters --s 6000 |

3. chaos — 提高抽象程度
接受0到100之间的数字,以增加或减少主题中的抽象程度。
1 | /imagine Eiffel tower --chaos 60 |

4. Resolution(分辨率)
为了指定输出分辨率,您可以使用一些常用的关键词,如8K、4K、逼真、超逼真、超详细和复杂细节等。
或者您也可以选择标准设置以获得可预测的输出。hd和quality / --q 是其中两个设置指令。
1 | /imagine red rose flower --hd |
5. Aspect ratio(长宽比)
你可以指定输出图像的宽高比,这被称为纵横比。默认输出是一个正方形图像(1:1 纵横比)。但如果你想要更具电影感的视角——或者只是想制作一张适合笔记本电脑桌面的壁纸,你可以改变纵横比。
1 | /imagine jasmine in the wild flower --ar 4:3 |
如果您想指定自定义图像大小,请使用以下示例。
1 | /imagine jasmine in the wild flower --w 600 --h 300 |
您无法指定自定义的宽高比,但可以指定一些标准的宽高比以及一些非标准的宽高比!(以下是一些示例)

6. Image as a prompt
如果您想要在多张图片上获得类似图像风格的输出(当您需要获得一致的输出时),请传递一个图像的URL。
1 | /imagine http://www.imgur.com/Im3424.jpg box full of chocolates |
生成的图像将同时参考种子图像(来自您传递的URL)和文本prompt。
您可以提供多张图片作为prompt
您可以为这些图片指定权重(请参见下一条)
7. 为图片加权(重)的prompt
如果您希望输出结果更接近于您的提示图像(减少midjourney自己的想象力,请参见上一点),则应该给予该图像更高的权重。 (keyword : --iw <number>) .
1 | /imagine http://www.imgur.com/ks34f24.jpg chocolates --iw:4 |
8. 为prompt中的文本加权
1 | /imagine wild animals tiger::2 zebra::4 lions::1.5 |
9. 从图像中过滤掉词语
使用 --no 关键字来丢弃任何不想要的主题。
1 | /imagine KFC fried chicken --no sauce |

10. 最后,这里有一些你可以尝试使用的有趣关键词
1 | Sony Alpha α7, ISO1900, Leica M = 指定任何镜头类型或相机类型。 |
我们谈论了如何在中途实验的输出图像上获得一定程度的控制。但这还不够。Midjourney 的工作人员为您留下了很大的想象和实验空间。祝您尝试不同的提示并享受创造过程。
译者注:本站后续会提供更多Midjourney相关的文章,包括最新的v5.1的官方教程、一些特殊技巧(模特换衣、家居设计、人物制作等),以及色彩搭配等方面的内容,敬请期待!
关于Midjourney的其他文章:
TorchV AI支持试用!
如您有大模型应用方面的企业需求,欢迎咨询!
原文:Taking generated Midjourney (MJ) images to the next level
作者:Lars Nielsen
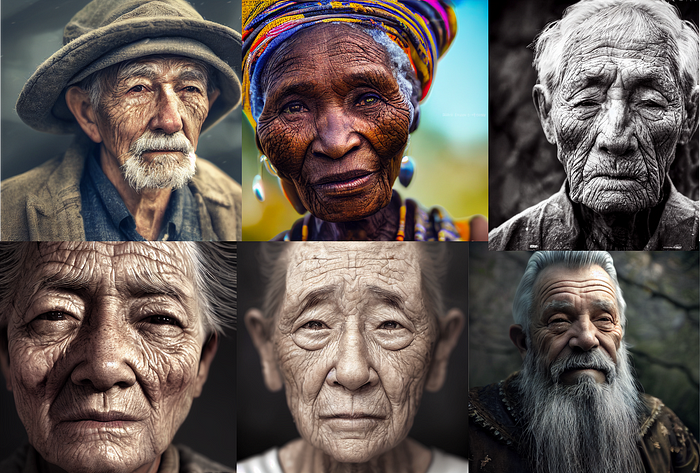
本文将简要介绍使用midjourney生成更逼真的合成人脸的操作流程。
任何使用Midjourney创建涉及人脸图像的人都非常清楚,当涉及到人脸时,使用Midjourney生成的图像效果很差。
例如-下面的图片是使用Midjourney应用程序(升级版)生成的,几乎每个逼真的人脸图像最终都会变形。
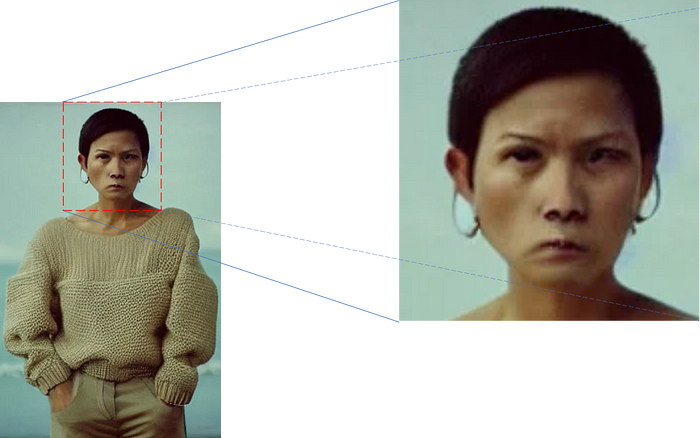
由midjourney生成的图像:不良面部构造示例(1)

由midjourney生成的图像:不良面部构造示例 (2)
为了减少面部重建的畸变并使其更有用,这里提供一个快速的图像生成流水线供您尝试 —
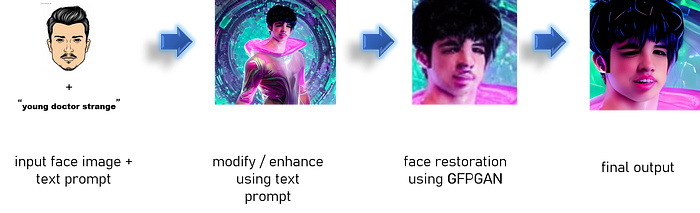
使用GFPGAN进行人脸修复的图像生成流程
步骤1:提供一个图片链接作为您的图像prompt,在您的文本prompt中。通过此处的链接学习如何进行高级文本提示生成。(Midjourney写作提示的高级指南)
步骤2:使用关键词和属性进行细化。
步骤3:将经过细化处理后的图像输入GFPGAN。
步骤4:您可以将这个新恢复的图像反馈到图像提示中,或在GFPGAN中继续几次迭代。
.. 注意:这可能需要从面部重建软件(GFPGAN)进行几次迭代,因此最好为此创建一个小型Python脚本。
GANs(生成对抗网络)是一种神经网络,通过迭代尝试多轮比上一次更好的输出来从随机噪声中生成图像(物体、人脸和几乎任何东西)。经过几次迭代后,它们会生成合成图像,这些图像与最初在训练集中存在的真实图像几乎相似。
(很遗憾,我们不会详细介绍GAN的工作原理。)你可以在这本精彩的书中学习GAN(《GANs in Action: Deep learning with Generative Adversarial Networks》——Jakub Langr和Vladimir Bok著)。
GFPGAN是一种专门用于恢复人脸的GAN实现。正如他们网站上所提到的,他们
它是开源的,可以在这里获取。 (https://github.com/TencentARC/GFPGAN )
但是对于那些没有支持GPU的机器或不太懂技术(万一你遇到了一些需要修复错误的麻烦),这里有GFPGAN在Hugging Face Spaces上的实现。链接在这里 - https://huggingface.co/spaces/akhaliq/GFPGAN
这里是我们从midjourney恢复的一些真实输出样本。
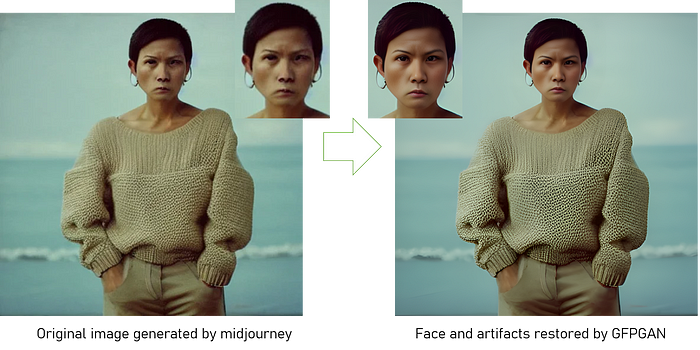
通过midjourney文本提示生成的图像,使用GFPGAN进行面部修复
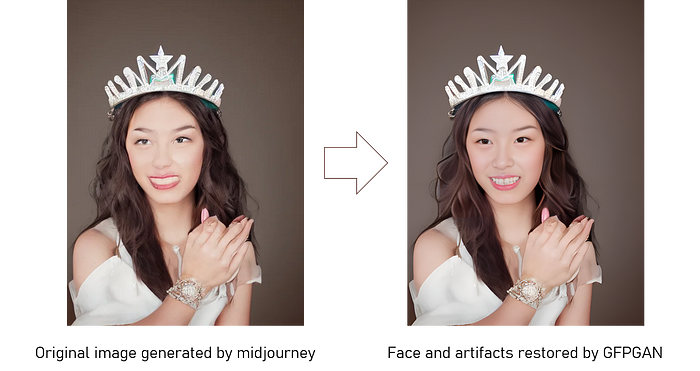
通过midjourney文本提示生成的图像,使用GFPGAN进行面部修复
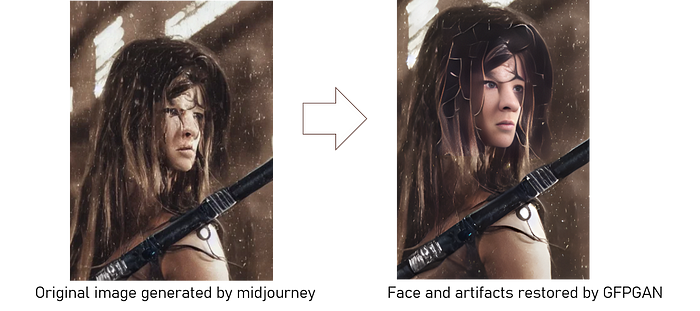
通过midjourney文本提示生成的图像,使用GFPGAN进行面部修复
以下是通过midjourney生成的一些人脸图像 - 经过几次迭代。
关于Midjourney的其他文章:
TorchV AI支持试用!
如您有大模型应用方面的企业需求,欢迎咨询!
原文:Best Logo Prompts for Midjourney V5 AI Image Generator: Blueprint for Amazing Logo included!
作者:Michael King
今天我们将探索一些超棒的提示,帮助你使用最新版本、最强大的Midjourney,像专业人士一样轻松制作出独特、引人注目的标志!

但等等,还有更多!作为这个美妙蛋糕上的额外樱桃,我还会提供一个Blueprint模板,您可以混合、匹配和调整它来创建自己的标志设计杰作。请耐心阅读本文直到最后,因为那里将会有这个时髦的Blueprint。
logo制作的魔法开始了
Prompt:Design of abstract logo featuring a dog in blue on a pink background. Include lines as an additional design element. --v 5

Prompt:Design of sketchy logo featuring a bird in green on a blue background. Include pattern as an additional design element. --v 5

Prompt:Design of professional logo featuring a leaf in green on a brown background. Include curves as an additional design element. --v 5

Prompt:Design of professional logo featuring a leaf in green on a brown background. Include curves as an additional design element. --v 5

Prompt:Design of professional logo featuring a leaf in green on a brown background. Include curves as an additional design element. --v 5

Prompt:Design of sketchy logo featuring a queen in black on a silver background. Include highlights as an additional design element. --v 5

Prompt:Design of professional logo featuring a fish in yellow on a purple background. Include circle as an additional design element. --v 5

Prompt:Design of sketchy logo featuring a knight in purple on a black background. Include texture as an additional design element. --v 5

Prompt:Design of wild logo featuring a heart in multicolored on a red background. Include square as an additional design element. --v 5

Prompt:Design of futuristic logo featuring a spaceship in white on a brown background. Include star as an additional design element. --v 5

Prompt:Design of whimsical logo featuring a cat in silver on a gold background. Include diamond as an additional design element. --v 5

Prompt:Design of vintage logo featuring a star in gray on a blue background. Include pattern as an additional design element. --v 5

Prompt:Design of professional logo featuring a triangle in pink on a gold background. Include pattern as an additional design element. --v 5

Prompt:Design of professional logo featuring a computer in blue on a yellow background. Include highlights as an additional design element. --v 5

Prompt:Design of futuristic logo featuring a cat in purple on a gray background. Include hexagon as an additional design element. --v 5

Prompt:Design of fancy logo featuring a galaxy in green on a gold background. Include pattern as an additional design element. --v 5

Prompt:Design of futuristic logo featuring a zombie in green on a purple background. Include pattern as an additional design element. --v 5

Prompt:Design of abstract logo featuring a skull in blue on a white background. Include highlights as an additional design element. --v 5

Prompt:Design of playful logo featuring a bird in black on a black background. Include moon as an additional design element. --v 5

Prompt:Design of watercolor logo featuring a circle in black on a purple background. Include geometric shapes as an additional design element. --v 5

现在,正如承诺的那样,这是我之前提到的超级棒的蓝图模板。使用这个家伙作为起点,并进行自定义以创建一个独一无二的标志:
Design of [style风格] logo featuring a [symbol标志] in [color颜色] on a [background背景] background. Include [additional_element额外元素] as an additional design element.
这是一个Logo设计prompt的主要公式,使用下面的 YAML 内容替换方括号中的元素。
1 | style: |
大家看到了吗!有了这些技巧、诀窍和超棒的蓝图,你就可以用Midjourney V5 AI图像生成器征服标志设计世界。记住,熟能生巧,所以不要害怕尝试并让你的创造力奔放!
但在你开始创作标志杰作之前,请帮我一个忙关注我的频道。我承诺会继续提供最新的技巧和诀窍,让您娱乐和知情。
愉快的设计,下次再见并保持好奇心!
作为对您耐心的小小奖励,这里有一个Python脚本,可以动态随机地创建标志提示。
1 | import random |
关于Midjourney的其他文章:
TorchV AI支持试用!
如您有大模型应用方面的企业需求,欢迎咨询!
员外注释:Wolfram的ChatGPT插件貌似是目前最好的几个ChatGPT Plugin之一,这篇文章从动手实现,到我意想不到的反向操作电脑(这还可以延伸到各类硬件),最后说原理,对于开发Plugin的开发者应该有一些帮助。
中文译文:ChatGPT的即时插件:介绍Wolfram ChatGPT插件套件
英文原文:Instant Plugins for ChatGPT: Introducing the Wolfram ChatGPT Plugin Kit

几周前,我们与OpenAI合作发布了Wolfram插件,使ChatGPT可以使用Wolfram语言和Wolfram|Alpha作为工具,在ChatGPT内部自动调用。可以将其视为向ChatGPT添加广泛的“计算超能力”,从而让它获得 Wolfram语言和Wolfram|Alpha中所有通用的计算功能和计算知识。
但是如果您想制作自己的特殊插件,进行特定的计算或者访问仅在您自己的电脑或电脑系统上可用的数据或服务怎么办呢?今天,我们发布了第一个版本的开发套件来实现这一点。借助整个Wolfram Language技术栈构建,并且我们已经成功地使整个过程变得非常简单——至少基本定制 ChatGPT 插件现在只需要不到一分钟就可以轻松部署。
需要进行一次(非常简单)设置-验证OpenAI身份并安装Plugin Kit。然后你就可以开始创建你的第一个插件。
要运行这里的示例,您需要:
开发者可以访问ChatGPT的OpenAI插件系统
可以访问Wolfram语言系统(包括免费的Wolfram Engine for Developers、Wolfram Cloud Basic等)
您现在还需要使用PacletInstall[“Wolfram/ChatGPTPluginKit”]安装ChatGPT Plugin Kit(插件套件)。
这是一个非常简单的例子。假设你为一个单词创造了一个“强度”的概念,将其定义为“字母数字”的总和(“a”为1,“b”为2等)。在 Wolfram 语言中,您可以计算如下:

而且作为十多年来的标准,您可以立即将这样的计算部署为 Wolfram Cloud 中的 Web API——可通过 Web 浏览器、外部程序等立即访问:

但是现在有一种新的部署形式:作为ChatGPT的插件。首先,您需要获取插件工具包:

然后您就可以立即部署您的插件了。只需要:

最后一步是您需要告诉ChatGPT有关您的插件。在Web界面中(按照当前配置),选择“Plugins > Plugin store > Develop your own plugin”(“插件”>“插件商店”>“开发自己的插件”),并将来自ChatGPTPluginDeployment的URL插入到你的对话框中 (通过点击复制按钮获取  ) :
) :

现在一切准备就绪。您可以开始与ChatGPT谈论“单词强度”,它将调用您的插件(默认情况下称为“WolframCustom”)来计算它们:

展开这个对话气泡,可以了解ChatGPT与插件之间的通信:

没有插件,它就不知道“字母强度”是什么。但有了插件,它就能够做出各种(相当惊人的)事情——比如这样:

关于角马属性的修饰很迷人,但如果打开聊天气泡,就可以看到它是如何得出答案的——它只是开始尝试不同的动物(“狮子”,“斑马”,“角马”):

软件工程师会立即注意到,我们设置的插件正在本地主机上运行,也就是在您自己的计算机上执行。正如我们将要讨论的那样,这通常是一件非常有用的事情。但是您也可以使用Plugin Kit创建纯粹在Wolfram Cloud(或者阿里云/腾讯云/华为云…)中执行的插件(例如,您不必在计算机上安装Wolfram Engine)。
你所要做的就是使用ChatGPTPluginCloudDeploy——然后你会得到一个Wolfram Cloud中的URL,你可以告诉ChatGPT这个插件的位置:

实际上,您可以直接在网络浏览器中完成整个设置过程,无需进行任何本地 Wolfram 安装。只需在 Wolfram Cloud 中打开一个笔记本,并从那里部署您的插件即可:

让我们来做一些其他的例子。接下来,让我们发明一个“地理影响圆盘(geo influence disks)”的概念,然后部署一个插件来呈现这样的东西(稍后我们将谈论一些正在进行的细节):
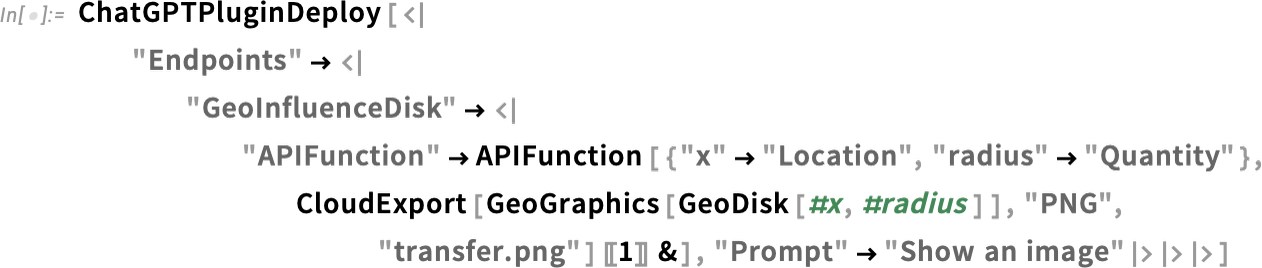
现在我们可以安装这个新插件,然后开始向ChatGPT询问“地理影响圆盘(geo influence disks)”:

ChatGPT 成功调用了插件,并返回了一张图片。有趣的是,它猜测(事实上是正确的)“地理影响圆盘”应该是什么意思。请记住,它无法看到图片或读取代码,因此它的猜测只能基于 API 函数名称和提出的问题。当然,在调用 API 函数时,它必须有效地理解至少一点内容——x 应该表示位置,而 radius 则表示距离。
再举个例子,我们来制作一个插件,可以向用户(即部署插件的人)发送短信:

现在只需要说“发送一条信息…”(“send me a message…”)

一条短信将会到达——在这种情况下,它还带有ChatGPT的小装饰:

这是一个插件,它还会发送提到的动物的“警报图片”:
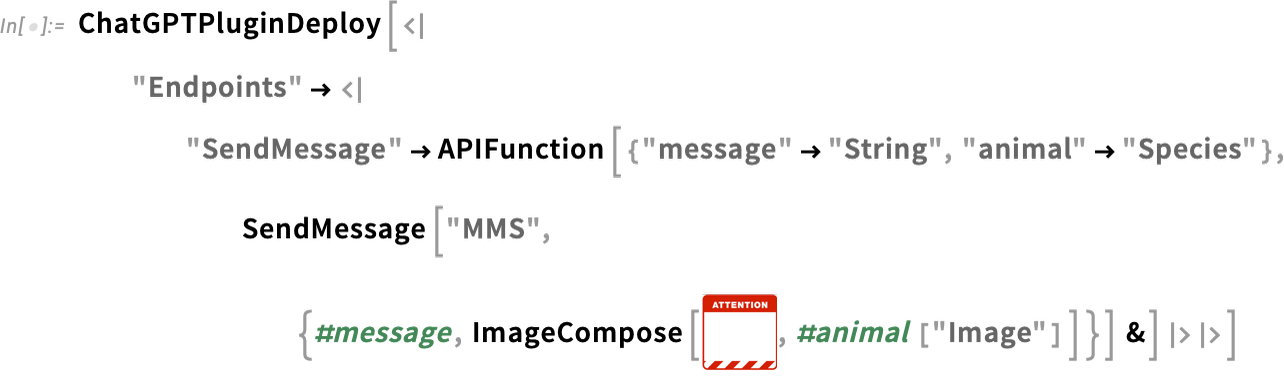
是的,需要许多技术才能实现这一点:


作为另一个例子,让我们创建一个插件来检索我的个人数据——这里是我在 Wolfram databin数据中积累了数年的心率数据:

现在我们就可以使用ChatGPT来对这些数据提出自己的问题了:

而且,如果安装了主要的Wolfram插件,我们可以通过ChatGPT的“语言用户界面”立即对这些数据进行实际计算:

这个例子使用了 Wolfram Data Drop 系统。但是,我们也可以用类似 SQL 数据库(关系型数据库)的东西来做同样类型的事情。如果你已经设置好插件以访问私有数据库,那么通过 ChatGPT 和 Wolfram 插件真正令人惊叹的事情就能够实现。
当您通过ChatGPT的标准Web界面使用它时,ChatGPT是在OpenAI的服务器上运行。但是,通过插件,您可以“回溯”——通过您的Web浏览器——以使事情发生在自己的本地计算机上。我们稍后将讨论这个“引擎盖下”的工作原理,但现在可以说一下:当您使用ChatGPTPluginDeploy(而不是ChatGPTPluginCloudDeploy)部署插件时,在插件中实际运行的Wolfram语言代码将在本地计算机上运行。因此,这意味着它可以访问计算机上的本地资源,如摄像头、扬声器、文件等。
例如,这里我正在设置一个插件来使用我的计算机摄像头拍照(使用 Wolfram 语言的 CurrentImage[ ] 函数)—然后将图片与我指定的任何颜色混合(我们稍后会讨论 CloudExport 的用法):

安装插件后,我对ChatGPT说:“想象一下我穿着绿色的衣服!”然后,ChatGPT会立即调用插件,让我的电脑拍摄我的照片,并将其与绿色混合(包括我的“我不知道这是否有效”的表情):
译者:这真的好吗???

好的,让我们尝试一个稍微复杂一些的例子。在这里,我们将创建一个插件来让ChatGPT在我的电脑上打开笔记本,并开始写入内容。为了实现这一点,我们将定义几个API端点(并将整个插件命名为“NotebookOperations”):

首先,让我们告诉ChatGPT创建一个新笔记本

然后在我的屏幕上弹出了一个新的笔记本:

如果我们查看从中部署插件的 Wolfram 语言会话中的符号 nb,我们将发现它是由 API 设置的:

现在让我们使用其他的API端点向笔记本添加内容:

这就是我们可以获得的结果:

这段文字是由ChatGPT编写的;图片则来自于网络图像搜索。 (我们也可以使用Wolfram语言中的新ImageSynthesize[]函数制作全新的猫咪图片。)
最后,让我们请ChatGPT展示一张用CurrentNotebookImage从电脑屏幕上捕捉到的笔记本截图:

我们还可以添加另一个端点,使用CloudPublish将笔记本发布到云中,并可能通过电子邮件发送URL。
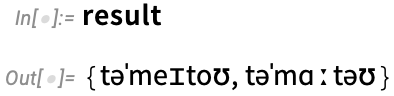
我们可以将前面的示例视为在笔记本中累积结果。但是我们也可以只在Wolfram语言符号的值中累积结果。这里,我们将符号“result”初始化为空列表。然后,我们定义了一个API来附加到此列表,但是给出了提示,仅当有单词结果时才执行此附加操作:

让我们为ChatGPT设置一个“练习”:

此时,result仍为空:

现在让我们来问第一个问题:

ChatGPT并不会直接显示答案。但它会调用我们的API并将其附加到result中:

让我们来问问另一个问题:

现在 result 中包含了两个答案:
如果我们在笔记本中放置Dynamic[result],每当ChatGPT调用API时,我们会看到它动态地改变。
在最后一个例子中,我们从ChatGPT内部修改了符号的值。如果我们感觉勇敢,可以让ChatGPT评估计算机上的任意代码,例如使用调用ToExpression的API。但是,是的,赋予ChatGPT执行自己制作的任意代码的能力似乎会使我们面临某种“天网风险”(并使我们更加想知道“AI宪法”之类的事情)。
但比执行任意代码更安全的做法是让ChatGPT有效地“四处查找”我们的文件系统。让我们设置以下插件:

首先,我们设置一个要操作的目录:

现在让我们问ChatGPT关于那些文件:

使用 Wolfram 插件,我们可以让它制作这些文件类型的饼图:

现在我们要求它做一些非常“LLM-ey”的事情,并总结每个文件的内容(在API中,我们使用Import导入文件的纯文本版本):

还有很多事情可以做。这里有一个插件,可以计算从您的电脑到服务器的ping时间:


或者,作为另一个例子,您可以设置一个插件来创建定时任务,在指定的时间提供电子邮件(或短信等)提醒:

ChatGPT 负责认真排队任务:

然后,每隔大约10秒钟,我的邮箱里就会弹出一个(也许有些可疑的)动物笑话:

最后一个例子,让我们考虑一下在我的电脑上播放曲调的本地任务。首先,我们需要一个能够解码音符并播放它们的插件(”ChatGPTPluginDeploy”用于告诉ChatGPT插件已经完成了工作——因为ChatGPT本身无法知道这一点):

在这里,我们给ChatGPT想要的音符——是的,这立即在我的电脑上演奏出来:

现在,作为对一位著名虚构人工智能的致敬,让我们尝试演奏另一首曲子:
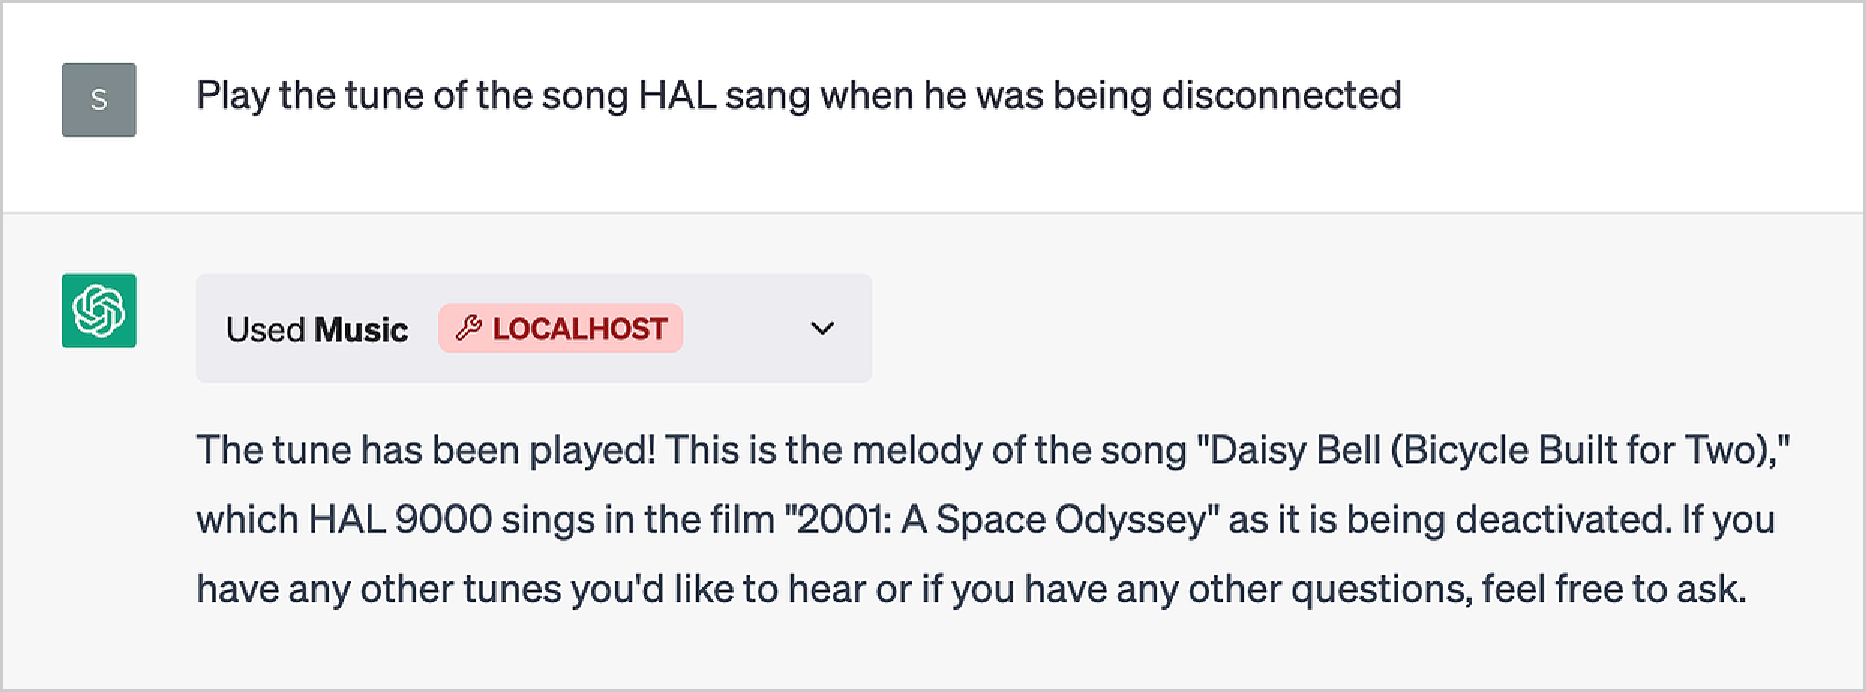
是的,ChatGPT整理了一些笔记,并将它们打包到插件中;然后插件播放了它们:

依然可以运行:

但是…等一下!那是什么曲调?ChatGPT似乎还不能像HAL那样(可疑地)宣称:
“没有[HAL] 9000电脑曾经犯过错误或扭曲信息。按任何实际定义的词语,我们都是防错和无误的。“
我们现在已经看到了许多使用ChatGPT插件工具包的示例。但是它们是如何工作的?底层是什么?当您运行ChatGPTPluginDeploy时,实际上正在设置一个Wolfram语言函数,可以从ChatGPT内部调用该函数,以便在需要时使用。为了使这个过程顺利进行,需要使用Wolfram语言独特能力的广泛谱系,并与ChatGPT中某些“聪明”的功能相结合。
从软件工程角度来看,ChatGPT插件基本上就是一个或多个Web API(连同告诉ChatGPT如何调用这些API的“清单”)。那么如何在Wolfram语言中设置Web API呢?十年前我们发明了一种极其简单易行的方法。
像Wolfram语言中的所有内容一样,Web API也由符号表达式表示,在这种情况下形式为APIFunction[…]. 那么APIFunction里面有什么呢?其中有两个部分:一段实现所需功能的Wolfram Language代码和规范说明,在将字符串传递给APIFunction之前应该如何解释这些字符串(例如来自Web API)。
以下是一小段 Wolfram Language 代码, 在此案例中用于否定颜色并使其变浅: =>

如果我们愿意,我们可以将其重构为一个应用于两个参数的“纯函数”:

纯函数本身只是一个符号表达式,它会被计算为其自身:

如果需要的话,我们可以给纯函数的参数命名,并将它们与其名称作为键一起提供到一个关联 ( ) :
) :

但是假设我们想要从 Web API 调用我们的函数。Web API 中的参数始终为字符串。那么,如何将字符串(例如“lime green”)转换为 Wolfram 语言可以理解的符号表达式呢?好吧,我们必须使用 Wolfram 语言的自然语言理解能力。
以下是一个示例,其中我们正在说希望将字符串解释为颜色:

那个颜色样本到底是什么?就像 Wolfram 语言中的其他所有内容一样,它只是一个符号表达式:

好的,现在我们准备将所有内容打包成APIFunction。第一个参数表示我们要表示的API有两个参数,并描述了我们希望如何解释这些参数。第二个参数给出了实际的Wolfram语言函数,该API计算它们。单独使用,APIFunction只是一个符号表达式,其本身就可以评估:

但如果我们为参数提供值(这里使用关联),它将被计算:

目前,所有这些都只是在我们的 Wolfram 语言会话中发生。但要获得实际的 Web API,我们只需“云部署”APIFunction:

现在我们可以从Web浏览器中调用此Web API:
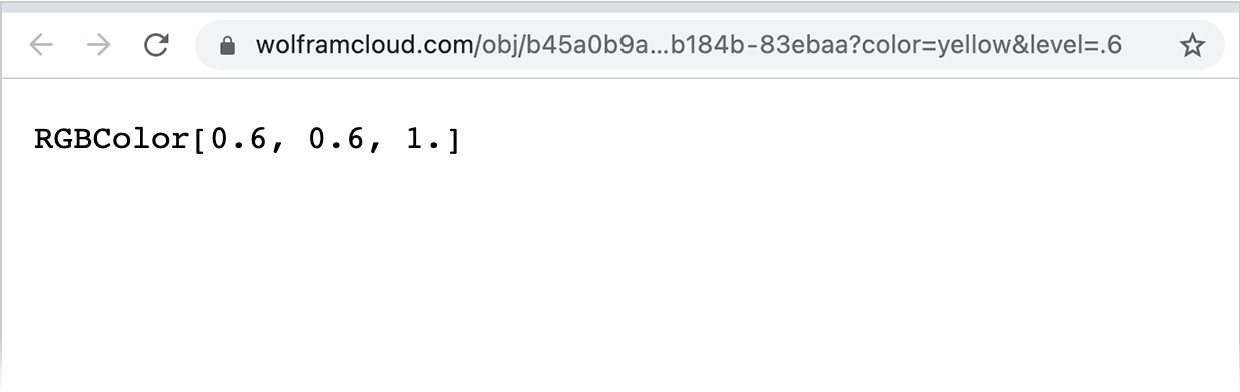
是的,那就是符号表达式的结果。如果我们想要一些可视化的东西,我们可以告诉APIFunction将其结果作为PNG输出:

现在它将显示为网络浏览器中的图像:

(请注意,CloudDeploy 部署的 Web API 默认情况下权限设置为只有我可以运行。如果使用 CloudPublish,则任何人都可以运行它。)
好的,那么我们如何设置我们的 Web API 以便作为 ChatGPT 插件调用呢?一个直接的问题是,在最简单的级别上,ChatGPT 只处理文本,因此我们必须将结果转换为文本。所以让我们进行一些 Wolfram 语言编程来实现这个目标。以下是 Wolfram 知识库中常见颜色值和名称列表:

当然,我们也知道许多其他命名颜色的集合,但在这里不必担心它们:

现在我们可以使用Nearest函数来找到最接近我们所得颜色的常见颜色:

现在让我们将其放入APIFunction中(这里我们已经“图标化”了颜色列表;我们也可以定义一个单独的函数来查找最近的颜色,它会自动随CloudDeploy一起带来):

现在我们已经准备好使用ChatGPTPluginDeploy了。 ChatGPT插件的工作方式是,我们必须为与我们的API对应的“端点”命名。 这个名称以及我们在API中用于参数的名称将被ChatGPT用来确定何时以及如何调用我们的插件。 但在这个例子中,我们只想为端点使用某种唯一名称,这样我们就可以在聊天中引用它而不会让ChatGPT将其与其他内容混淆。 所以让我们称之为ColorMangle。 现在让我们进行部署:

到目前为止,我们关于APIFunction及其调用的所有内容在ChatGPTPluginDeploy和ChatGPTPluginCloudDeploy中都是相同的。但接下来要说的就不同了。因为ChatGPTPluginDeploy设置API函数在本地计算机上执行,而ChatGPTPluginCloudDeploy则将其设置为在Wolfram Cloud(或Wolfram Enterprise Private Cloud等)上运行。
本地部署和云端部署都有优缺点。在本地运行可以让您获得计算机的本地功能,如相机、文件系统等。在云端运行则允许其他人也能运行您的插件(但目前除非您将插件注册到OpenAI,否则一次只有有限数量的人能安装您的插件)。
好吧,让我们来谈谈本地插件部署。ChatGPTPluginDeploy 在您的计算机上有效地设置了一个最小化 Web 服务器(使用10行 Wolfram 语言代码实现),在 ChatGPTPluginDeploy 选择的端口上运行,并且每当它收到对 API URL 的请求时调用 Wolfram 引擎与您的 API 函数进行交互。
这是 ChatGPTPluginDeploy 正在使用的操作系统套接字(是的,Wolfram 语言将套接字——像其他所有东西一样——表示为符号表达式):

好的,但是ChatGPT怎么知道你的API呢?首先,您需要通过ChatGPT UI的 Plugins > Plugin store > Develop your own plugin(插件>插件商店>开发自己的插件)告诉它您正在使用的端口。您可以通过单击ChatGPTPluginDeployment对象中的  图标或以编程方式找到端口:

您输入此URL,然后告诉ChatGPT“查找清单文件”:

让我们看一下它找到了什么:

这是一个“清单”,它告诉插件安装程序的相关信息。我们没有指定太多内容,所以大部分都是默认值。但清单中重要的一部分是提供API规范URL的部分:http://localhost:59353/.well-known/openapi.json
访问该URL后,我们可以找到这个“OpenAPI规范”:

最后,点击Install localhost plugin,该插件将出现在您的ChatGPT会话中已安装插件列表中

当ChatGPT启动时安装了插件,它的“系统提示”中会包含一个额外的部分,让它可以“学习”如何调用该插件:

现在我们可以开始使用这个插件了:

是的,它有效。但这里有一些魔法。ChatGPT不得不“拆开”我们所要求的内容,意识到API端点称为ColorMangle是相关的,然后确定其颜色参数应该是“青柠绿”,级别应该是“0.5”。打开盒子,我们可以看到它所做的:

现在我们可以开始在其他地方使用“颜色混合”——尽管ChatGPT急于告诉我们,“颜色混合”是一种“虚构的操作”,可能是为了避免被指责不尊重某个国家的旗帜颜色:

在我们处理的这个案例中,ChatGPT成功地将文本片段正确“连接”到API中的适当参数。而且它是从我们为参数使用的名称(以及我们给出的端点名称)所获得的信息碎片中实现了这一点(相当惊人)。
但有时候我们需要告诉它更多信息,我们可以通过在ChatGPTPluginDeploy内指定插件提示来实现:

现在我们不仅需要谈论颜色:

起初,它没有成功地“解开”“冰岛的颜色”,但后来它纠正了自己,并得到了答案。(是的,如果我们写一个更好的提示,也许我们本可以避免这种情况。)
实际上,您可以提供多个级别的提示。您可以为整个插件包括一个相当长的提示。然后,您可以为每个单独的API端点提供较短的提示。最后,您可以通过将“color”→ “Color”替换为类似于以下内容来帮助ChatGPT解释API中单个参数:

当您设置插件时,它可以包含许多端点,执行不同的操作。此外,在共享提示之外,这特别方便的原因之一是(出于安全原因),任何给定子域只能有一个关联的插件。因此,如果想要具有各种功能,则必须通过使用不同的端点来实现。
对于ChatGPTPluginCloudDeploy,每个子域仅限一个插件意味着任何给定用户一次只能部署一个云插件。但对于本地插件规则略有不同,并且ChatGPTPluginDeploy可以通过在不同端口上运行它们来部署多个插件-事实上,默认情况下ChatGPTPluginDeploy每次调用时都会选择随机未使用的端口。
但是本地插件如何工作?它如何“回到”您的计算机?魔法基本上发生在ChatGPT Web前端中。所有插件工作方式都是当将要调用该插件时,LLM逐标记生成过程停止,并且“外循环”的下一个动作是调用该插件-然后将其提供给LMM在下一步中将添加到字符串中。好吧,在本地插件的情况下,“外循环”使用聊天窗口前端中JavaScript向指定了localhost 端口 的计算机发送请求。(顺便说一下,一旦ChatGPTPluginDeploy打开端口,它将保持打开状态,直到您在其套接字对象上明确调用Close。)
当使用本地插件时,它们在部署插件的Wolfram语言会话中运行其Wolfram语言代码。这意味着例如(如我们在某些情况下看到的那样),设置的值在进行另一个调用时仍然存在。
在云中,它不会立即以这种方式工作,因为每个API调用实际上是独立的。但是可以轻松地将状态保存在云对象中(例如使用CloudPut或CloudExpression等)以便可以跨多个API调用具有“持久性内存”。
ChatGPT内部的LLM(目前)仅设置为处理文本。那么图像怎么办?好吧,插件可以将它们放入Wolfram Cloud中,并将其URL传递给ChatGPT。 ChatGPT已经设置能够直接呈现特定类型的东西-如图像。
因此-正如我们上面所看到的-要从插件“输出”图像(或几个图像),我们可以使用CloudExport将每个图像放入云对象中,在PNG格式中进行操作。然后ChatGPT可能需要一些提示来显示嵌入式输出中的图片。
部署Wolfram Language插件于ChatGPT中存在一些稍微棘手的“管道”,其中大部分在ChatGPTPluginDeploy和ChatGPTPluginCloudDeploy中自动处理。但是通过基于Wolfram语言的基本符号结构(及其集成部署功能)来构建,可以非常简单地为ChatGPT创建复杂的自定义Wolfram语言插件,并为LLM和Wolfram语言周围不断发展的生态系统做出贡献。
TorchV AI支持试用!
如您有大模型应用方面的企业需求,欢迎咨询!
这是一篇帮助非专业网页设计师快速改善设计感的文章,7个设计技巧,对于全栈工程师也是非常有用的。
这里是原文链接
每个网页开发者都不可避免地会遇到需要做出视觉设计决策的情况,无论他们是否喜欢。
也许你所在的公司没有全职设计师,需要自己实现新功能的用户界面。或者你正在进行一个副业项目,并且想要它看起来比其他基于Bootstrap的网站更好。
很容易就会放弃并说:“我永远无法做出好看的东西,我不是艺术家!”但事实证明,有很多技巧可以提升你的工作水平,而这些技巧并不需要具备图形设计背景。
以下是七个简单的想法,可以用来改善你今天的设计。
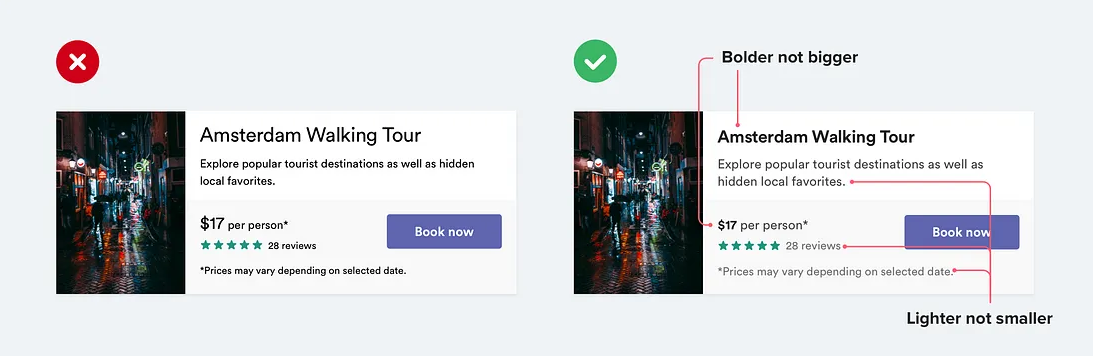
在设计 UI 文本时,常见的错误是过度依赖字体大小来控制层次结构。
“这段文本重要吗?让它变大一点。”
“这段文本次要吗?让它变小一点。”
与其完全依靠字体大小,不如尝试使用颜色或者字重来完成同样的工作。
“这段文本重要吗?让它加粗。”
“这段文本次要吗?用浅色调。”
尽量只使用两到三种颜色:

同样,对于 UI 设计工作来说,通常只需要两种字重:

在 UI 设计中避免使用小于 400 的字重;它们可以用于大标题,但在较小的尺寸下阅读起来太困难。如果您考虑使用较轻的字重来弱化某些文本,请改用较浅的颜色或更小的字号。
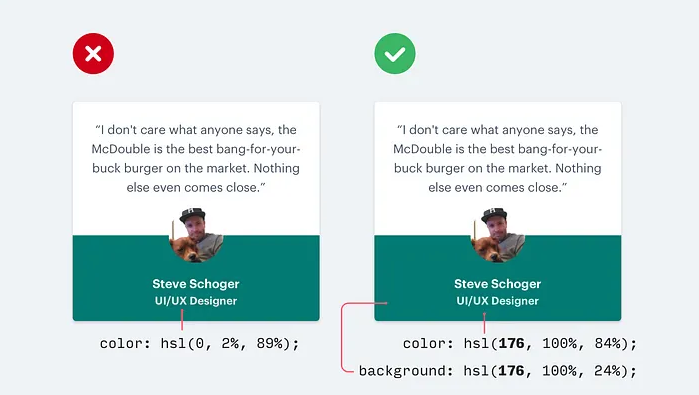
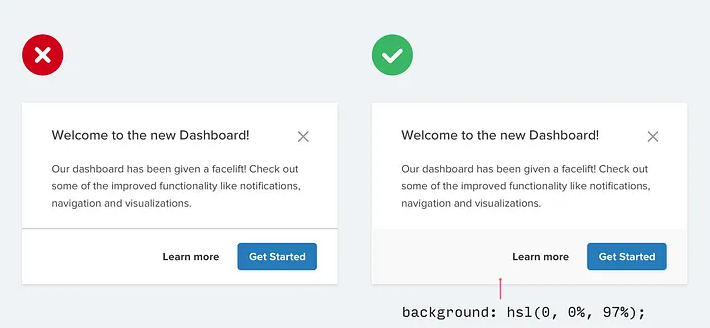
将文本变成浅灰色是在白色背景下减弱其重要性的好方法,但在有色背景上看起来并不那么好。
这是因为我们实际上看到的效果是灰色对白色的对比度降低了。
让文本更接近背景颜色才能帮助创建层次结构,而不是使它变成浅灰色。

当你在使用色彩丰富的背景时,有两种方法可以降低对比度:
使用白色文本并降低不透明度。这样可以让背景颜色透过一点,以某种方式减弱文本与背景之间的冲突。
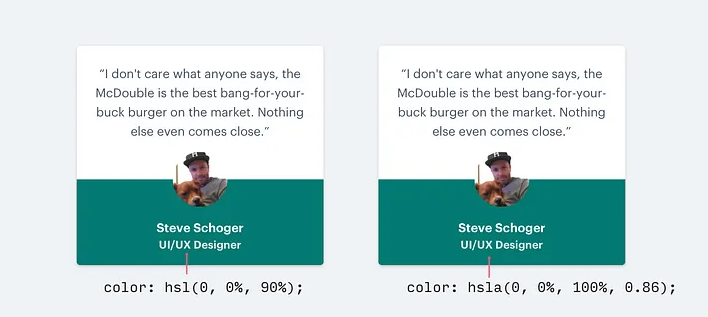
当你的背景是图像或图案时,这比降低不透明度更有效;或者当降低不透明度会使文本感觉过于沉闷或褪色时。
选择与背景相同色调的颜色,通过调整饱和度和亮度使其看起来合适。

不要使用大的模糊和扩散值来使盒子阴影更加明显,而是添加垂直偏移。
这样看起来更自然,因为它模拟了一个从上方照射下来的光源,就像我们在现实世界中习惯看到的那样。
这也适用于内部阴影,例如您可能会在井或表单输入上使用:
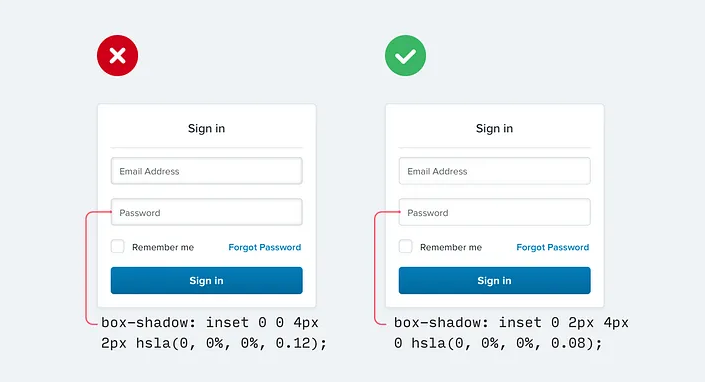
如果你对阴影设计感兴趣,Material Design指南是一个很好的入门材料。
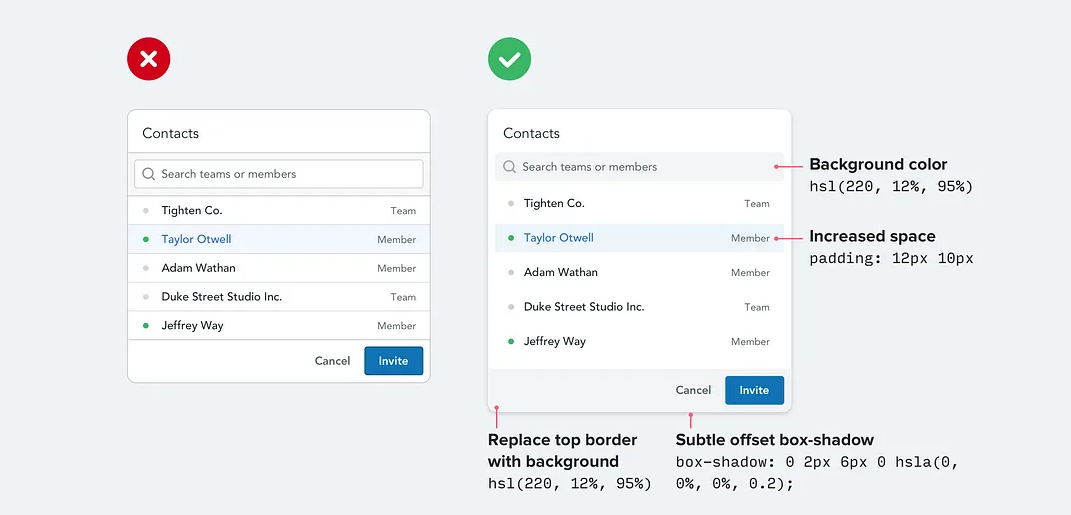
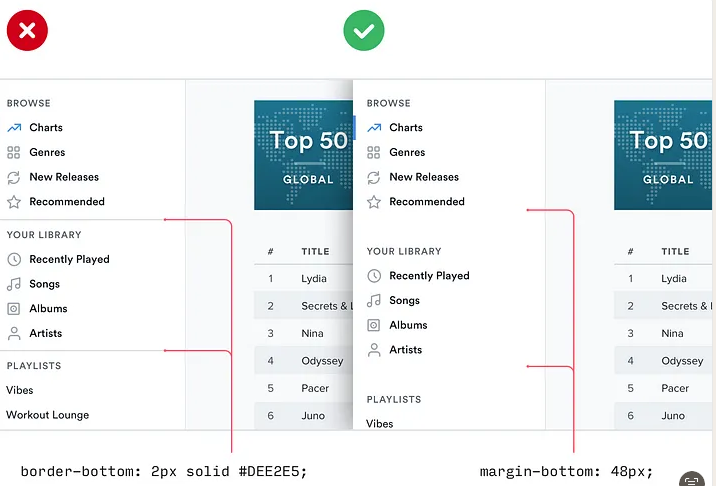
当你需要在两个元素之间创建分隔时,尽量不要立即使用边框。
虽然边框是区分两个元素的好方法,但它们并不是唯一的方法。过多地使用边框会让你的设计感觉繁忙和杂乱。
下次当你想要使用边框时,可以尝试以下这些替代方案:
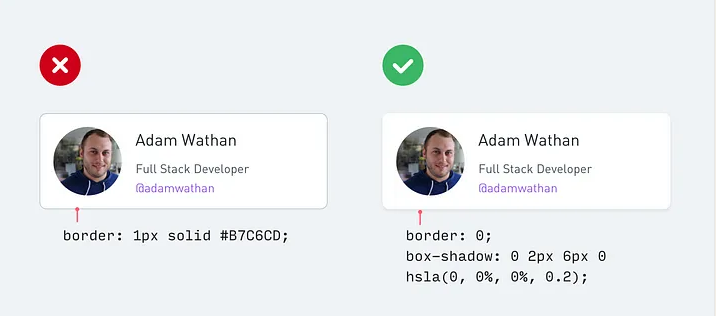
盒子阴影可以很好地勾勒出像边框一样的元素,但更加微妙,并且能够达到相同的目标而不会分散注意力。
给相邻的元素略微不同的背景颜色通常就足以区分它们。如果您已经使用了不同的背景颜色,另外还加上了边框,请尝试去掉边框;也许您并不需要它。
有什么比增加元素之间的距离更好的方法来创建分隔呢?将事物彼此拉得更远是一种非常好的方式,可以在不引入任何新UI的情况下创建元素组之间的区别。

如果你正在设计一些需要大图标的东西(比如一个落地页的“特性”部分),你可能会本能地选择免费的图标集,例如 Font Awesome 或 Zondicons,并将它们的大小增加到符合你的需求。
毕竟,它们是矢量图像,所以如果你增加了它们的尺寸,质量不会受到影响,对吧?
虽然矢量图像确实不会因为尺寸变大而降低质量,但是那些在 16-24 像素下绘制的图标,在放大到原来大小的 3 倍或 4 倍时永远都不会看起来很专业。它们缺乏细节,并且总是感觉过于“粗壮”。
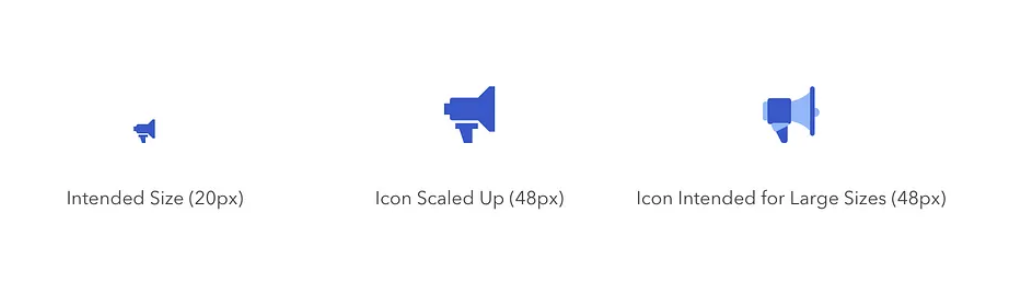
如果你只有小图标,可以尝试将它们放在另一个形状内,并给该形状添加背景色:
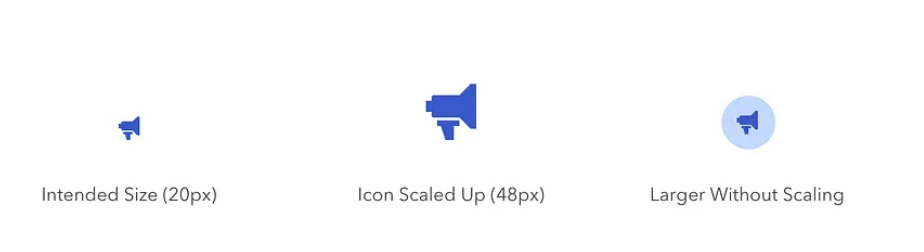
这样可以让您保持实际图标更接近其预期大小,同时填充更大的空间。
如果您有预算,还可以使用专为较大尺寸设计的高级图标集,例如Heroicons或Iconic。
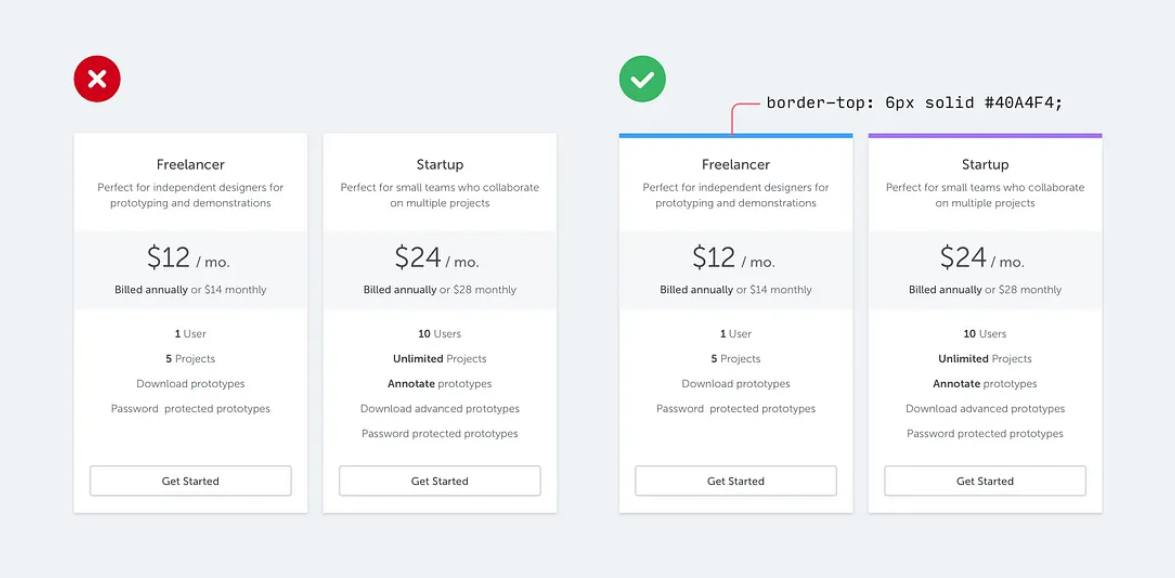
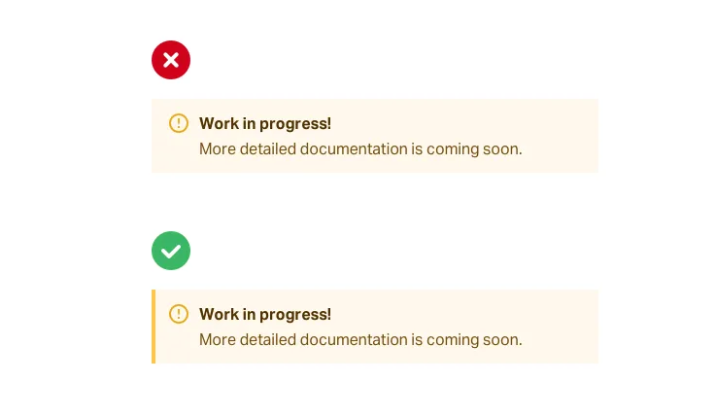
如果你不是一名平面设计师,那么如何为你的用户界面增添视觉上的吸引力呢?
一个简单的技巧就是在原本感觉有些单调的界面部分添加彩色边框。
例如,在警告信息旁边加上一条彩色边框:
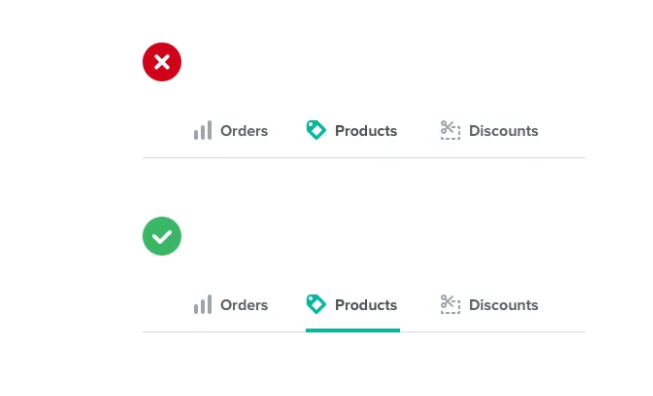
或者用于突出显示活动导航项:
甚至可以跨越整个布局的顶部:
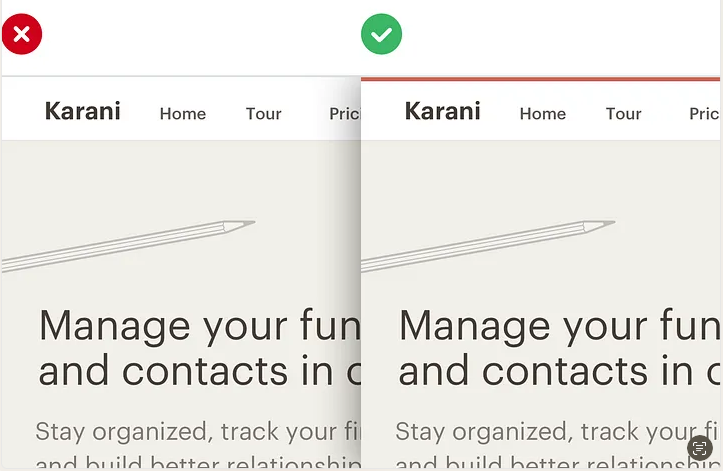
在UI中添加一个彩色矩形并不需要任何平面设计技能,但它可以大大提升你的网站的“设计感”。
挑选颜色有困难吗?试试从像Dribbble这样受限调色板中选择颜色,以避免被传统调色板无尽可能性所压倒。
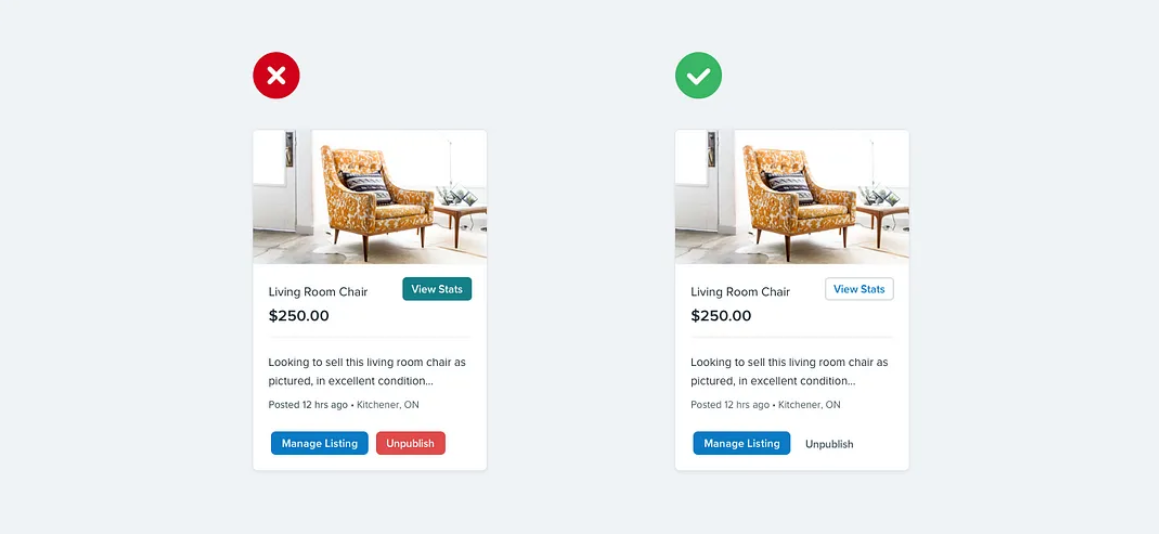
当页面上有多个用户可以执行的操作时,很容易陷入仅基于语义设计这些操作的陷阱。
像Bootstrap这样的框架在您添加新按钮时会提供一系列语义样式可供选择,从而鼓励了这种行为:
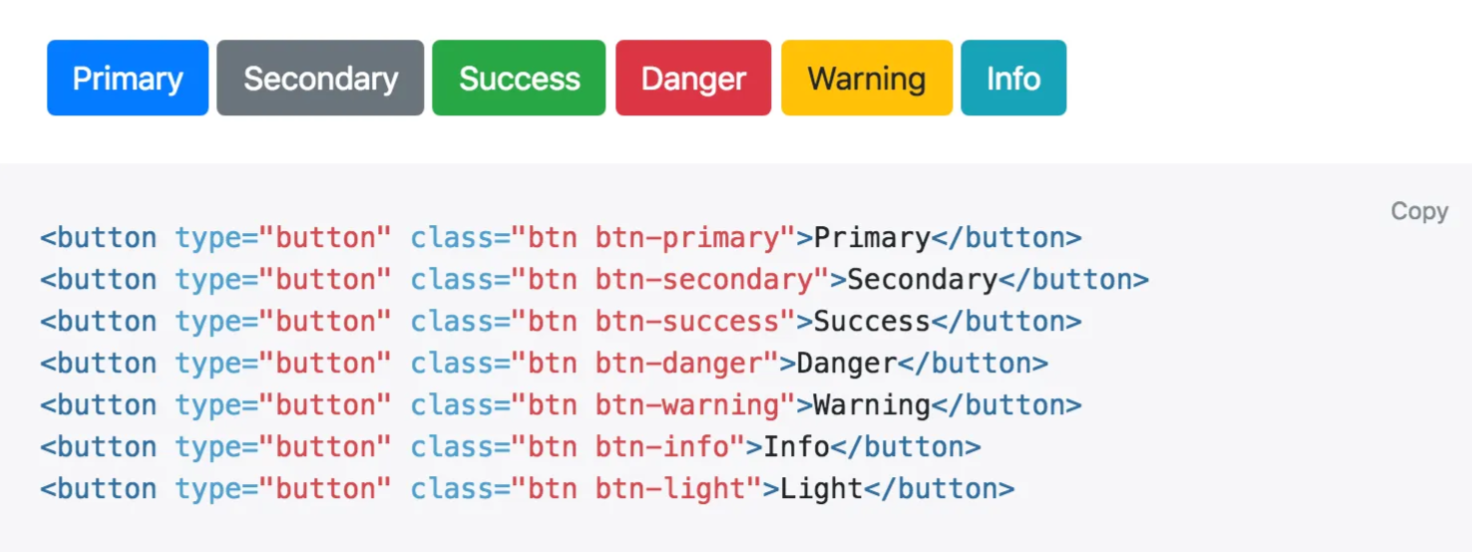
“这是一个积极的操作吗?把按钮变成绿色。”
“这会删除数据吗?把按钮变成红色。”
语义是按钮设计中重要的一部分,但有一个更重要的维度经常被忽视:层次结构。
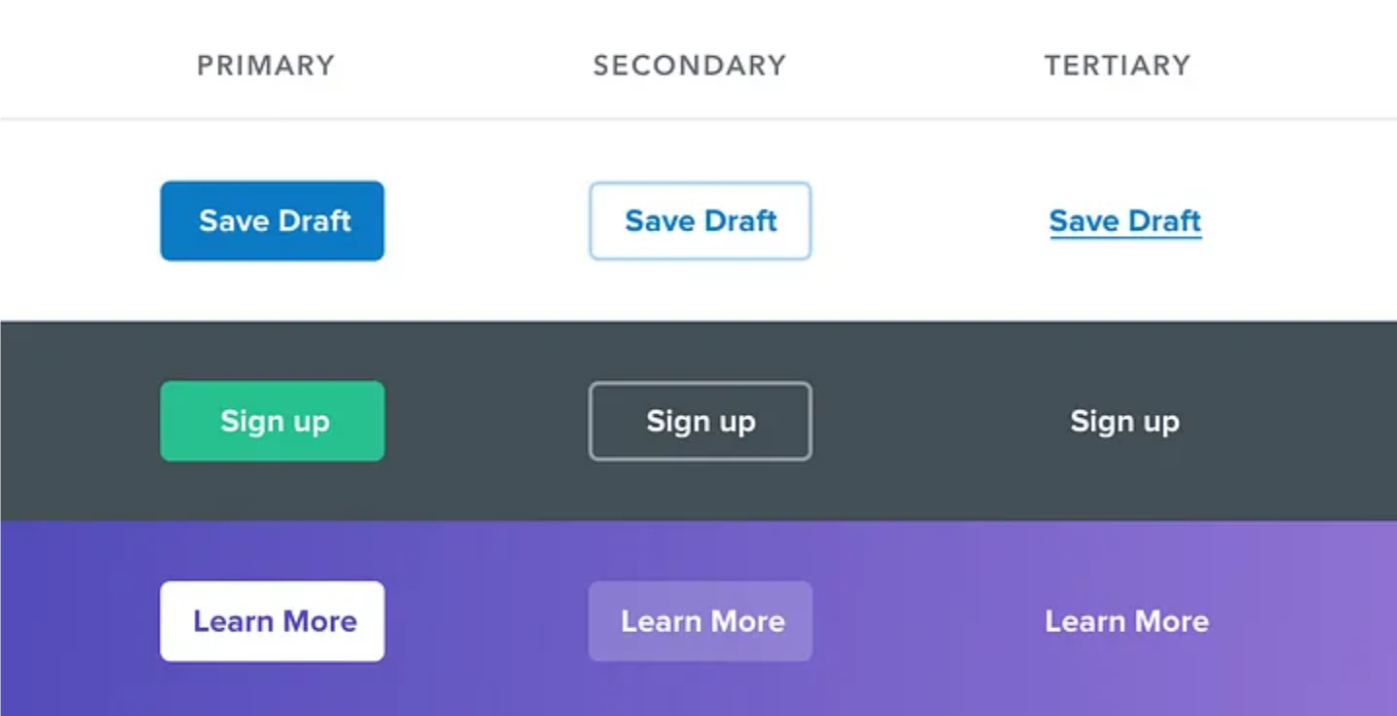
页面上的每个操作都处于一个重要性金字塔中。大多数页面只有一个真正的主要操作,几个不太重要的次要操作和几个很少使用的第三级操作。
在设计这些动作时,重要的是传达它们在层次结构中所处的位置。
“破坏性的操作呢,它们不应该总是红色吗?”
并非如此!如果破坏性操作不是页面上的主要操作,则最好将其作为次要或第三按钮处理。
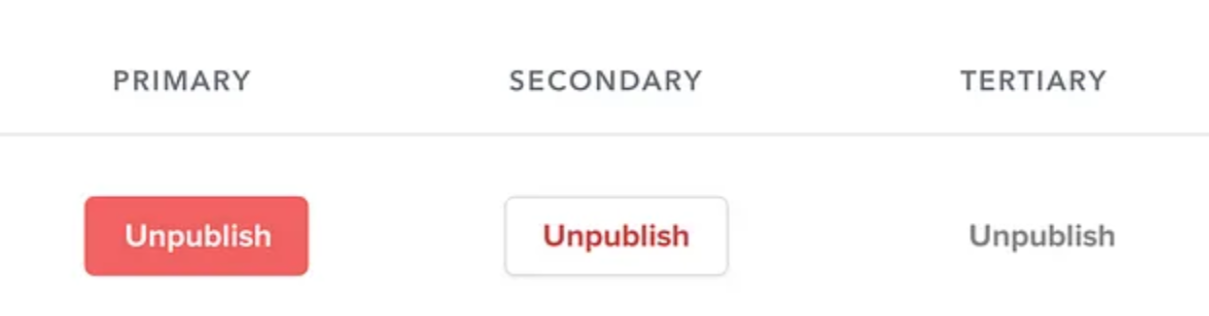
将大号、红色和加粗的样式保留给那些在界面中作为主要操作的负面行为,例如确认对话框:
TorchV AI支持试用!
如您有大模型应用方面的企业需求,欢迎咨询!
本文比较了HuggingFace出品的Transformers Agent与LangChain Agent。
原文链接:Hugging Face Transformers Agent 作者:Sophia Yang。
还有一个Youtube视频,如果可以看且英文尚可的朋友可以直接看,视频更清楚。
以下为翻译正文:
就在两天前,Hugging Face发布了Transformers Agent——一款利用自然语言从精选工具集中选择工具并完成各种任务的代理。这听起来很熟悉吧?没错,它与LangChain Tools和Agents非常相似。在本篇博客文章中,我将介绍Transformers Agent以及与LangChain Agent的比较。
简而言之,它在transformers的基础上提供了一个自然语言API:我们定义了一组策划工具并设计了一个代理来解释自然语言并使用这些工具。
我可以想象HuggingFace的工程师们会这样说:我们在HuggingFace上托管了许多令人惊叹的模型。我们能否将它们与LLMs集成?我们能否使用LLMs来决定使用哪个模型、编写代码、运行代码并生成结果?基本上,没有人需要再学习所有复杂的任务特定模型了。只需给出一个任务,LLMs(代理)就会为我们完成一切。
下面是所有步骤:
来源: https://huggingface.co/docs/transformers/transformers_agents
第一步是实例化一个agent。agent只是一个LLM,可以是OpenAI模型、StarCoder模型或OpenAssistant模型。
使用OpenAI模型需要OpenAI API密钥,并且使用不免费。我们从HuggingFace Hub加载StarCoder模型和OpenAssistant模型,这需要HuggingFace Hub API密钥并且免费使用。
1 | from transformers import HfAgent |
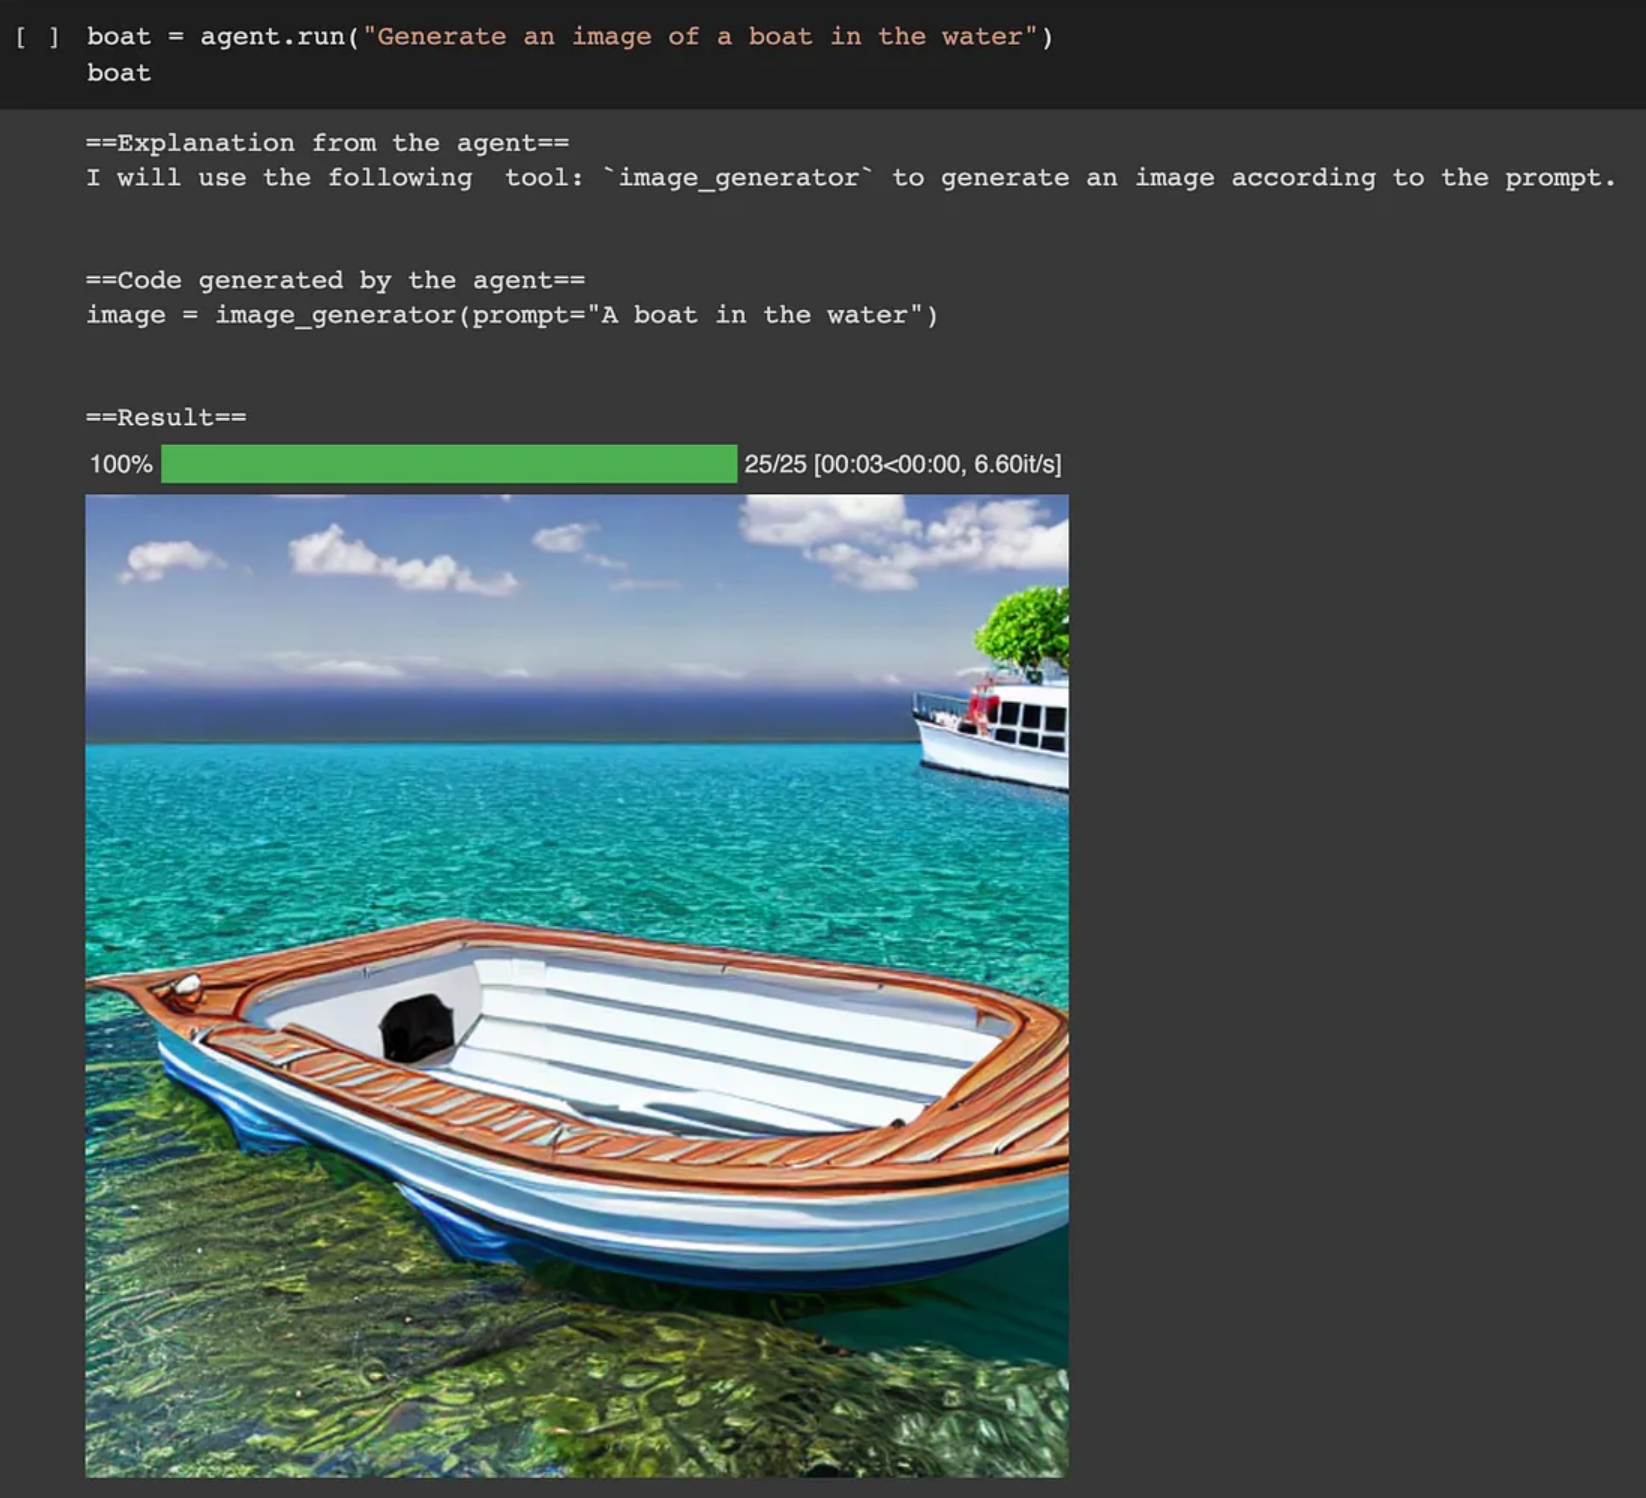
agent.run是一种单次执行方法,可以自动选择任务所需的工具,例如,选择图像生成器工具来创建图像。
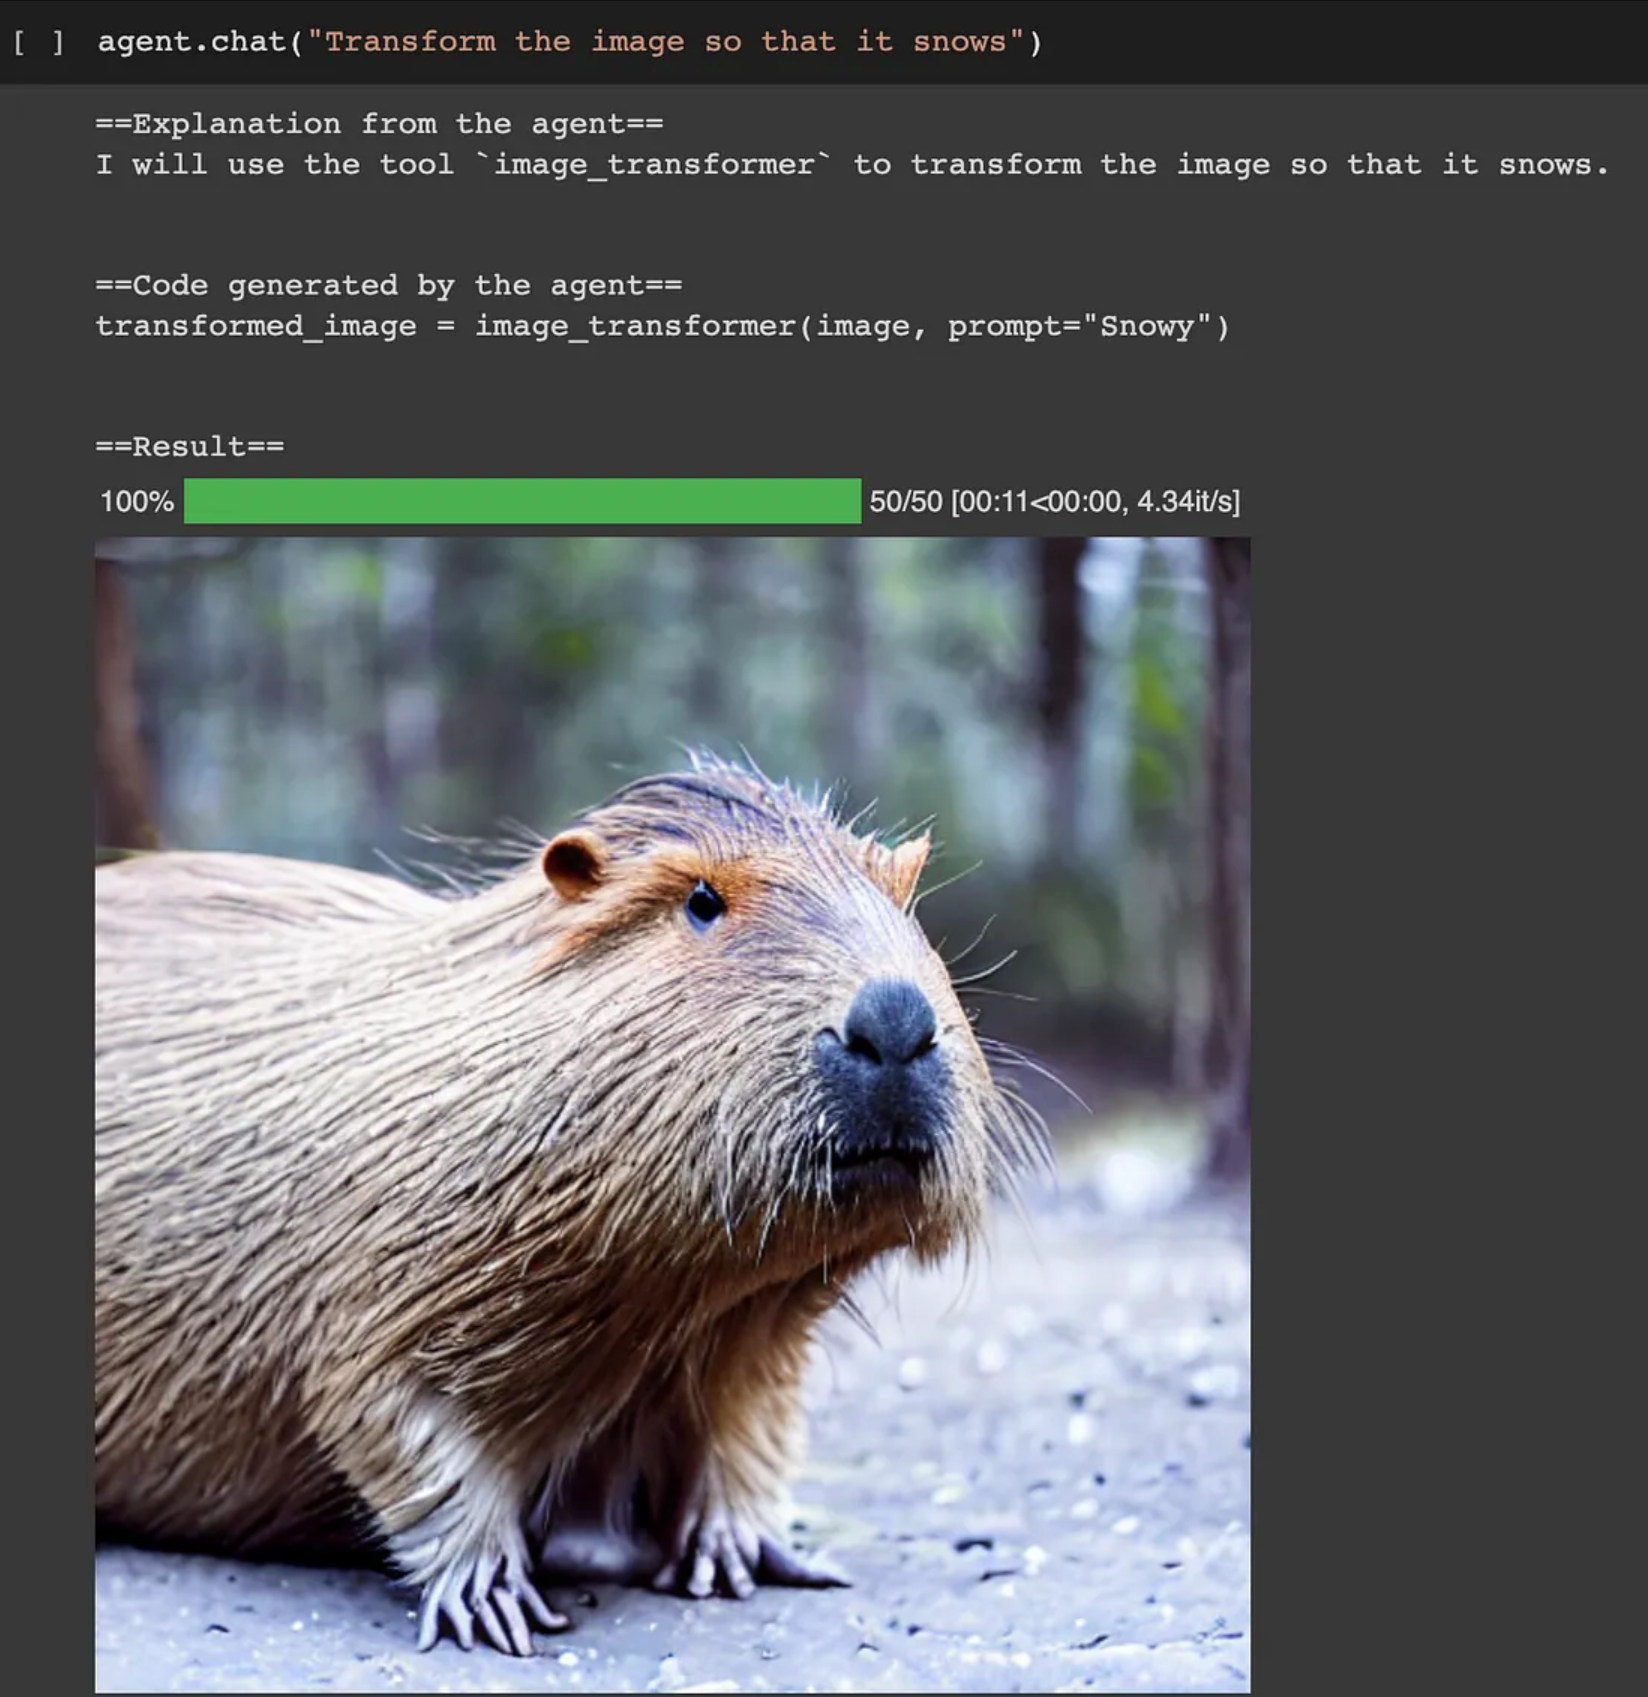
agent.chat 保留聊天记录。例如,在这里,它知道我们之前生成了一张图片,并且可以转换图像。
Transformers Agent仍处于实验阶段。它的范围更小,灵活性较低。目前Transformers Agent的主要重点是使用Transformer模型和执行Python代码,而LangChain Agent则“几乎”可以完成所有任务。让我们分解一下比较Transformers和LangChain Agents之间不同组件:
在这两种情况下,创建自定义代理并不太困难::
在这篇博客文章中,我们探讨了Hugging Face Transformers代理的功能,并将其与LangChain代理进行了比较。我期待着在Transformers代理方面看到更多的发展和进步。
. . .
By Sophia Yang on May 12, 2023
Sophia Yang 是一位高级数据科学家。欢迎在领英、推特和YouTube上关注她,并加入DS/ML读书俱乐部❤️。
TorchV AI支持试用!
如您有大模型应用方面的企业需求,欢迎咨询!
译者注:
本文为《Enabling conversational interaction on mobile with LLMs》的中文翻译稿,Google发布的这篇文章对大语言模型在应用侧的发展有很积极的意义。LLM目前还是聚焦在文本上,因为是语言模型啊。但是这篇文章在研究的是如何让LLM看懂UI,并可以和文本内容进行转化相互转换:比如,看到UI内容进行提问、理解屏幕展现的主要内容是什么、让大模型看图阅读理解,还有一个就是像人一样去操作(这个我觉得是RPA的增强版)。
英文原文:Enabling conversational interaction on mobile with LLMs
2023年5月12日星期五
由谷歌Research的学生研究员Bryan Wang和研究科学家Yang Li发布
移动设备上的智能助手已经显著提升了基于语言的交互,例如设置定时器、打开手电筒等简单日常任务。尽管取得了进展,但这些助手在支持移动用户界面(UI)中的对话式交互方面仍存在很大局限。例如,无法回答关于屏幕上显示的特定信息的用户问题。助手需要具有图形用户界面(GUI)的计算理解能力,才能实现这种功能。
先前研究调查了几个重要技术构建块,以启用与移动端 UI 的对话式交互,包括为用户总结移动屏幕以快速理解其目的、将语言指令映射到 UI 操作和建模 GUI 使其更适合基于语言进行交互。然而,每个构建块只涉及对话式交互中有限方面,并需要大量精心策划大规模数据集和训练专用模型。此外,在移动 UI 上可能发生各种各样的对话式交互。因此,必须开发一种轻量级、通用化方法来实现对话式交互。
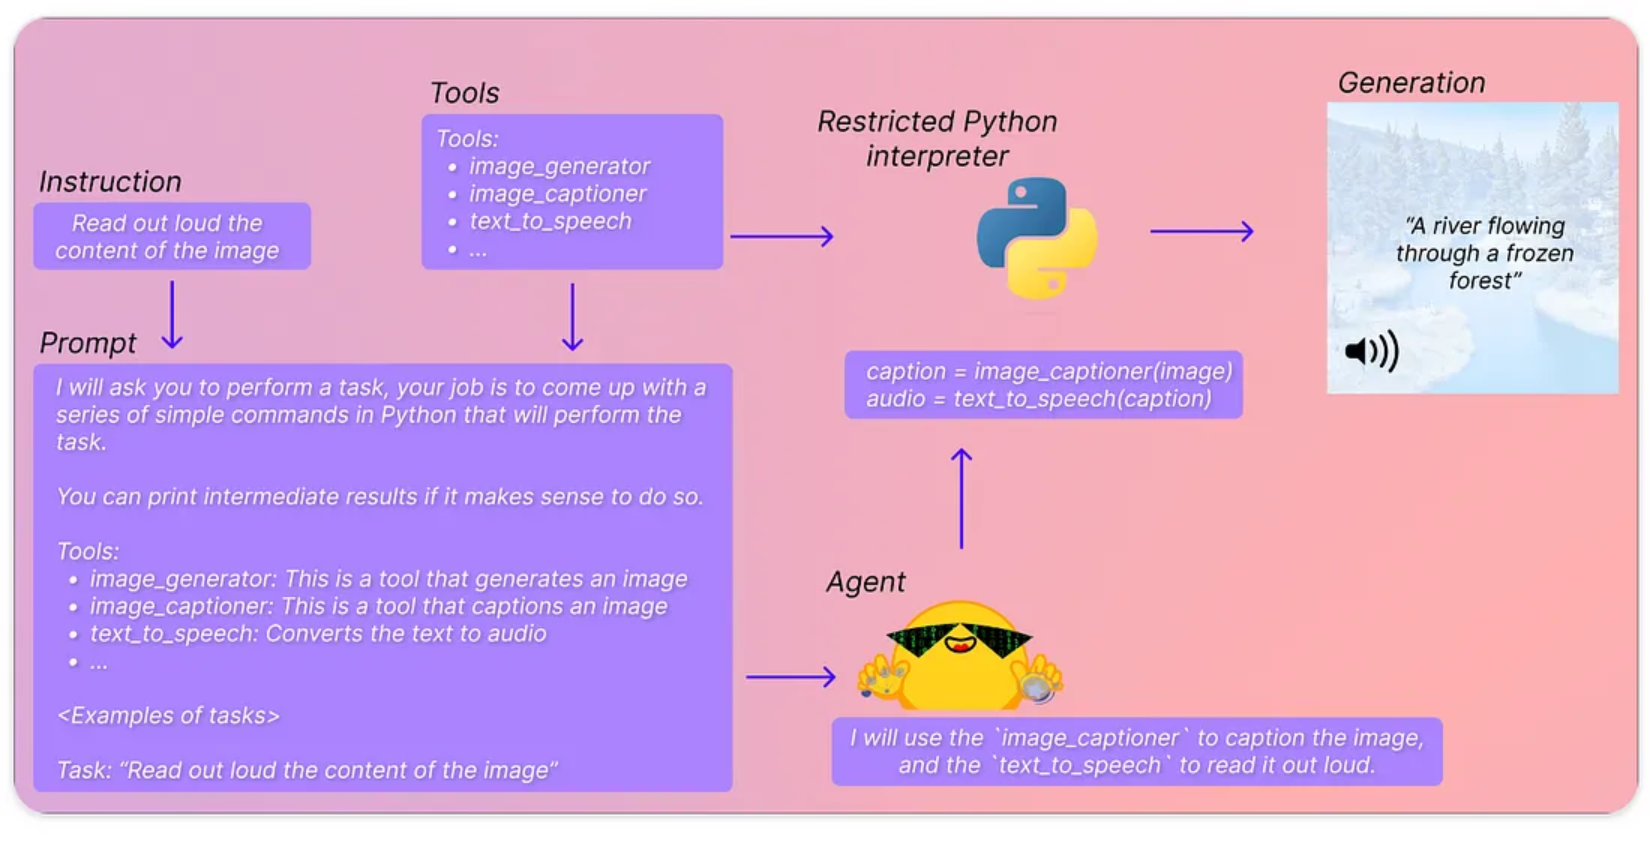
在 CHI 2023 上发布《利用大型语言模型实现与移动 UI 的对话式交互》,我们调查了利用大型语言模型(LLMs)实现与移动 UI 的多样化对话式交互的可行性。最近的预训练LLM(如PaLM)已经展示了自适应各种下游语言任务的能力,只需提供少量目标任务的示例即可。我们提出了一套Prompt技术,使交互设计师和开发人员能够快速原型化和测试与用户的新语言交互,从而节省了在投资专用数据集和模型之前的时间和资源。由于 LLMs 只接受文本token作为输入,因此我们贡献了一种生成移动 UI 文本表示形式的新算法。我们的结果表明,该方法使用每个任务仅两个数据示例即可实现竞争性表现。更广泛地说,我们展示了LLMs从根本上改变未来的“会话交互设计”流程的潜力。
通过prompt,LLMs支持上下文少样本学习——而不是为每个新任务微调或重新训练模型,只需使用目标任务的几个输入和输出数据示例即可提示LLM。对于许多自然语言处理任务(例如问答或翻译),少样本prompt的表现与针对每个任务训练模型(穷举)的基准方法效果是差不多的。但是,语言模型只能接受文本输入,而移动端UI却是多模式的,在其视图层次结构数据中包含文本、图像和结构信息(即包含UI元素详细属性的结构化数据)和截图。此外,将移动端屏幕的视图层次结构数据直接输入到LLMs中并不可行,因为它包含过多信息,如把每个UI元素的详细属性等内容都写出来,那可能超过LLMs输入的token长度限制。
为了解决这些挑战,我们开发了一系列让大语言模型(LLMs)可以“看懂”移动端UI的技术。我们提供了一种算法,使用深度优先搜索遍历将Android UI 的视图层次转换成HTML语法生成移动UI 的文本表示形式。我们还利用思维链提示技术,将一些生成的中间结果合理拼接起来,一并推给LLM以得出最终的推理能力。
我们的快速设计始于一个前言,它说明了prompt的目的。前言后面是多个实例,包括输入、思维链(如果适用)和每个任务的输出。每个实例其实就是一屏(移动端屏幕)的元素转化为HTML的各种语法输入。根据输入,可以提供思维链以引导LLMs进行逻辑推理。由于这一步骤是可选项,所以在上面的动画中没有显示。任务输出是目标任务所需的结果,例如屏幕摘要或用户问题答案等。通过在prompt中包含多个示例,可以实现少量提示功能。在预测过程中,我们将新输入屏幕附加到prompt末尾并将其馈送给模型。
我们进行了四项关键建模任务的全面实验:
实验结果表明,我们的方法在每个任务只使用两个数据示例的情况下就达到了比较好的性能。
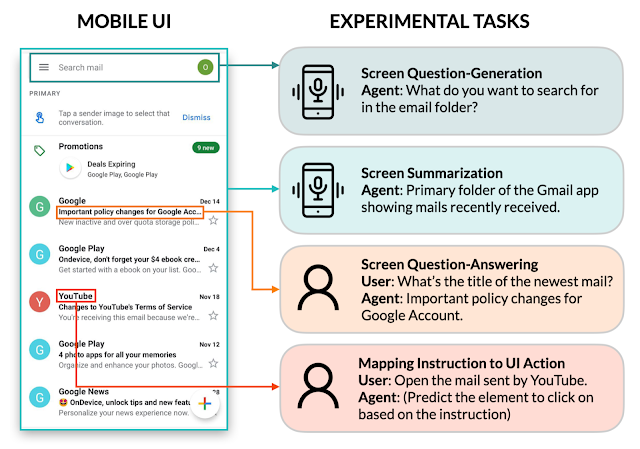
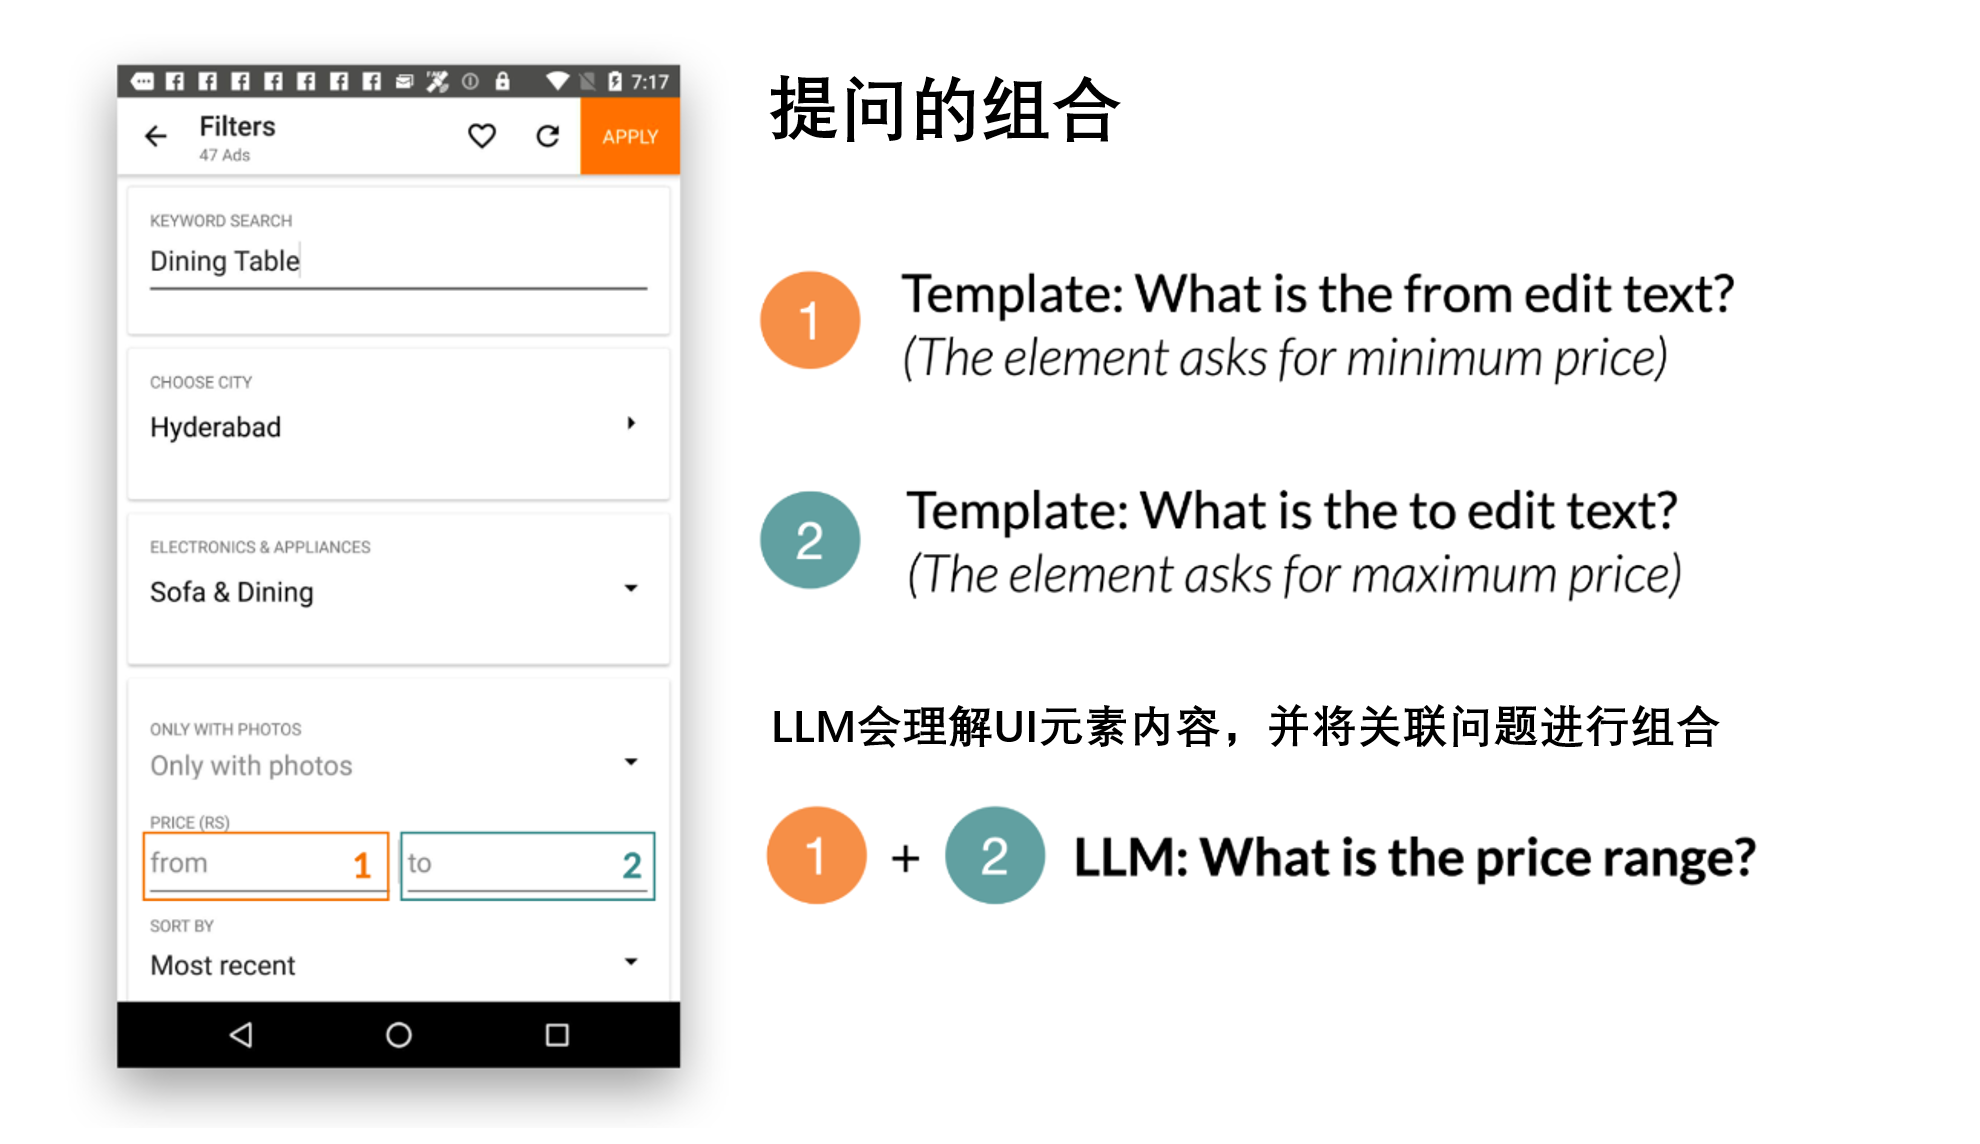
给定一个移动UI屏幕,屏幕提问生成的目标是综合相关用户输入所需的UI元素,产生连贯、语法正确的自然语言问题。
我们发现LLMs可以利用UI上下文来为相关信息生成问题。相比于启发式方法(基于模板的生成),LLMs在提问的质量方面表现显著优异。
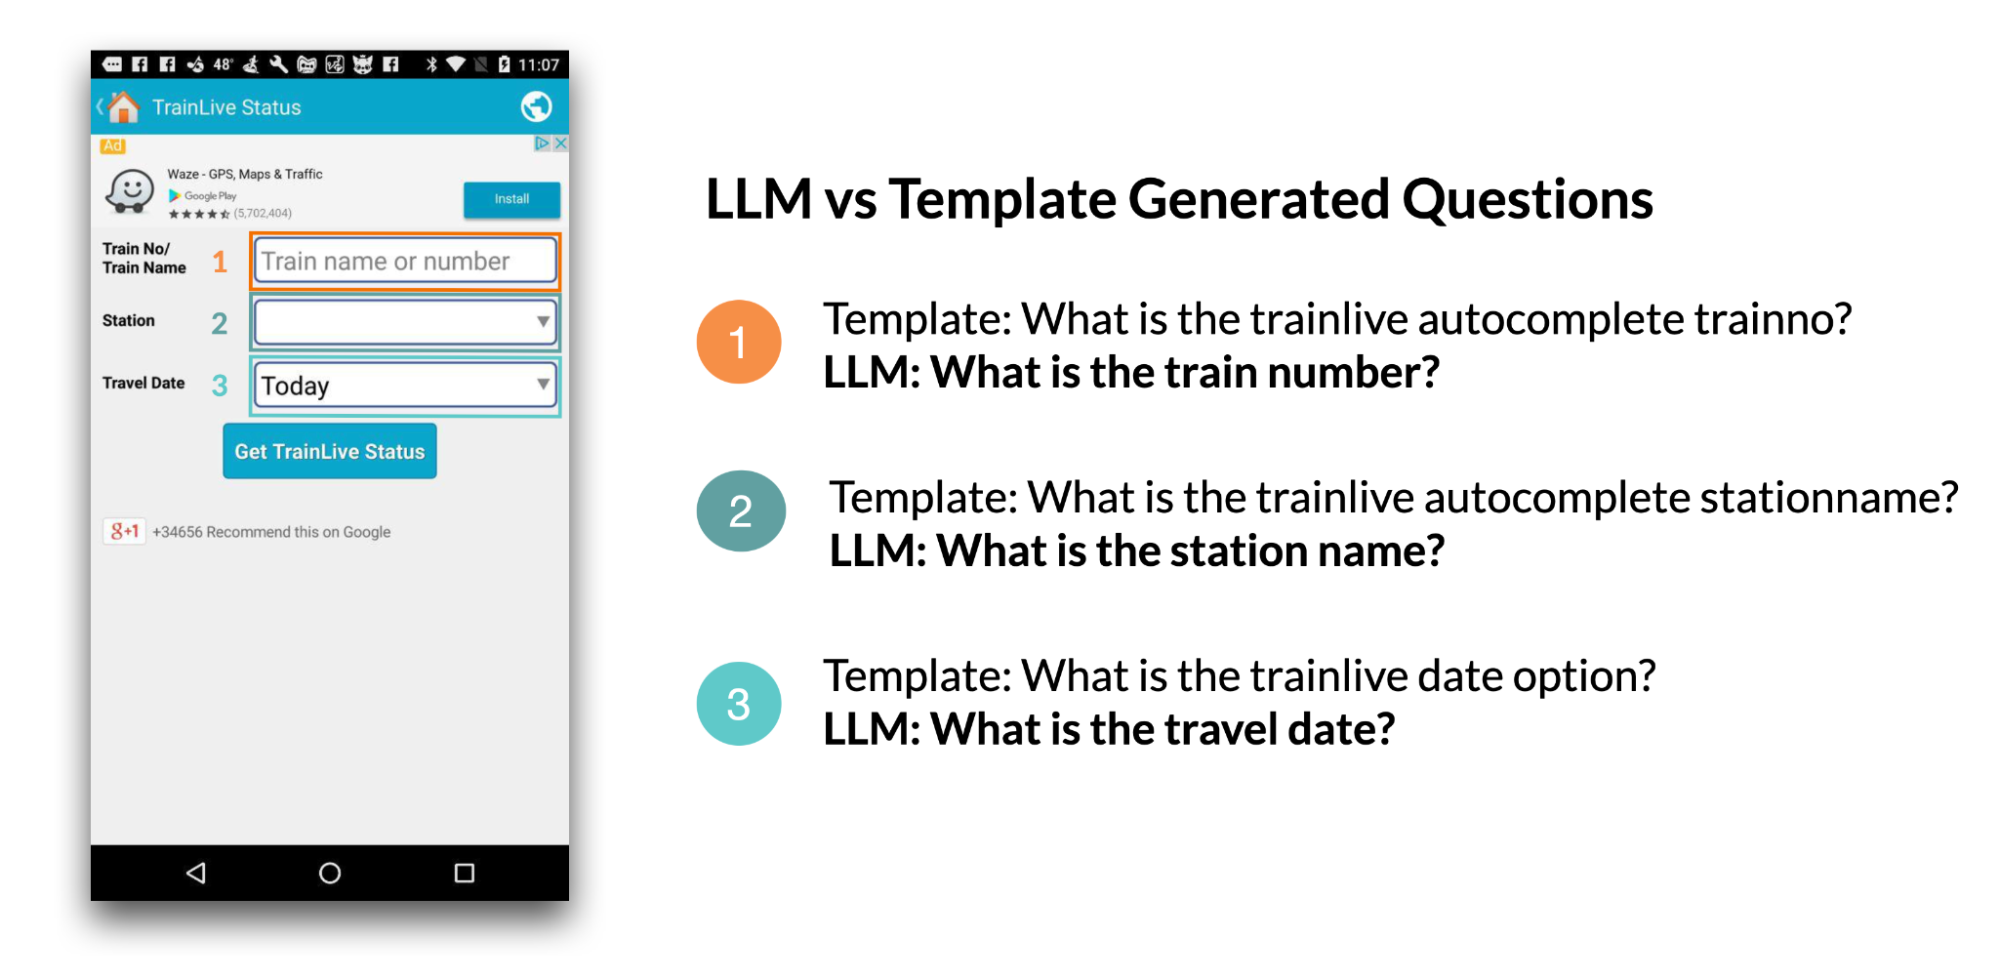
我们还展示了LLMs将相关的输入字段组合成一个问题以实现高效沟通的能力。例如,要求最低和最高价格的筛选器被合并为一个问题:“价格范围是多少?
在一次评估中,我们征求了人类对提问的语法正确性(Grammar)和与其生成所需输入字段相关性(Relevance)的评分。除了人工标注的语言质量外,我们还自动检查了LLMs覆盖生成问题所需所有元素的能力(Coverage F1)。我们发现,由LLM生成的问题几乎完美无缺地符合语法规范(4.98/5),并且高度相关于屏幕上显示的输入字段(92.8%)。此外,LLM在全面涵盖输入字段方面表现出色(95.8%)。
| Template | 2-shot LLM | |
|---|---|---|
| Grammar | 3.6 (out of 5) | 4.98 (out of 5) |
| Relevance | 84.1% | 92.8% |
| Coverage F1 | 100% | 95.8% |
屏幕摘要是自动生成描述性语言概述,涵盖移动屏幕的基本功能。该任务有助于用户快速了解移动端UI的目的,特别是当UI在视觉上不可访问时。
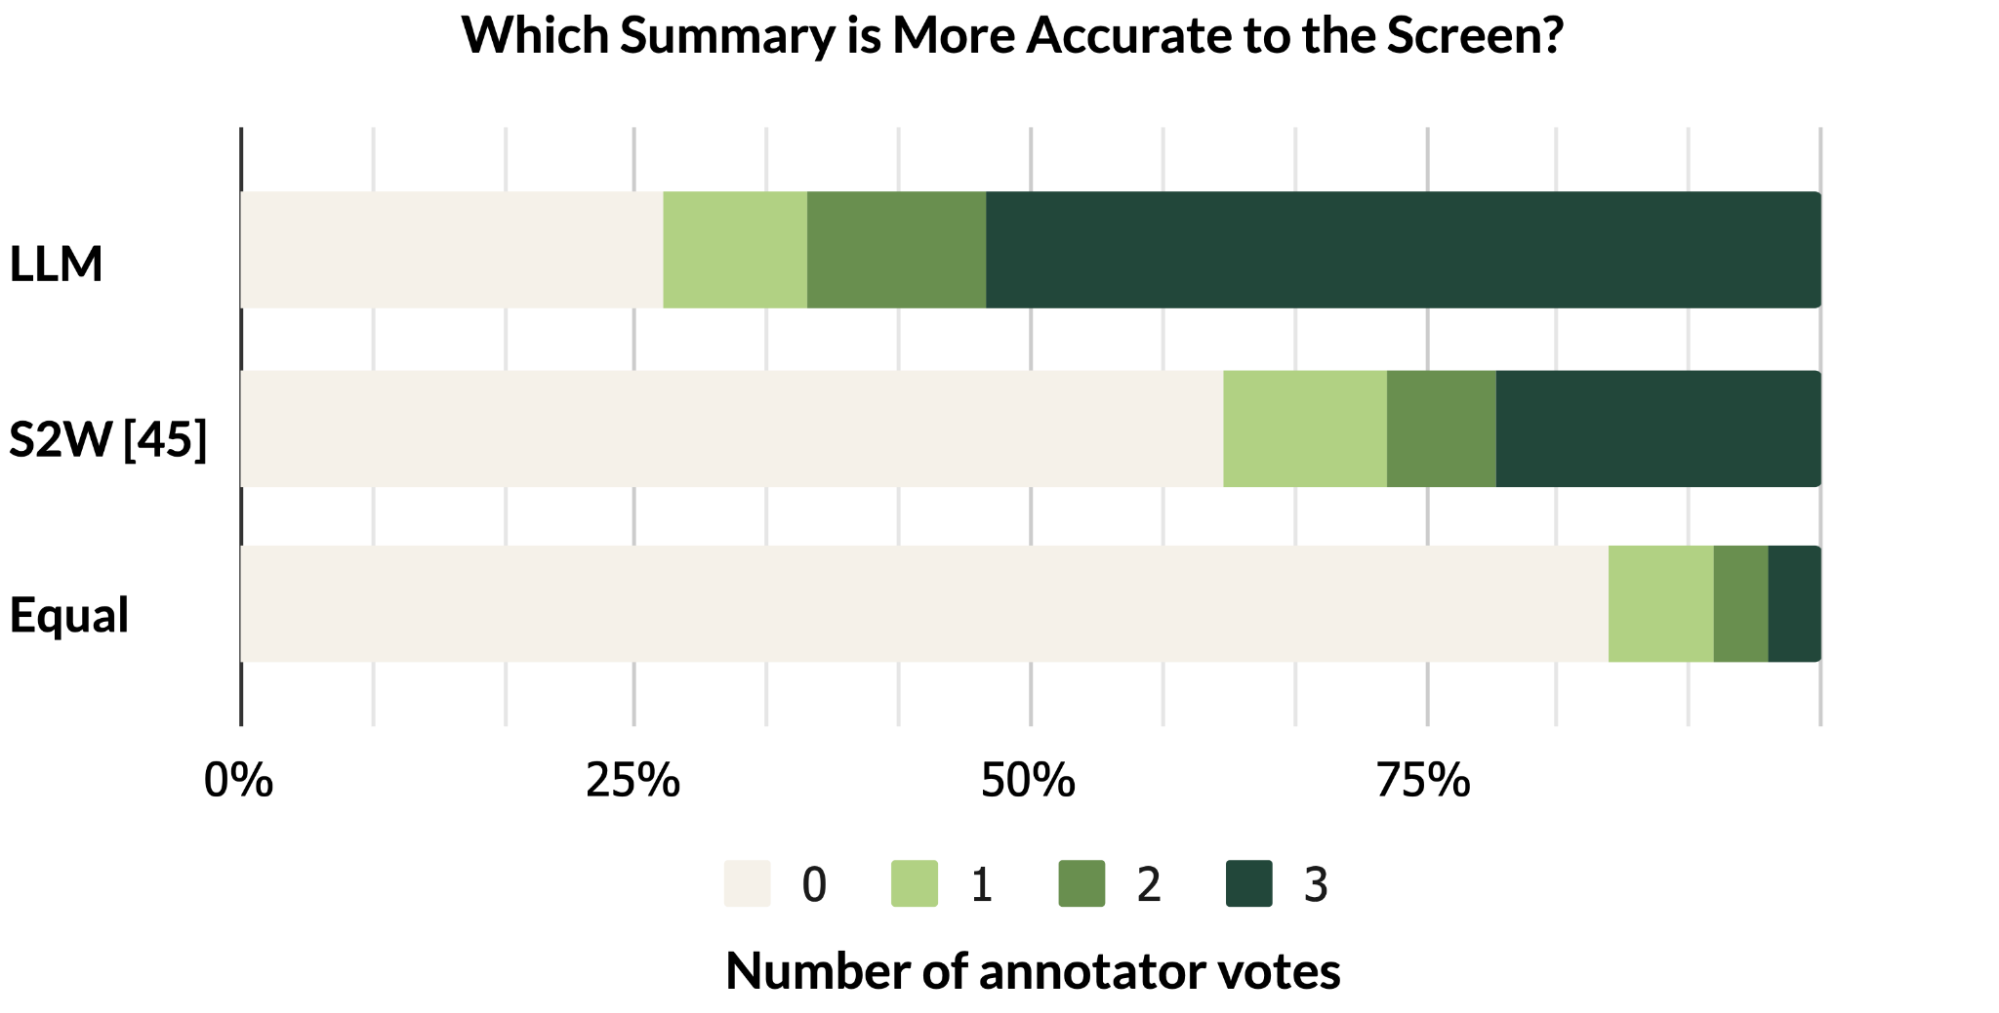
我们的研究结果表明,LLMs可以有效地总结移动端UI的基本功能,它们可以生成比我们之前使用UI特定文本介绍的Screen2Words基准模型更准确的摘要,如下面着色文本和框所示。
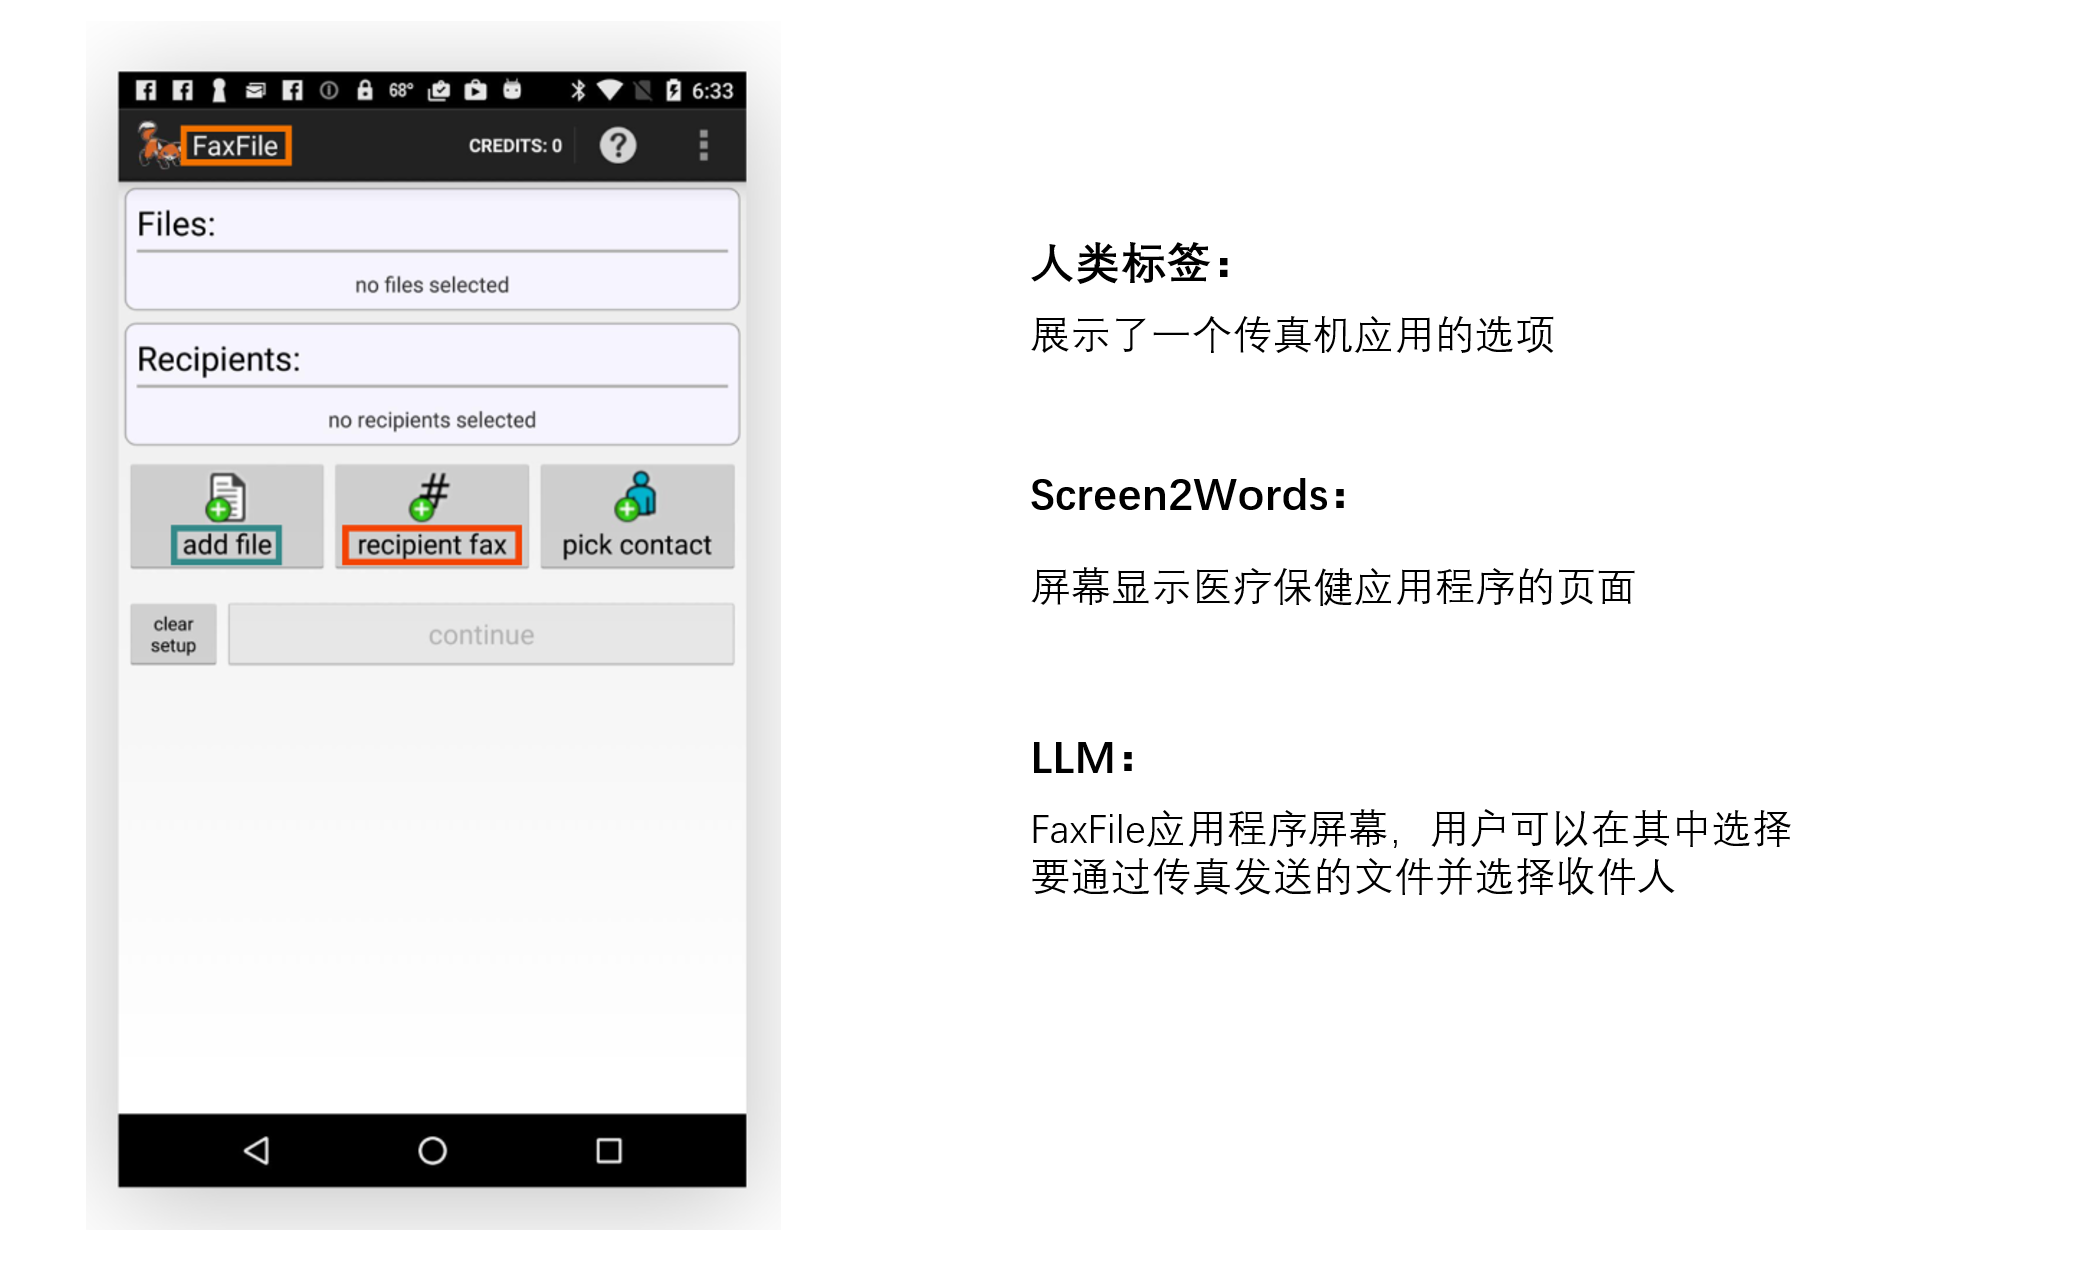
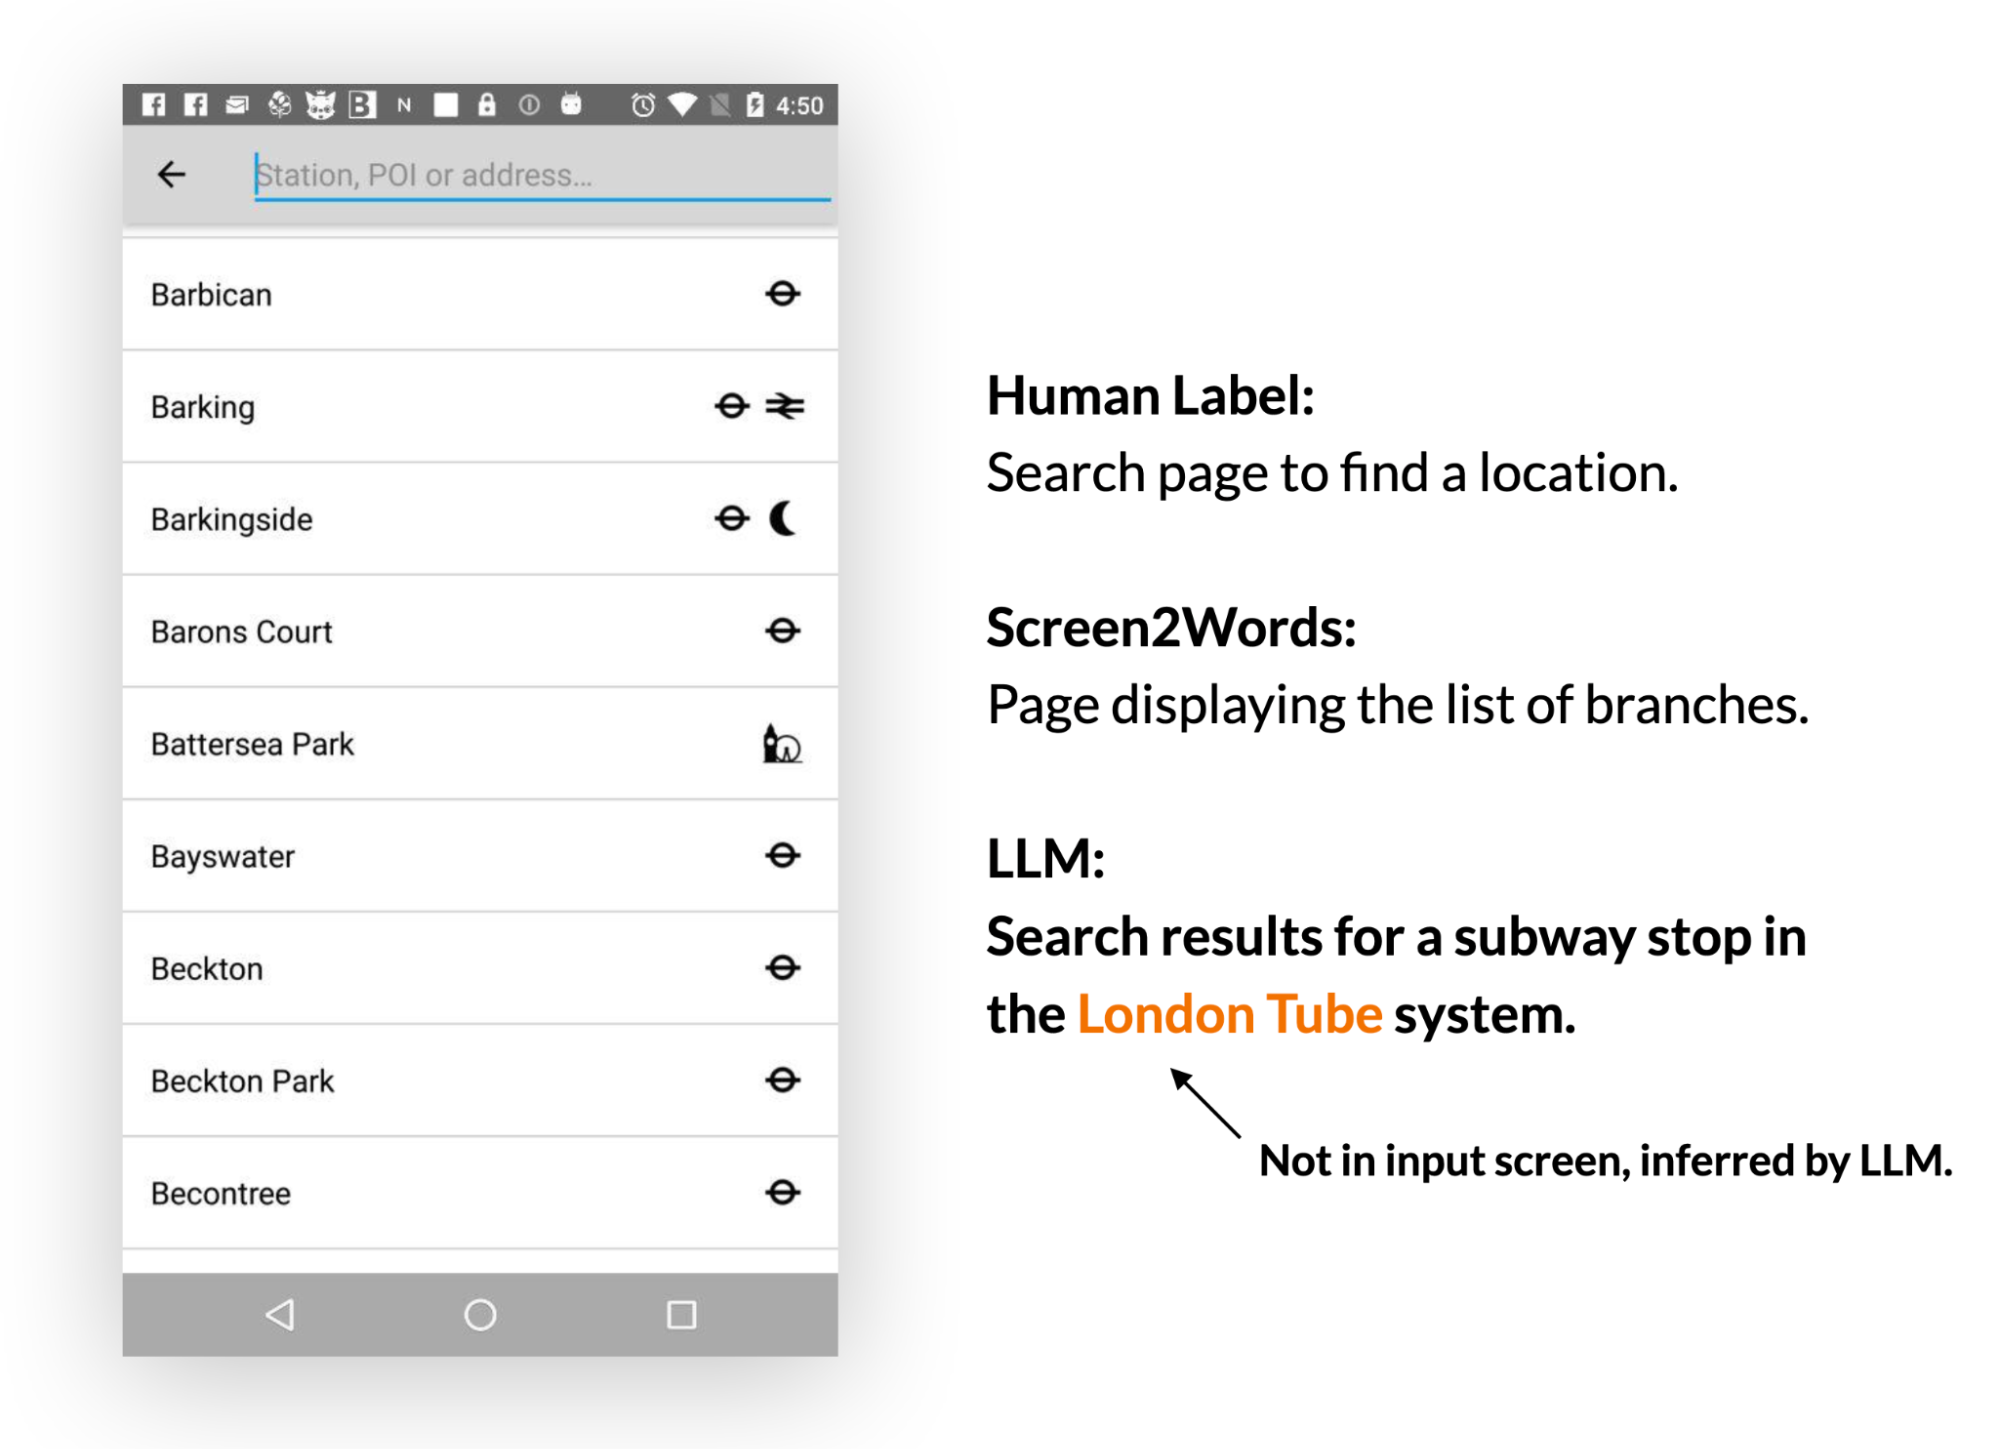
有趣的是,我们观察到LLMs在创建摘要时,利用他们的先前知识来推断未在UI中呈现的信息。
在下面的例子中,LLM推断地铁站属于伦敦地铁系统,而输入UI并不包含此信息。
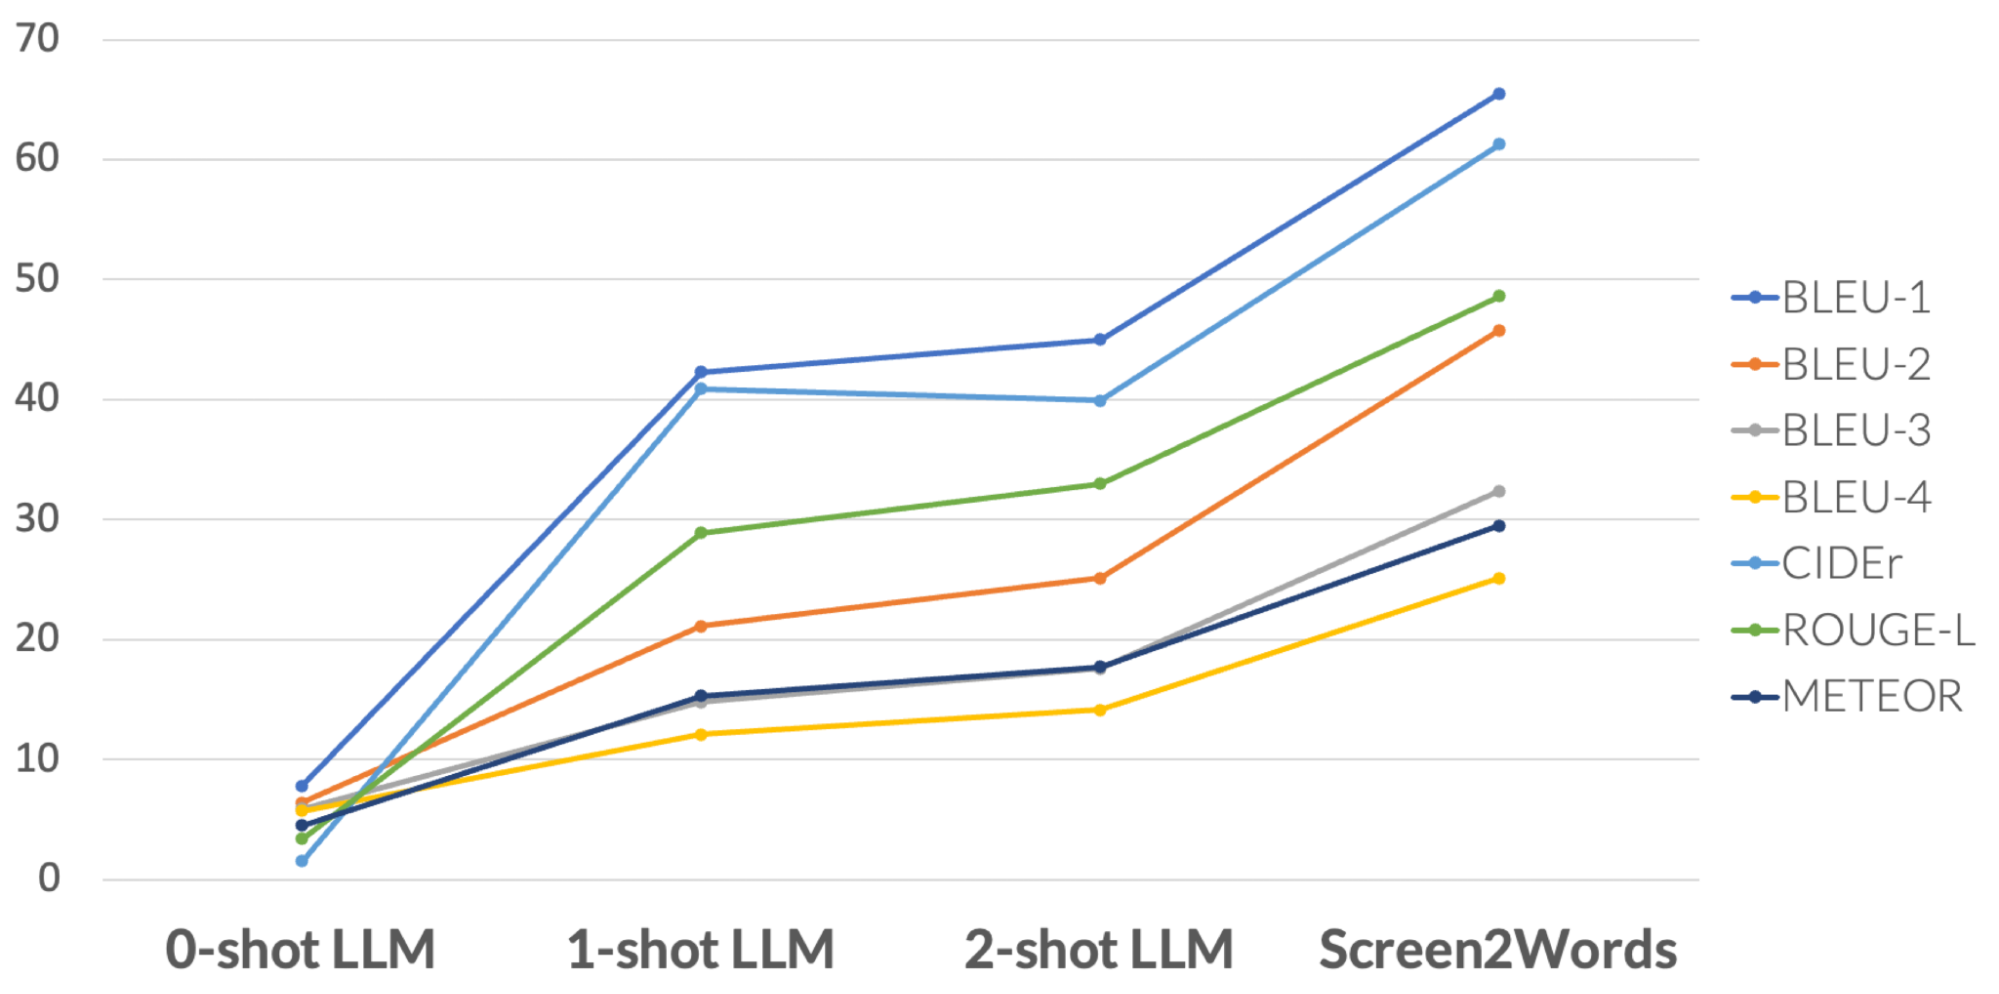
人类评估认为LLM摘要比基准更准确,但它们在BLEU(是一种用于评估机器翻译从一种自然语言到另一种自然语言的文本质量的算法)等指标上得分较低。感知质量和度量分数之间的不匹配反映了最近的研究结果,即尽管自动度量没有反映出来,LLM撰写的摘要更好。
给定一个移动端UI和一个开放式问题,要求提供有关UI的信息,模型应该提供正确的答案。我们专注于事实性问题,这些问题需要基于屏幕上呈现的信息来回答。
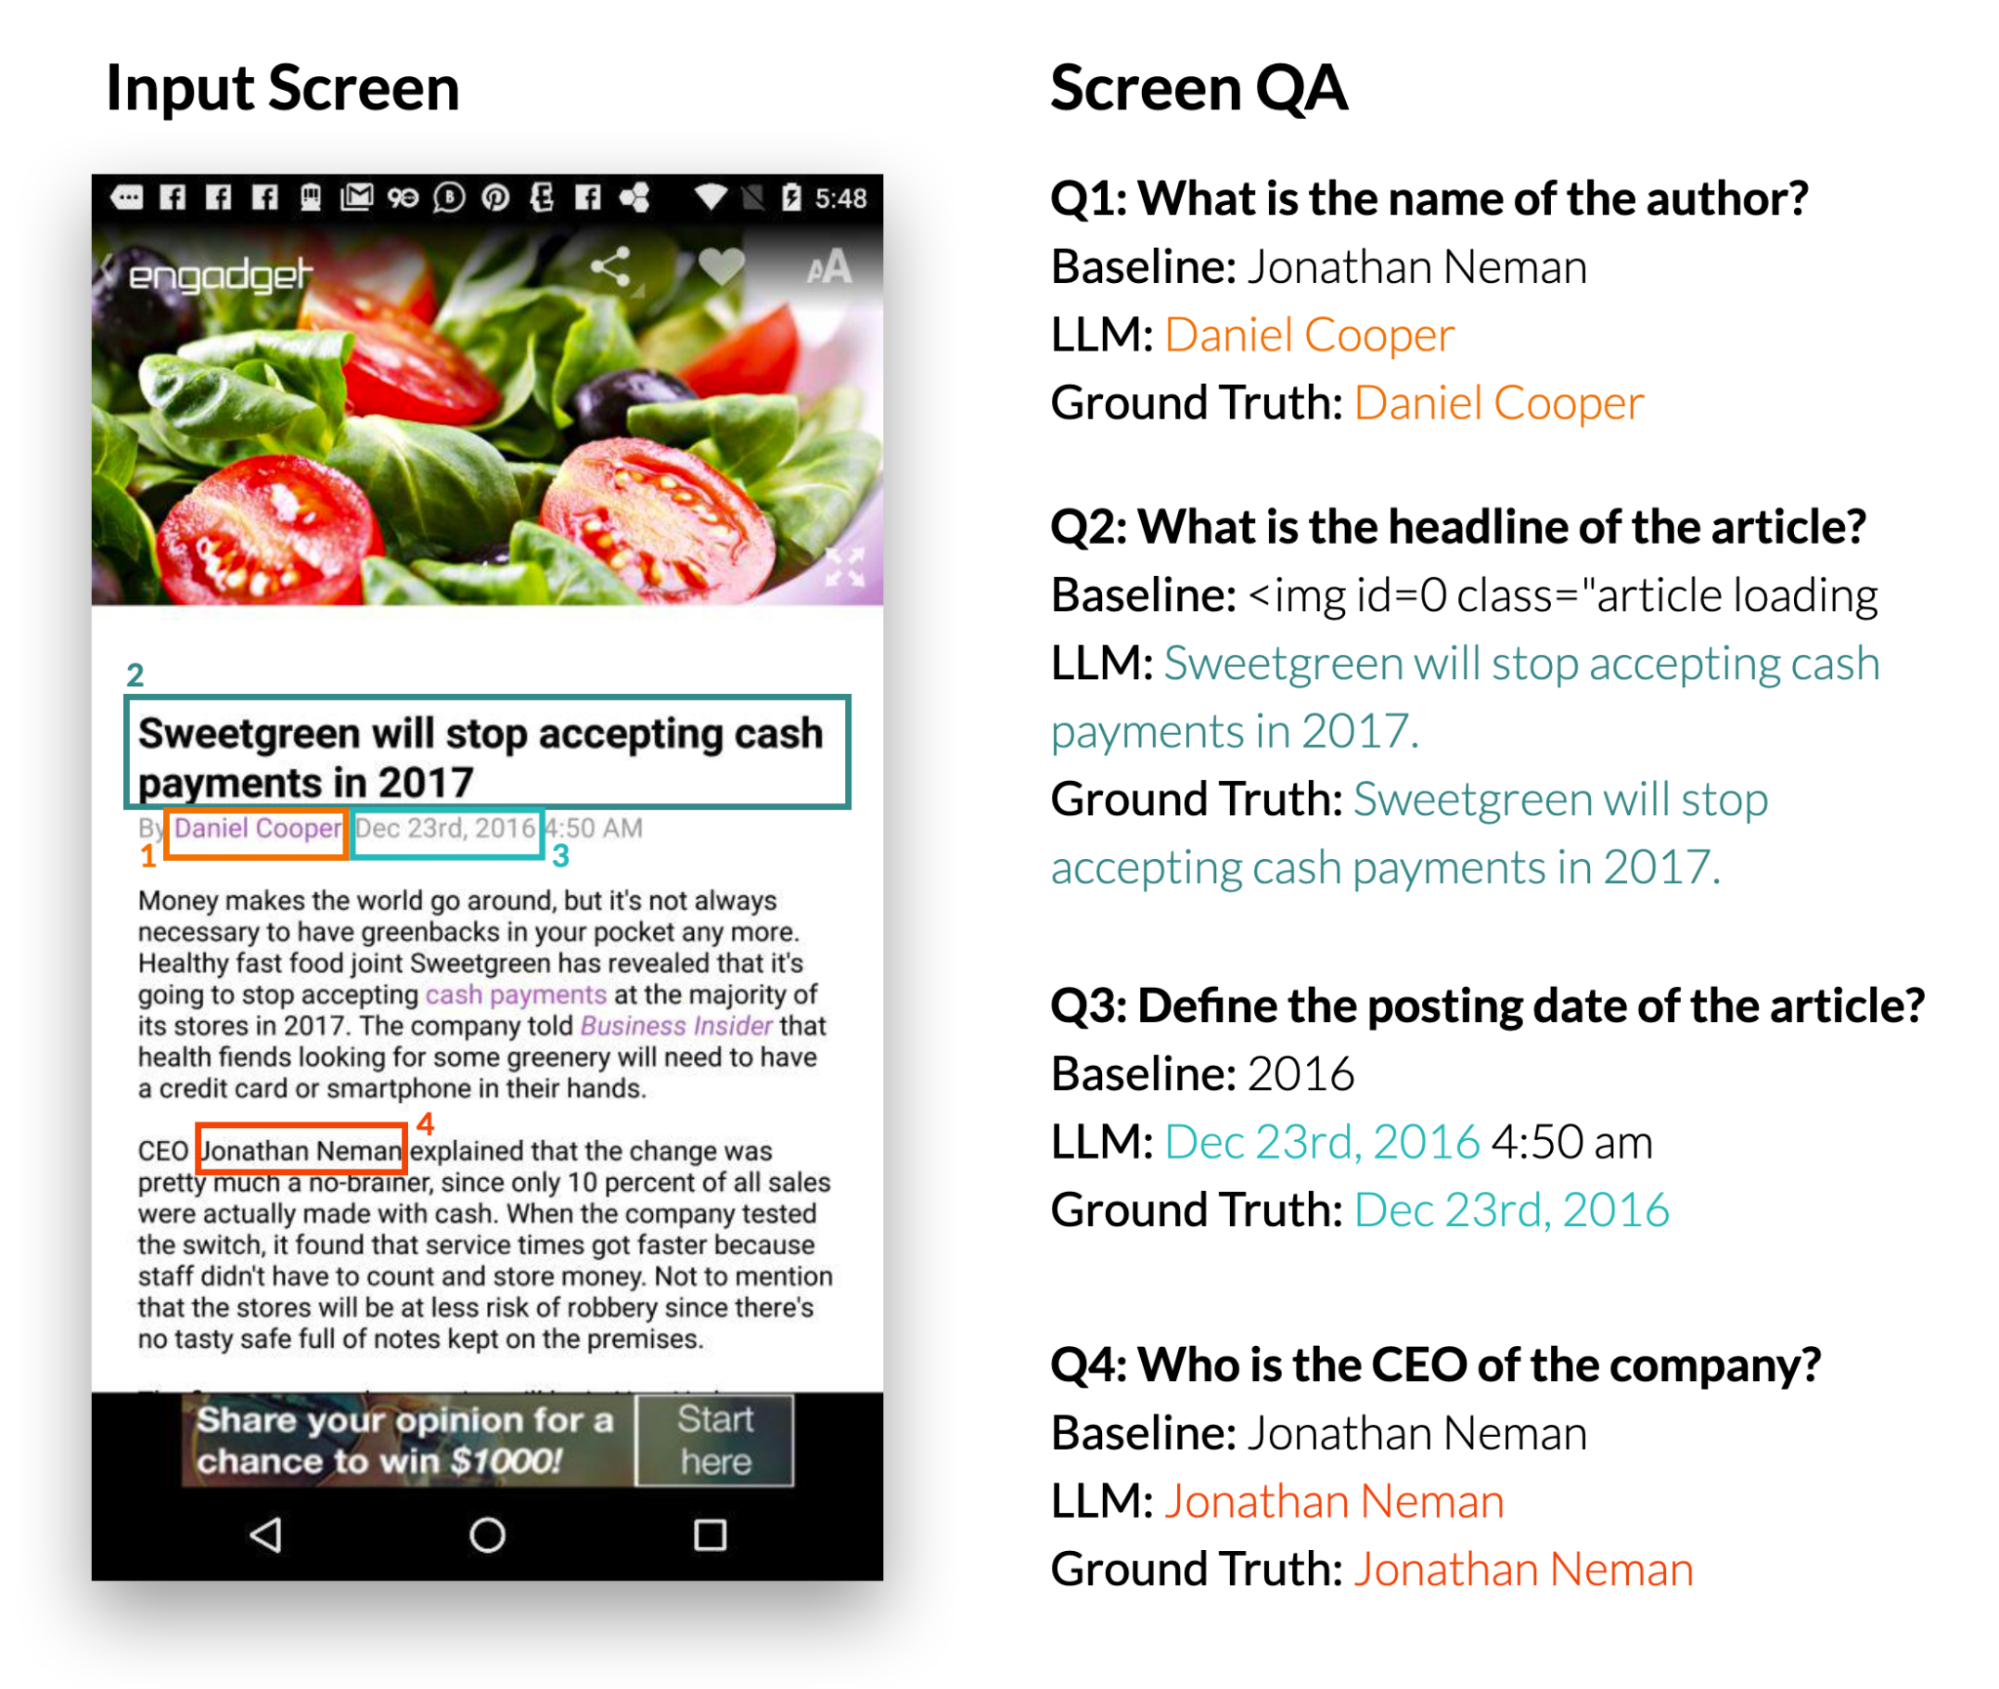
我们使用四个指标来报告性能:完全匹配(预测答案与真实答案完全相同)、包含真实答案(回答完整地包含了真实答案)、子字符串匹配(回答是真实答案的子字符串)以及基于整个数据集中预测和真实答案共享单词的微型F1分数。
我们的结果表明,LLM可以正确回答与用户界面相关的问题,例如“标题是什么?”。 LLM比基线QA模型DistillBERT表现显著更好,达到了66.7%的完全正确率。值得注意的是,0-shot LLM取得了30.7% 的精确匹配分数,这表明该模型具有固有的问答回复能力。
| Models | Exact Matches | Contains GT | Sub-String of GT | Micro-F1 |
|---|---|---|---|---|
| 0-shot LLM | 30.7% | 6.5% | 5.6% | 31.2% |
| 1-shot LLM | 65.8% | 10.0% | 7.8% | 62.9% |
| 2-shot LLM | 66.7% | 12.6% | 5.2% | 64.8% |
| DistillBERT | 36.0% | 8.5% | 9.9% | 37.2% |
给定一个移动端UI屏幕和自然语言控制UI的指令,模型需要预测执行指示动作的对象ID。例如,当使用“打开Gmail”进行指导时,模型应正确识别主屏幕上的Gmail图标。这个任务对于使用语音输入等语言输入来控制移动应用程序非常有用。我们之前介绍过这个基准任务。
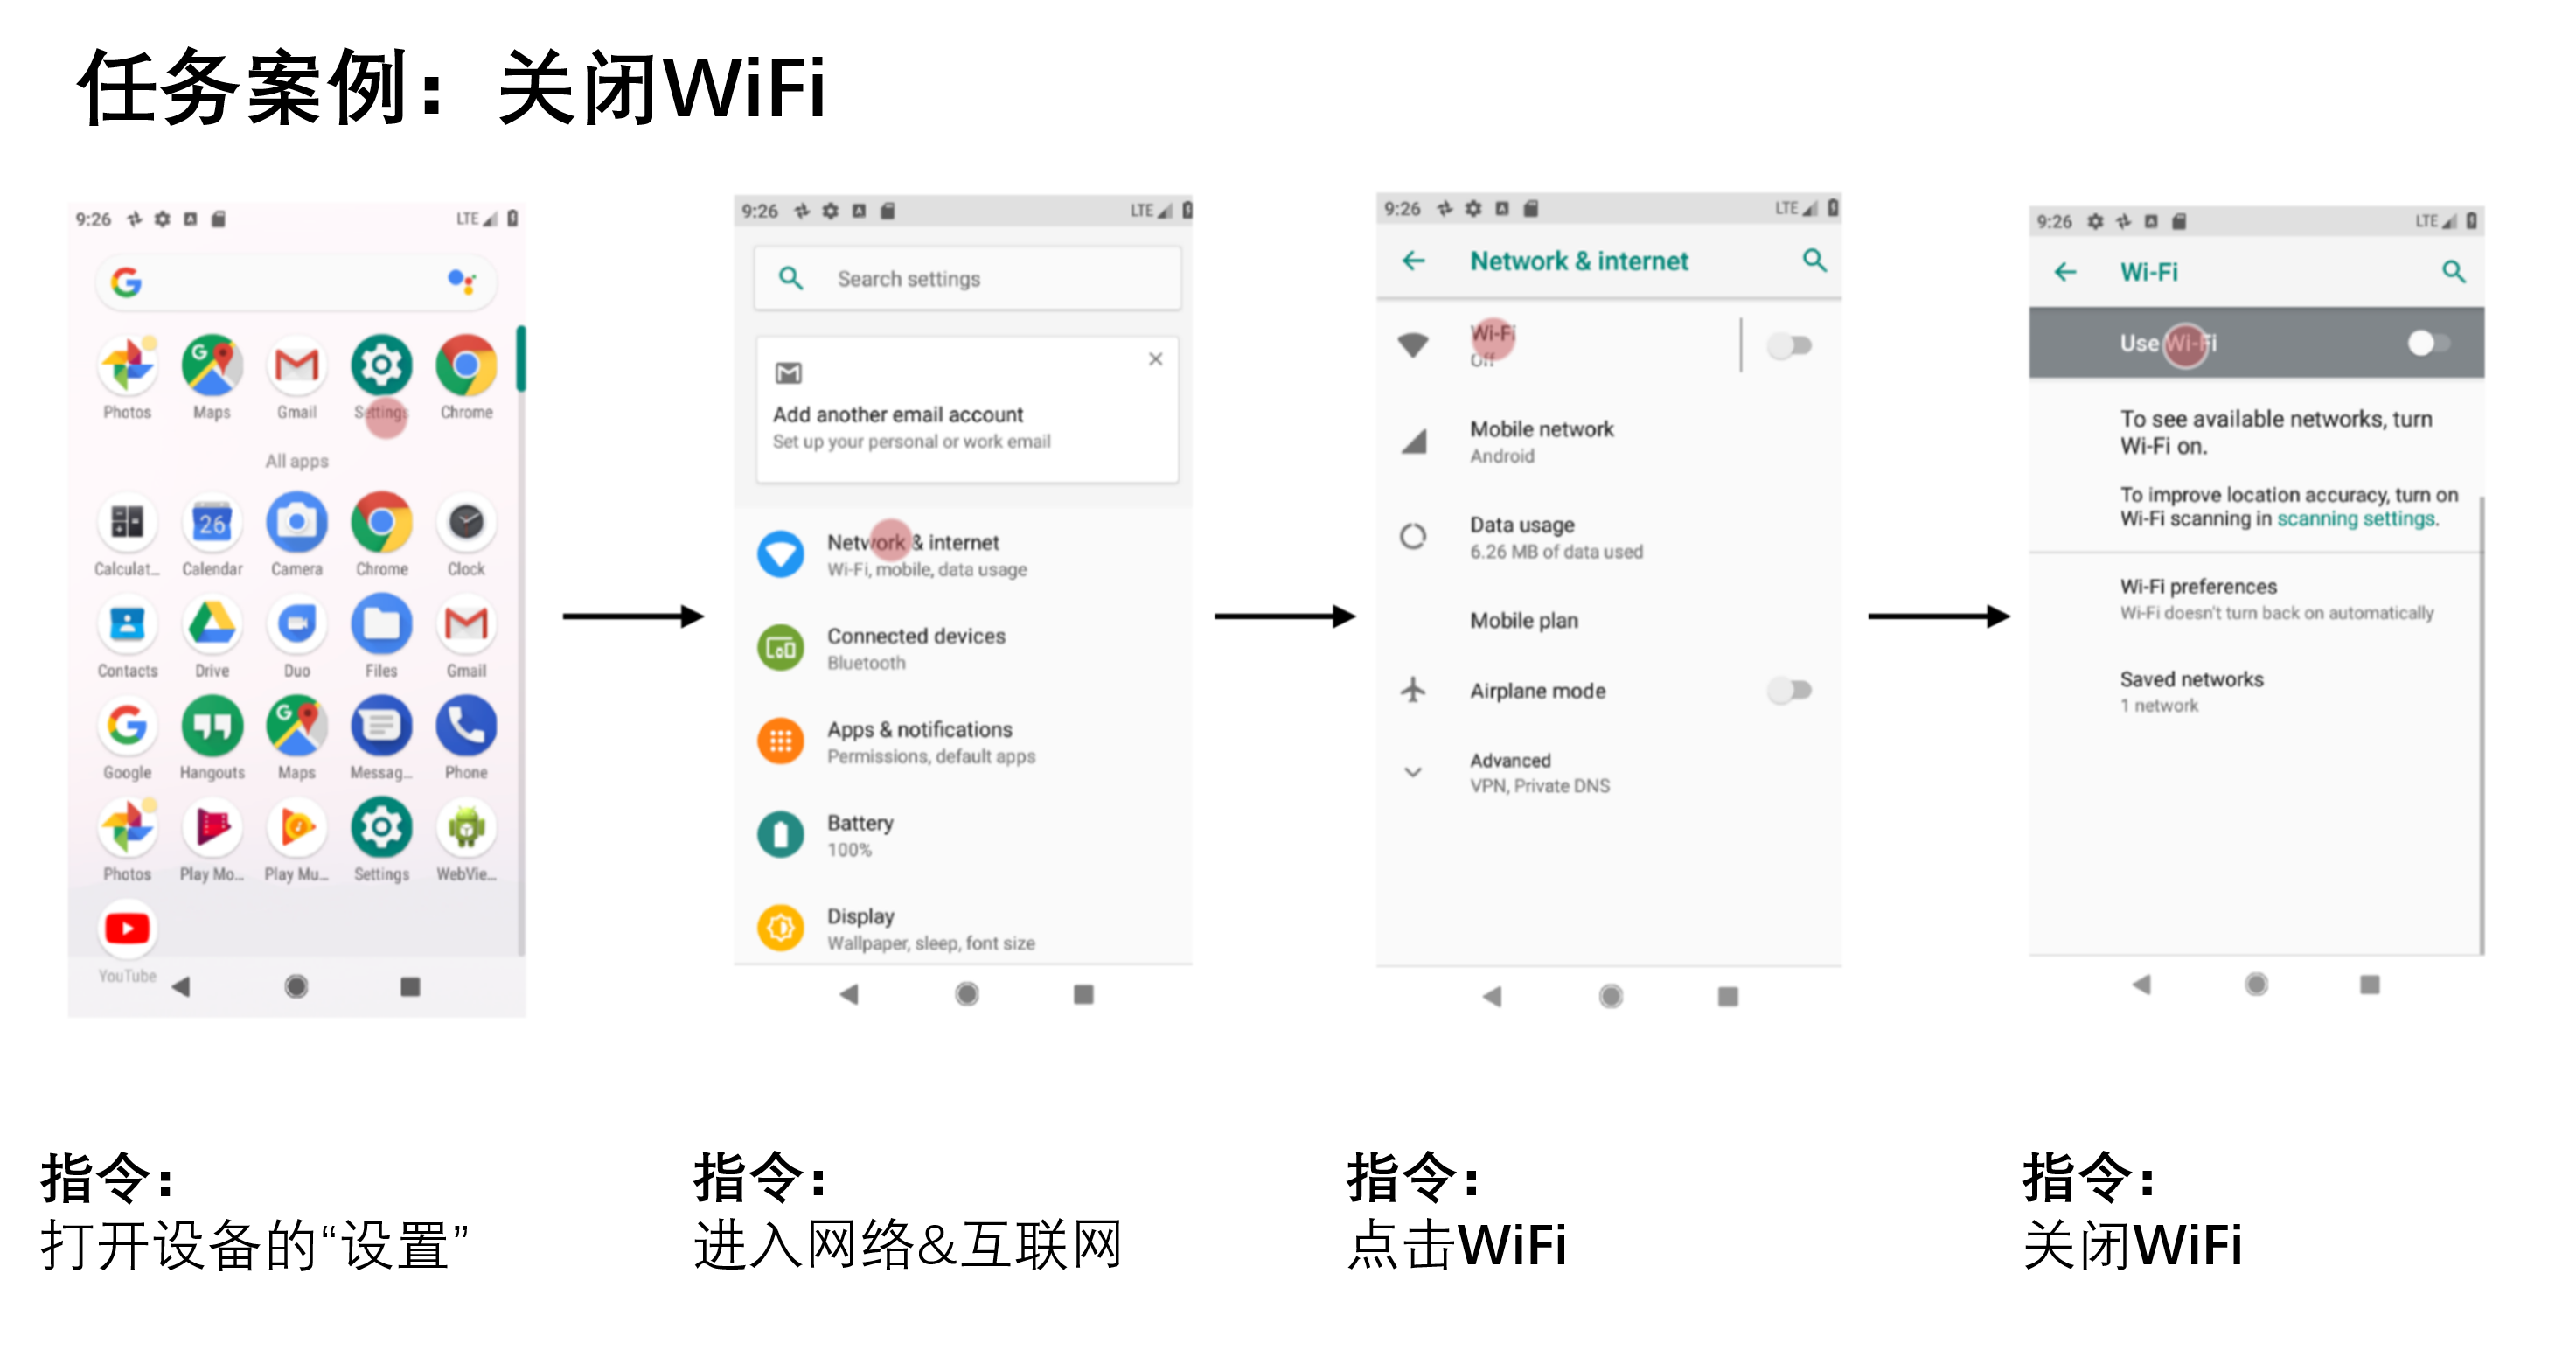
我们使用Seq2Act论文中的Partial和Complete指标评估了我们方法的性能。Partial指正确预测单个步骤的百分比,而Complete则衡量准确预测整个交互跟踪的部分。虽然我们基于LLM的方法没有超过在大规模数据集上训练得到的基准结果,但仅仅使用两个提示数据示例就取得了显着表现。
| Models | Partial | Complete |
|---|---|---|
| 0-shot LLM | 1.29 | 0.00 |
| 1-shot LLM (cross-app) | 74.69 | 31.67 |
| 2-shot LLM (cross-app) | 75.28 | 34.44 |
| 1-shot LLM (in-app) | 78.35 | 40.00 |
| 2-shot LLM (in-app) | 80.36 | 45.00 |
| Seq2Act | 89.21 | 70.59 |
我们的研究表明,在移动端UI上原型设计新语言交互可以像设计数据示例一样容易。因此,交互设计师可以快速创建功能模拟以测试与最终用户的新想法。此外,开发人员和研究人员可以在投入大量精力开发新数据集和模型之前探索目标任务的不同可能性。
我们调查了促使LLMs能够在移动端UI上实现各种对话交互的可行性。我们提出了一套提示技术,用于适应LLMs到移动UIs中。我们进行了广泛的实验来评估我们方法的有效性,并针对四个重要建模任务进行了比较。结果显示,与传统机器学习流水线(包括昂贵的数据收集和模型训练)相比,使用LLMs可以快速实现新颖基于语言的交互,并取得竞争性能。
感谢本文合著者Gang Li, 以及同事Chin-Yi Cheng、Tao Li、Yu Hsiao、Michael Terry 和 Minsuk Chang 的讨论和反馈意见。特别感谢Muqthar Mohammad 和Ashwin Kakarla 在协调数据收集方面提供宝贵帮助。感谢John Guilyard为博客创建动画和图形。
TorchV AI支持试用!
如您有大模型应用方面的企业需求,欢迎咨询!
五一小长假回来这一周,虽只有三天,对我来说却是翻天覆地的!
研发中心是我2017年来力石的第一站,当时担任研发部经理,那会儿就相当于现在的研发总监。2019年初离开研发中心,后面辗转到大数据产品中心、BOD中心和运营中心。四年后,又回到了研发中心,虽然,现在的力石和那会儿比已经很大,此研发中心非彼研发中心!
这次回到研发中心最大的原因ChatGPT带来的这波AI浪潮,AI太热了,热到身边几乎无人不知,且有“妖魔化”的趋势,言必大模型。对于大模型来势汹汹,至少在目前的能力范围内,我们还算应对有度。相比于国内大多数人是在看热闹,我们已经做了几件事:
因为以上这些原因,加上公司对“小知”这个产品一直以来的期望,所以老板极力主张我放掉手上的“活”,全力去带小知这个产品。
最近一年不到,除了直属团队的管理之外,我做的最认真的工作是销售。
其实我不是销售小白,之前自己两次创业,做的就是2B(软件业务)、2C(卖真皮女包)的销售,但是这一年做的更多是2G的销售。那是真的不一样啊,与人相处,还要处理各种复杂的人际关系,这一点和前面的销售面临的难题是完全不一样的。
从去年6月份的良渚项目开始,六个项目只丢了一个,成绩上来说还算可以。通过这一年,我也更加认识了自己:
接下来有时间,我会再好好总结一下这一年的经验收获,对我自己肯定是很有帮助的。
这周把手上的项目都交接掉了,但是近一个月内应该还会帮着过渡一段时间。接下来会更加潜心在小知这个产品上,期待着小知能翻天覆地,守得云开见月明!
新领导让我多关注关注PMF的事情,也就是寻找和调整产品-市场的结合点。这件事两年前老板也和我说过,说明PMF在他们眼里是我的一个标签了,这时候不自觉地想到老板的一句话——公司不缺你这么一个销售,你去做销售不划算!
嗯,那就好好搞产品吧。
就像插秧一样,退步方为向前!
最后感谢老华这一年的互相扶助和照顾,你差点把我培养成3T(IT、DT、OT)人才了,哈哈哈。
TorchV AI支持试用!
如您有大模型应用方面的企业需求,欢迎咨询!