defyour_function(a, b): let c = a c = b # error: c is immutable
if c != b: var c = b stuff()
let和var声明支持类型说明符以及模式,还支持延迟初始化:
1 2 3 4 5 6 7 8 9 10
defyour_function(): let x: Int8 = 42 let y: Int64 = 17
let z: Int8 if x != 0: z = 1 else: z = foo() use(z)
Note that let and var are completely opt-in when in def declarations. You can still use implicitly declared values as with Python, and they get function scope as usual.
structMyPair: var first: Int var second: Int def __init__(self&, first: Int, second: Int): self.first = first self.second = second def __lt__(self, rhs: MyPair) -> Bool: returnself.first < rhs.first or (self.first == rhs.first and self.second < rhs.second)
从语法上讲,与 Python 类相比,结构体中的所有实例属性都必须使用 var 或 let 声明显式声明。
if ('serviceWorker'in navigator) { addEventListener('load', function () { navigator.serviceWorker.register('./path/to/service-worker.js'); }); }
深入service worker
在 service worker 中,您可以访问 $service-worker 模块,该模块为您提供所有静态资源、构建文件和预渲染页面的路径。还提供了一个应用程序版本字符串,您可以使用它来创建唯一的缓存名称以及部署的base路径。如果您的 Vite 配置指定了 define(用于全局变量替换),则这也将应用于服务工作者以及服务器/客户端构建。
// Create a unique cache name for this deployment constCACHE = `cache-${version}`;
constASSETS = [ ...build, // the app itself ...files // everything in `static` ];
self.addEventListener('install', (event) => { // Create a new cache and add all files to it asyncfunctionaddFilesToCache() { const cache = await caches.open(CACHE); await cache.addAll(ASSETS); }
event.waitUntil(addFilesToCache()); });
self.addEventListener('activate', (event) => { // Remove previous cached data from disk asyncfunctiondeleteOldCaches() { for (const key ofawait caches.keys()) { if (key !== CACHE) await caches.delete(key); } }
event.waitUntil(deleteOldCaches()); });
self.addEventListener('fetch', (event) => { // ignore POST requests etc if (event.request.method !== 'GET') return;
{ "exports":{ ".":{ "types":"./dist/index.d.ts", // changing `svelte` to `default` is a breaking change: "svelte":"./dist/index.js" "default":"./dist/index.js" }, // removing this is a breaking change: "./foo":{ "types":"./dist/foo.d.ts", "svelte":"./dist/foo.js", "default":"./dist/foo.js" }, // adding this is ok: "./bar":{ "types":"./dist/bar.d.ts", "svelte":"./dist/bar.js", "default":"./dist/bar.js" } } }
使用 npm i -D @sveltejs/adapter-node 进行安装,然后将适配器添加到您的svelte.config.js文件中:
svelte.config.js
1 2 3 4 5 6 7
import adapter from'@sveltejs/adapter-node';
exportdefault { kit: { adapter: adapter() } };
Deploying
首先,使用npm run build构建您的应用程序。这将在适配器选项中指定的输出目录(默认为build)中创建生产服务器。
要运行应用程序,您需要输出目录、项目的package.json文件以及node_modules中的生产依赖项。可以通过复制package.json和package-lock.json并运行npm ci --omit dev来生成生产依赖项(如果您的应用程序没有任何依赖项,则可以跳过此步骤)。然后,您可以使用以下命令启动应用程序:
使用npm i -D @sveltejs/adapter-static进行安装,然后将适配器添加到您的 svelte.config.js 文件中:
svelte.config.js
1 2 3 4 5 6 7 8 9 10 11 12 13 14 15 16
import adapter from'@sveltejs/adapter-static';
exportdefault { kit: { adapter: adapter({ // default options are shown. On some platforms // these options are set automatically — see below pages: 'build', assets: 'build', fallback: null, precompress: false, strict: true }) } };
…and add the prerender option to your root layout:
…并将prerender 选项添加到您的根布局中:
src/routes/+layout.js
1 2
// This can be false if you're using a fallback (i.e. SPA mode) export const prerender = true;
You must ensure SvelteKit’s trailingSlash option is set appropriately for your environment. If your host does not render /a.html upon receiving a request for /a then you will need to set trailingSlash: 'always' to create /a/index.html instead.
# If you're using pnpm, add this step then change the commands and cache key below to use `pnpm` # - name: Install pnpm # uses: pnpm/action-setup@v2 # with: # version: 8
使用npm i -D @sveltejs/adapter-netlify进行安装,然后将适配器添加到您的 svelte.config.js 文件中:
svelte.config.js
1 2 3 4 5 6 7 8 9 10 11 12 13 14 15 16 17 18 19
import adapter from'@sveltejs/adapter-netlify';
exportdefault { kit: { // default options are shown adapter: adapter({ // if true, will create a Netlify Edge Function rather // than using standard Node-based functions edge: false,
// if true, will split your app into multiple functions // instead of creating a single one for the entire app. // if `edge` is true, this option cannot be used split: false }) } };
exportdefault { kit: { adapter: adapter({ // will create a Netlify Edge Function using Deno-based // rather than using standard Node-based functions edge: true }) } };
exportconstload = async (event) => { const context = event.platform.context; console.log(context); // shows up in your functions log in the Netlify app };
exportconst config = { isr: { // Expiration time (in seconds) before the cached asset will be re-generated by invoking the Serverless Function. // Setting the value to `false` means it will never expire. expiration: 60,
// Random token that can be provided in the URL to bypass the cached version of the asset, by requesting the asset // with a __prerender_bypass=<token> cookie. // // Making a `GET` or `HEAD` request with `x-prerender-revalidate: <token>` will force the asset to be re-validated. bypassToken: BYPASS_TOKEN,
// List of valid query parameters. Other parameters (such as utm tracking codes) will be ignored, // ensuring that they do not result in content being regenerated unnecessarily allowQuery: ['search'] } };
<script> let a = 0; let b = 0; let total = 0; asyncfunctionadd() { const response = awaitfetch('/api/add', { method: 'POST', body: JSON.stringify({ a, b }), headers: { 'content-type': 'application/json' } }); total = await response.json(); } </script>
<script> import { page } from'$app/stores'; /** @type {import('./$types').PageData} */ exportlet data; // we can access `data.posts` because it's returned from // the parent layout `load` function $: index = data.posts.findIndex(post => post.slug === $page.params.slug); $: next = data.posts[index - 1]; </script>
// cache the page for the same length of time // as the underlying data setHeaders({ age: response.headers.get('age'), 'cache-control': response.headers.get('cache-control') });
/** @type {import('./$types').PageLoad} */ exportasyncfunctionload({ fetch, depends }) { // load reruns when `invalidate('https://api.example.com/random-number')` is called... const response = awaitfetch('https://api.example.com/random-number');
// ...or when `invalidate('app:random')` is called depends('app:random');
return { number: await response.json() }; }
src/routes/random-number/+page.svelte
1 2 3 4 5 6 7 8 9 10 11 12 13 14
<script> import { invalidate, invalidateAll } from '$app/navigation'; /** @type {import('./$types').PageData} */ export let data;
function rerunLoadFunction() { // any of these will cause the `load` function to re-run invalidate('app:random'); invalidate('https://api.example.com/random-number'); invalidate(url => url.href.includes('random-number')); invalidateAll(); } </script>
<p>random number: {data.number}</p> <button on:click={rerunLoadFunction}>Update random number</button>
const user = await db.getUser(email); cookies.set('sessionid', await db.createSession(user));
return { success: true }; }, register: async (event) => { // TODO register the user } };
src/routes/login/+page.svelte
1 2 3 4 5 6 7 8 9 10 11 12
<script> /** @type {import('./$types').PageData} */ export let data; /** @type {import('./$types').ActionData} */ export let form; </script>
{#if form?.success} <!-- this message is ephemeral; it exists because the page was rendered in response to a form submission. it will vanish if the user reloads --> <p>Successfully logged in! Welcome back, {data.user.name}</p> {/if}
<form method="POST" use:enhance={({ form, data, action, cancel, submitter }) => { // `form` is the `<form>` element // `data` is its `FormData` object // `action` is the URL to which the form is posted // `cancel()` will prevent the submission // `submitter` is the `HTMLElement` that caused the form to be submitted
return async ({ result, update }) => { // `result` is an `ActionResult` object // `update` is a function which triggers the logic that would be triggered if this callback wasn't set }; }} >
<script> import { enhance, applyAction } from '$app/forms';
/** @type {import('./$types').ActionData} */ export let form; </script>
<form method="POST" use:enhance={({ form, data, action, cancel }) => { // `form` is the `<form>` element // `data` is its `FormData` object // `action` is the URL to which the form is posted // `cancel()` will prevent the submission
return async ({ result }) => { // `result` is an `ActionResult` object if (result.type === 'error') { await applyAction(result); } }; }} >
通常情况下,SvelteKit 首先在服务器上呈现您的页面,并将该 HTML 发送到客户端进行水合作用。如果您将 ssr 设置为 false,则会呈现一个空的“外壳”页面。如果您的页面无法在服务器上呈现(例如,因为使用了仅限于浏览器的全局变量,如 document),则这很有用,但在大多数情况下不建议这样做(请参见附录)。
+page.js
1
export const ssr = false;
如果你在根 +layout.js 中添加 export const ssr = false,那么整个应用程序将只在客户端渲染 —— 这基本上意味着你把应用程序变成了单页应用。
你可能会想知道,如果我们不能使用自己的存储库,我们如何能够使用 $page.data 和其他应用商店。答案是服务器上的应用商店使用 Svelte 的上下文 API - 存储库附加到组件树中,并通过setContext进行订阅时检索 getContext。我们可以对自己的存储库执行相同的操作:
src/routes/+layout.svelte
1 2 3 4 5 6 7 8
<script> import { setContext } from 'svelte'; import { writable } from 'svelte/store'; /** @type {import('./$types').LayoutData} */ export let data; // Create a store and update it when necessary... const user = writable(); $: user.set(data.user); // ...and add it to the context for child components to access setContext('user', user); </script>
src/routes/user/+page.svelte
1 2 3 4 5 6
<script> import { getContext } from 'svelte'; // Retrieve user store from context const user = getContext('user'); </script>
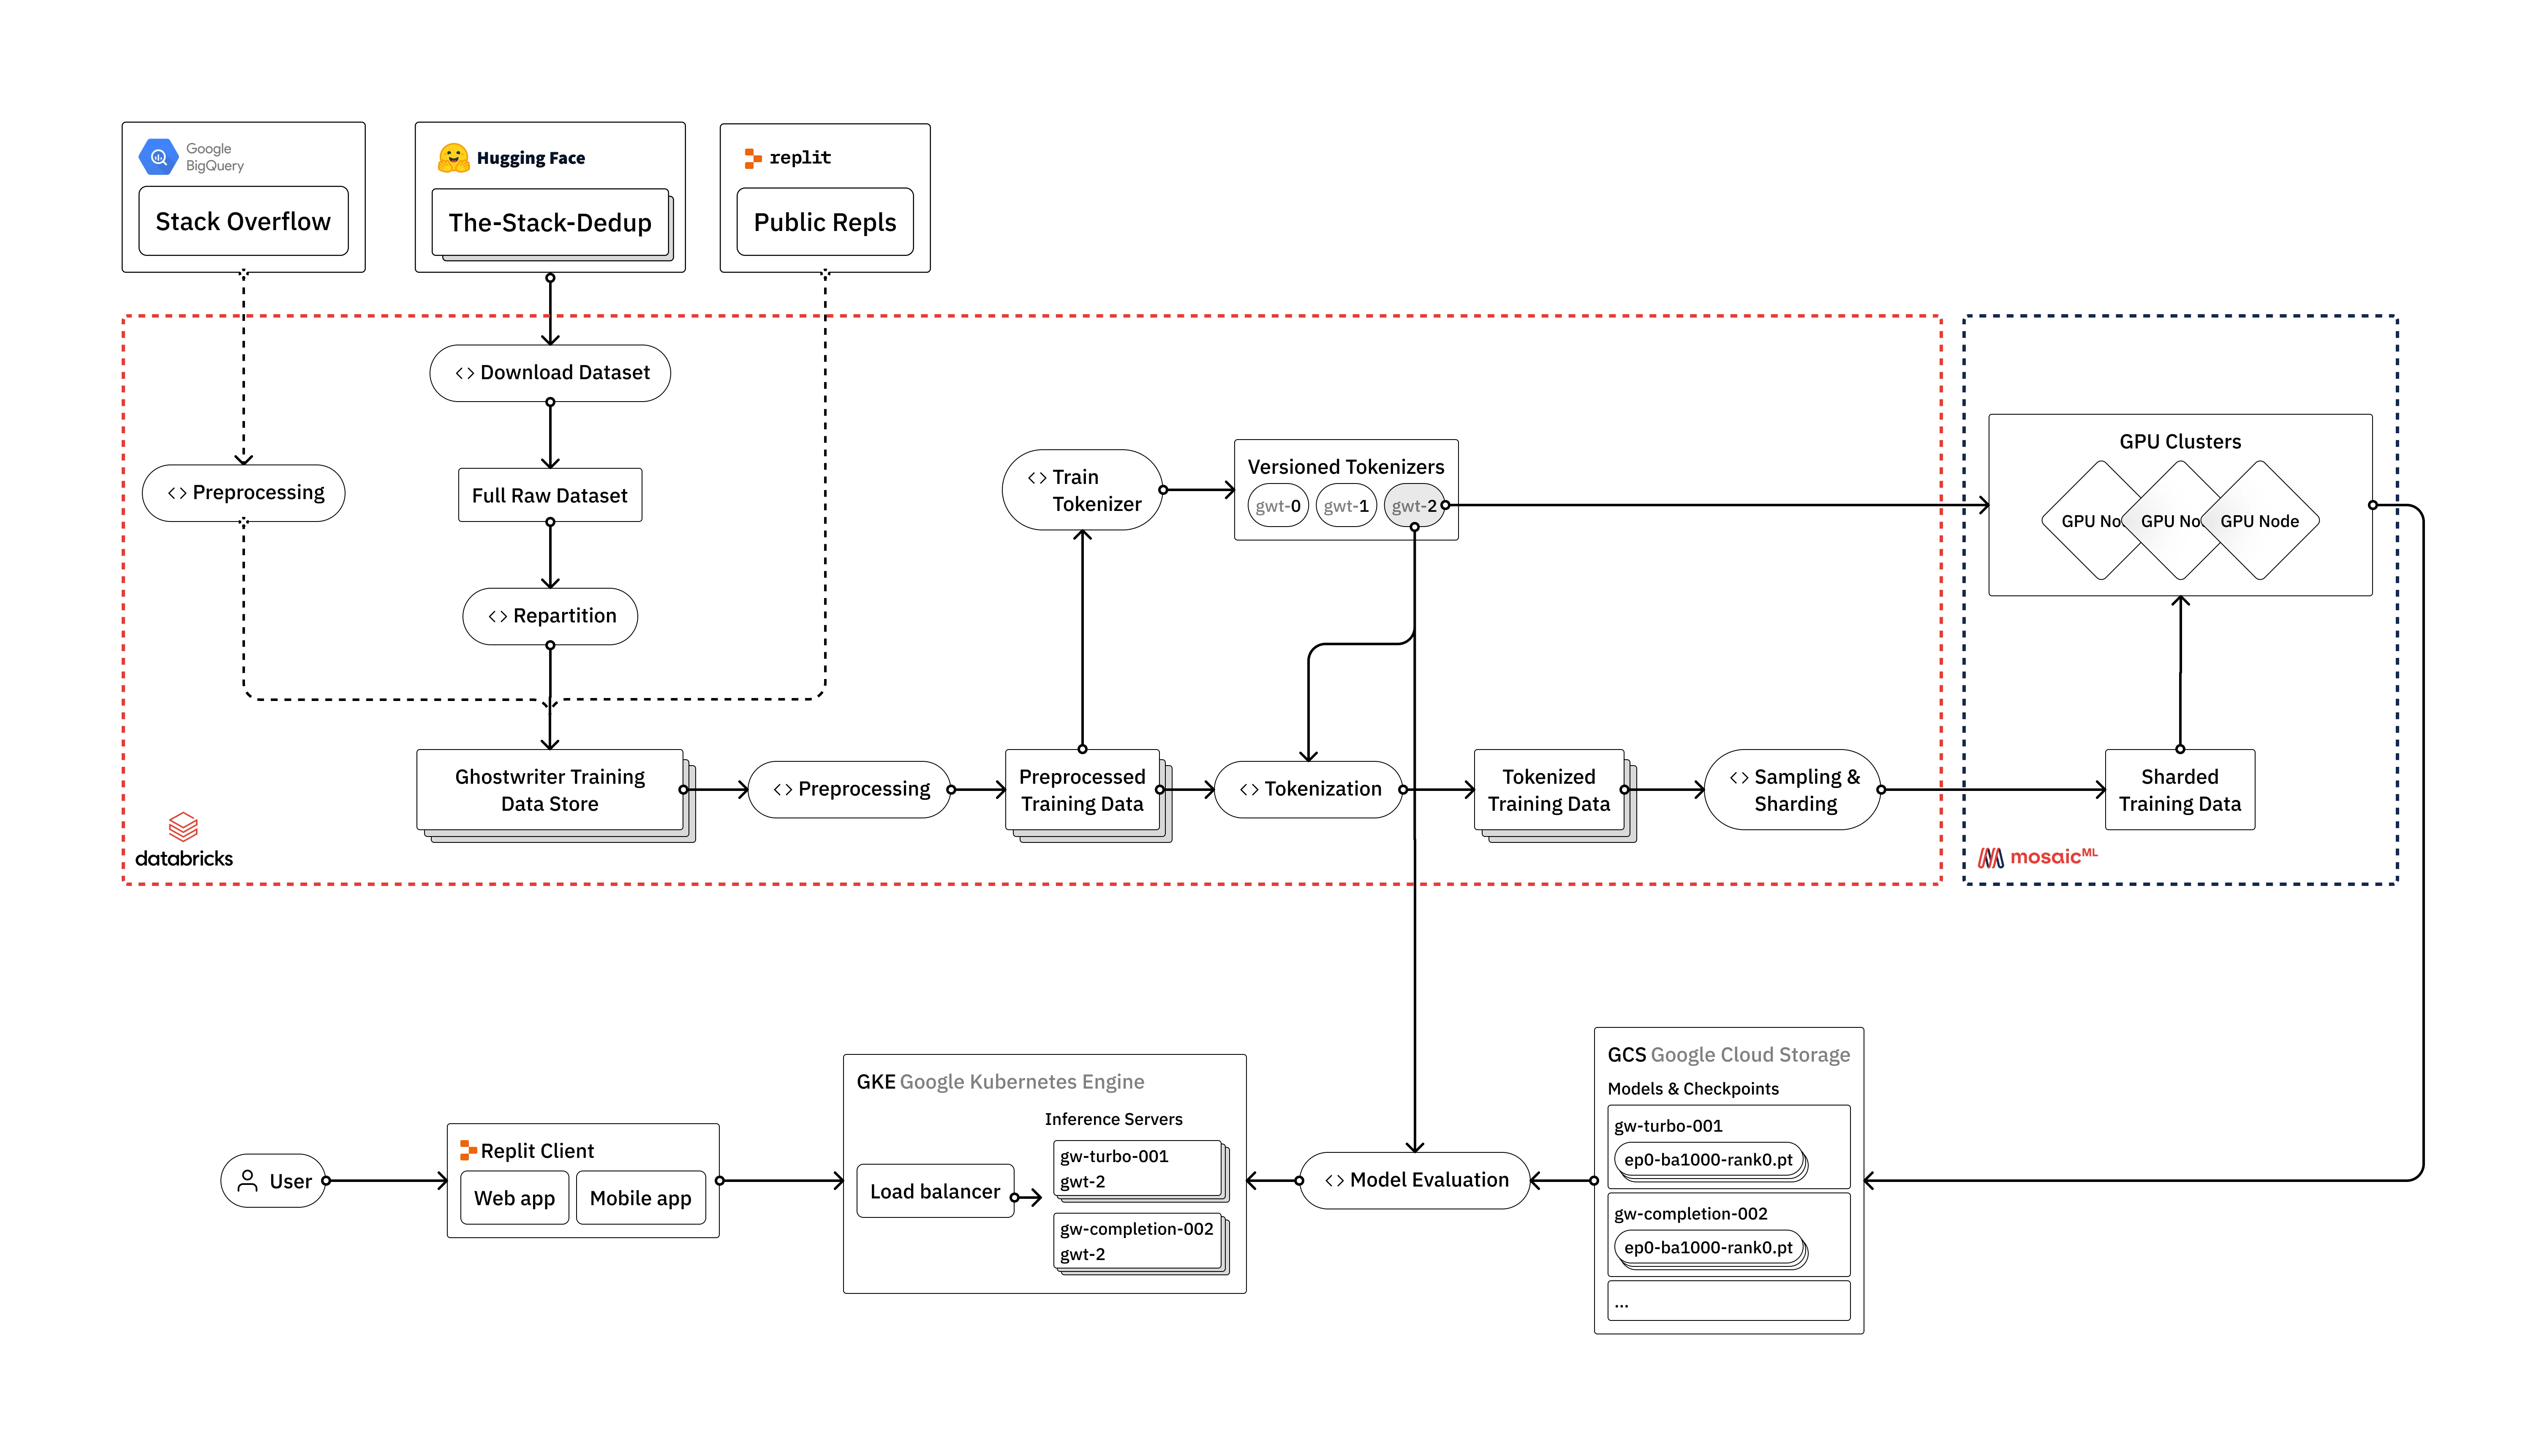
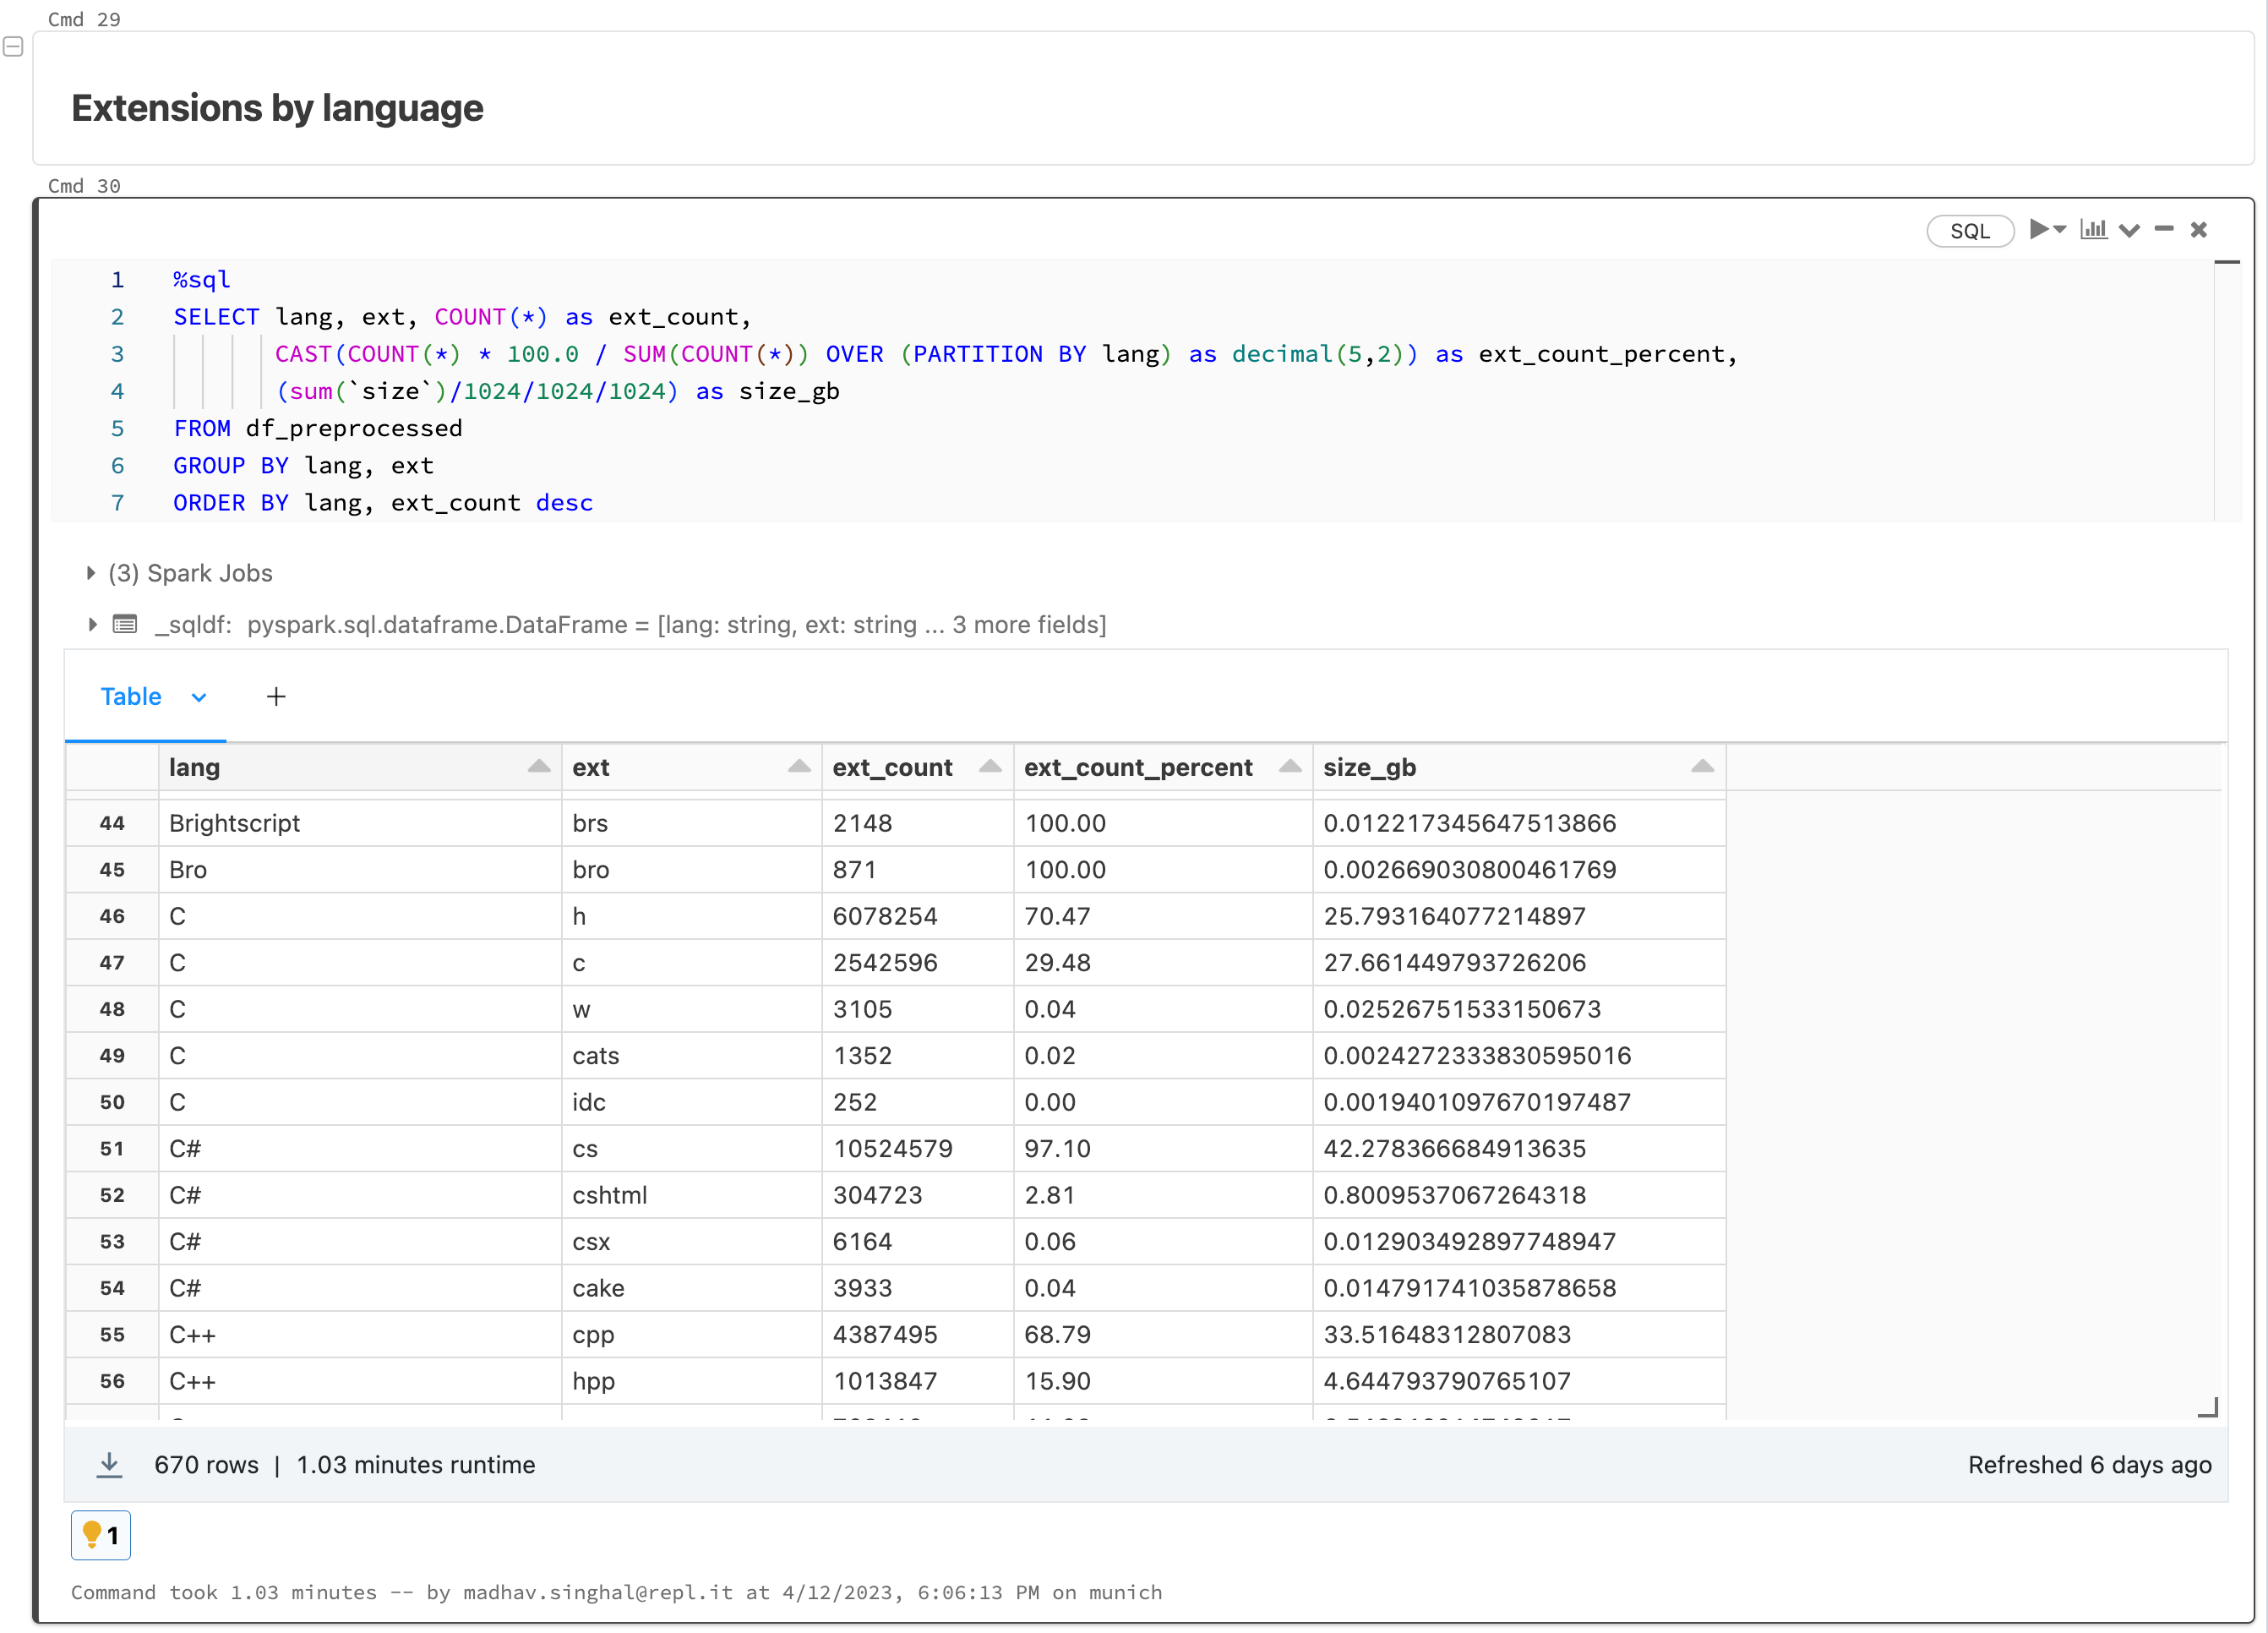
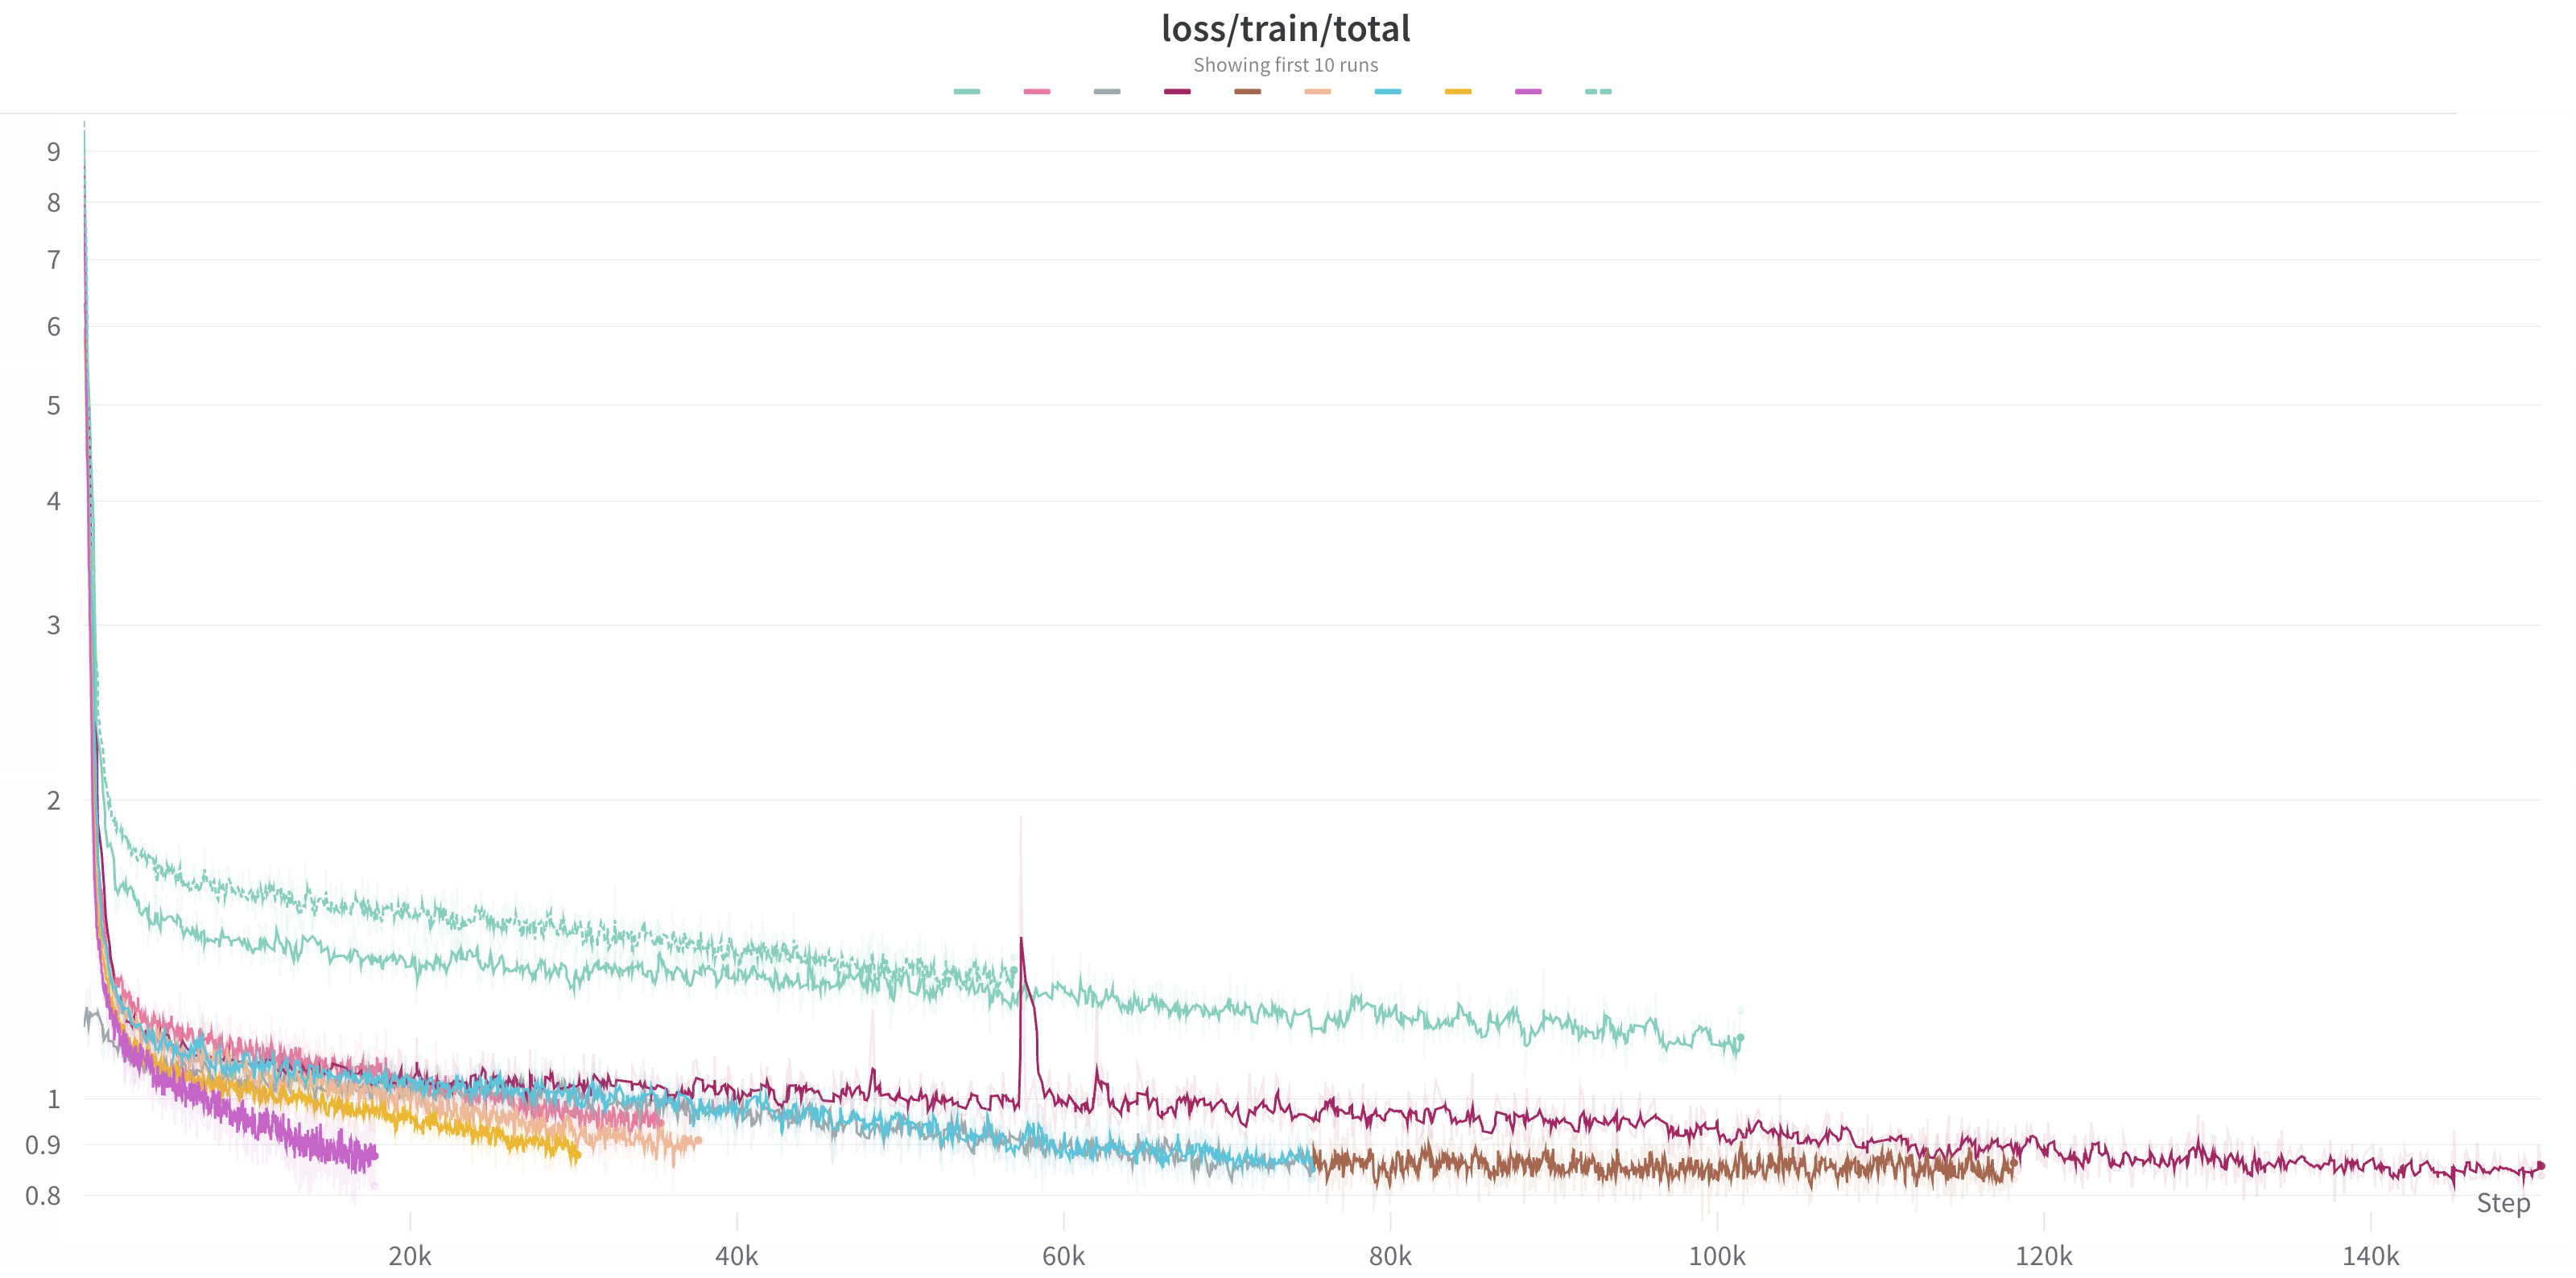
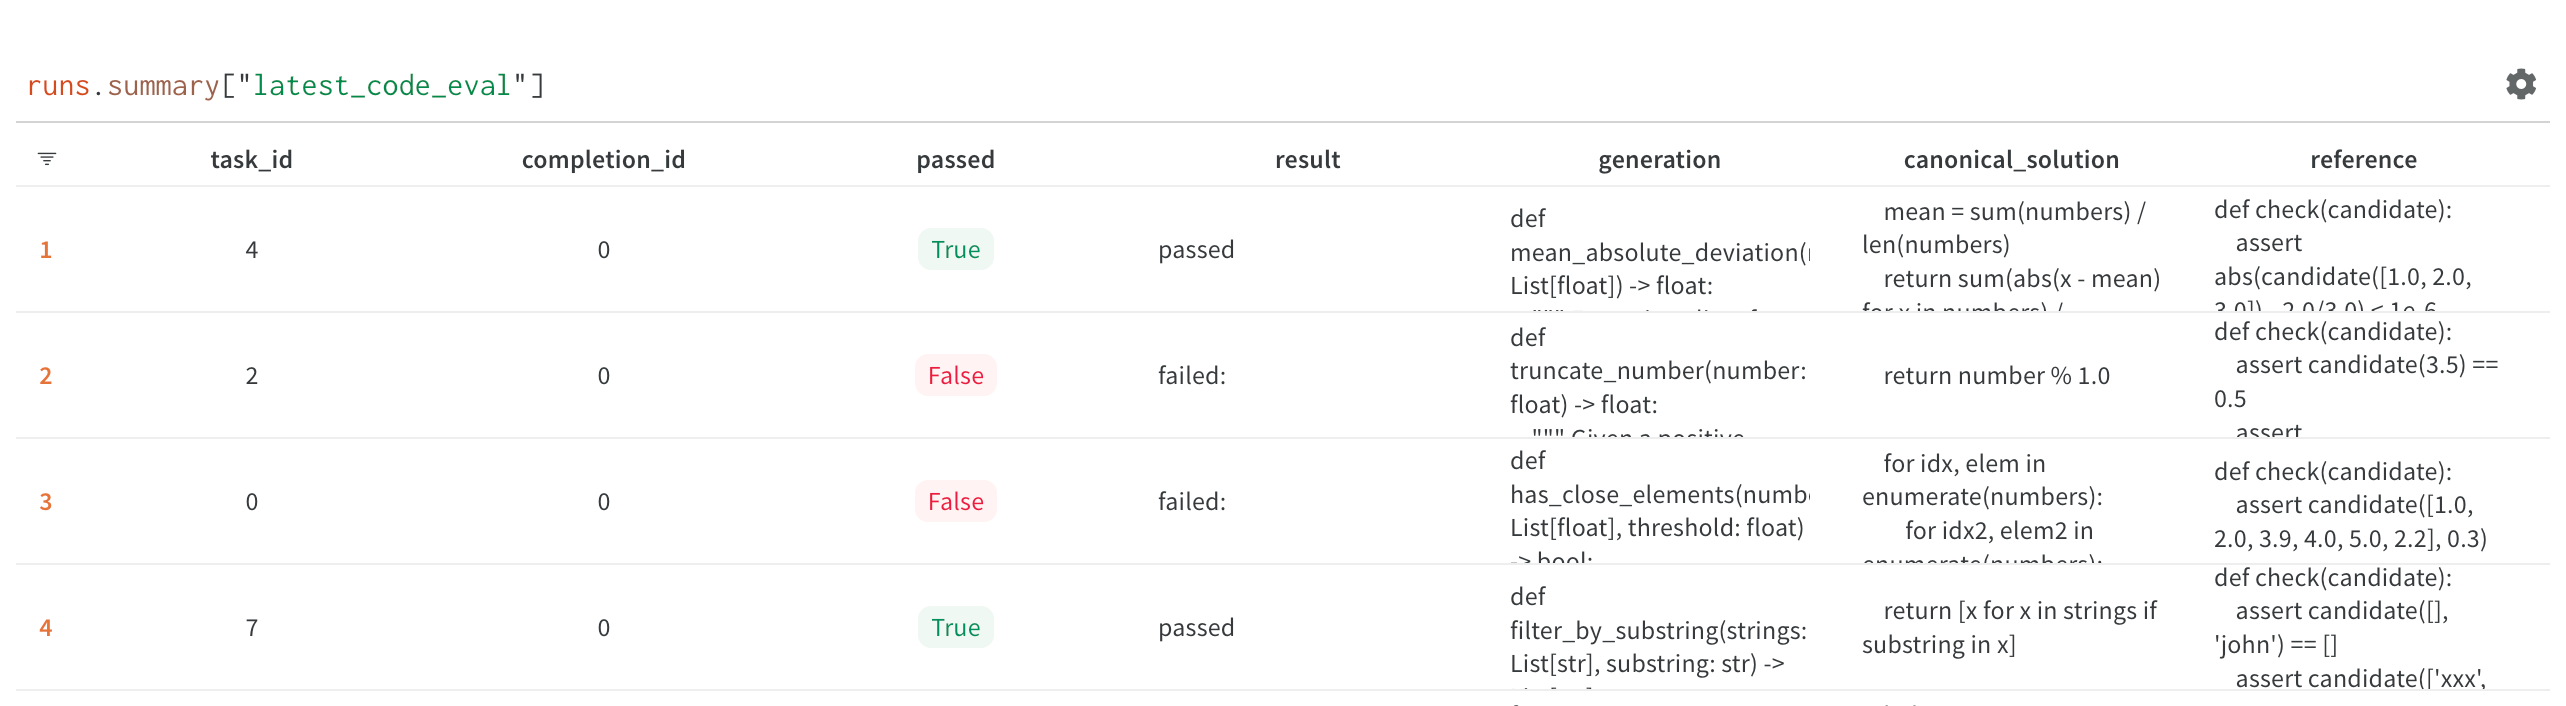
在Replit,我们投入了大量资源来建立从头开始训练自己的大型语言模型所需的基础设施。在本文中,我们将概述我们如何训练LLM(Large Language Models),从原始数据到部署到用户面向生产环境。我们将讨论沿途遇到的工程挑战以及如何利用我们认为构成现代LLM堆栈的供应商:Databricks、Hugging Face和MosaicML。
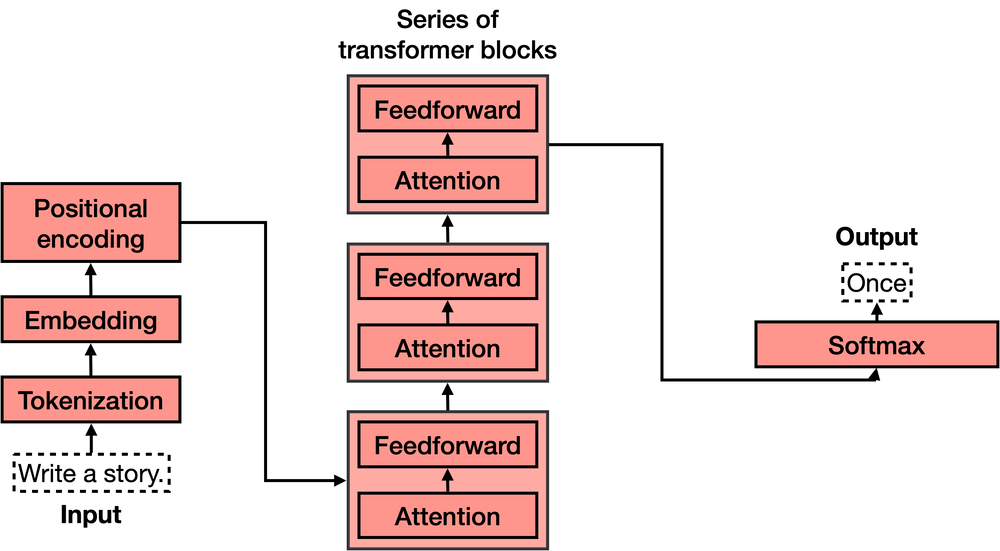
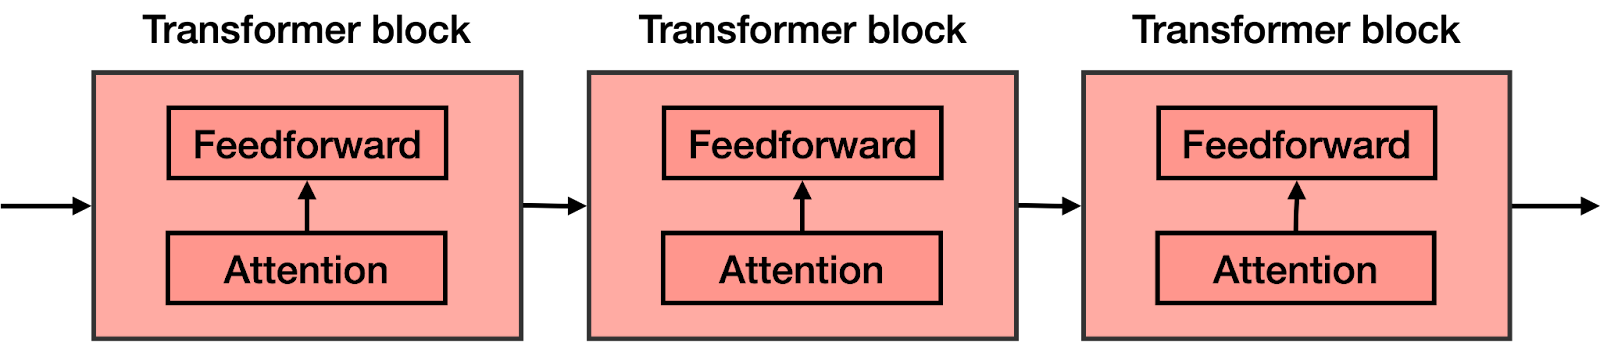
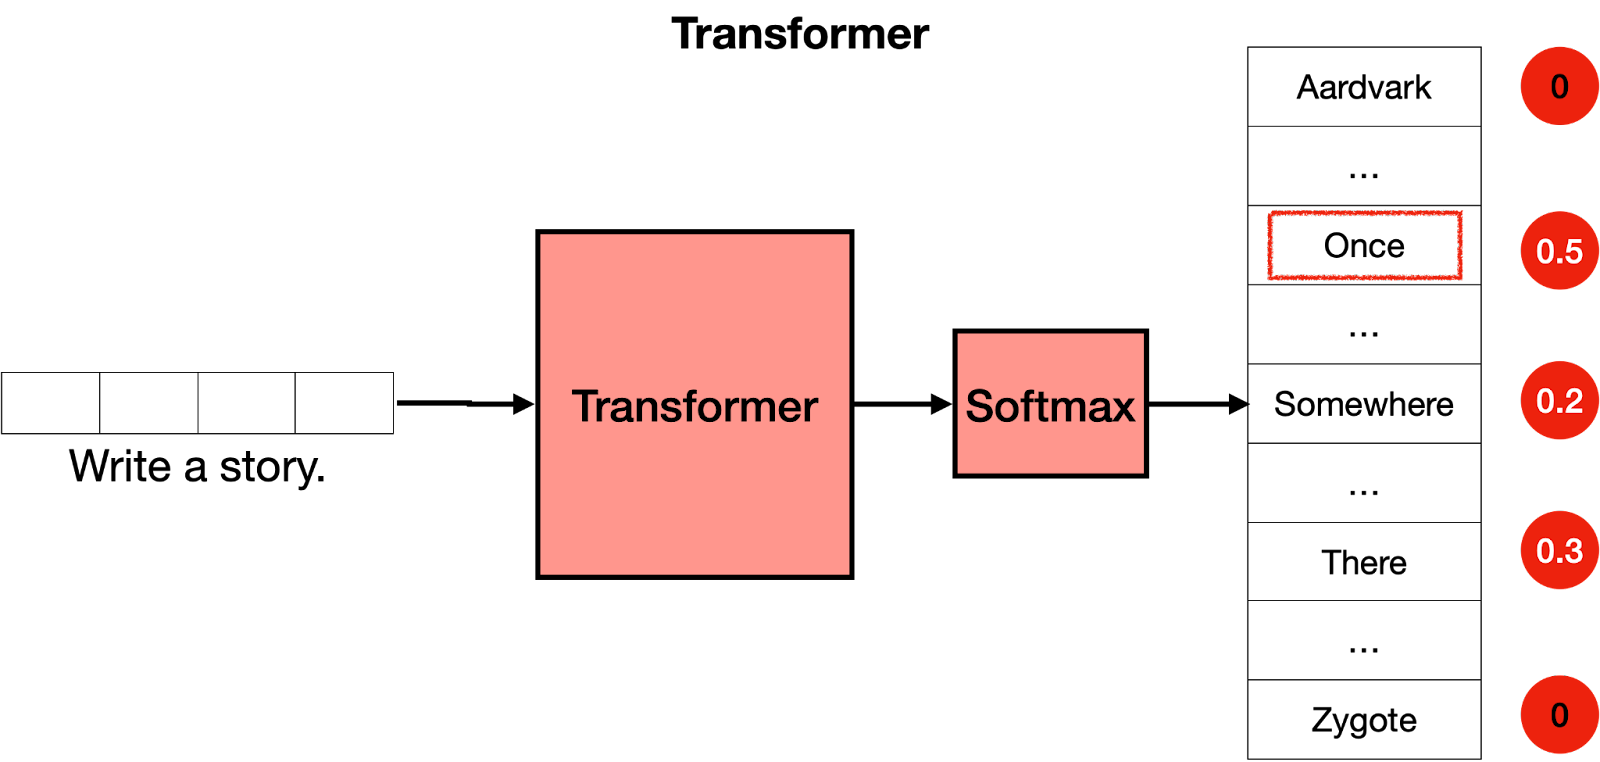
Transformer模型是机器学习中最令人兴奋的新发展之一。它们在论文Attention is All You Need中被介绍。Transformer可以用于写故事、文章、诗歌,回答问题,翻译语言,与人类聊天,甚至可以通过对人类来说很难的考试!但是它们到底是什么呢?你会很高兴地知道,Transformer模型的架构并不复杂,它只是一些非常有用组件的串联,并且每个组件都有自己的功能。在本篇文章中,您将了解所有这些组件。
简而言之,Transformer的作用是什么?想象一下你在手机上写短信。每输入一个单词后,你可能会得到三个建议的单词。例如,如果你输入“Hello, how are”,手机可能会建议下一个单词为“you”或“your”。当然,如果你继续选择手机中的建议单词,很快就会发现这些单词组成的信息毫无意义。如果你看每一组连续的3或4个单词,则它们可能有意义,但这些单词并不构成任何有意义的句子。这是因为手机使用的模型没有携带消息整体上下文,只是预测最近几个字后更可能出现哪个字。相反地,“Transformer”可以跟踪所编写内容背景,并且这就是它们编写文本使其具有意义之处所在。
我们可以训练这样一个大型网络,但是通过添加关键步骤:Attention(注意力)组件,我们可以极大地改进它。在开创性论文《Attention is All you Need》中引入的注意力机制是Transformer模型的关键成分之一,也是它们如此有效的原因之一。下面将解释注意力机制,但现在先想象它作为一种向文本中每个单词添加上下文的方式。
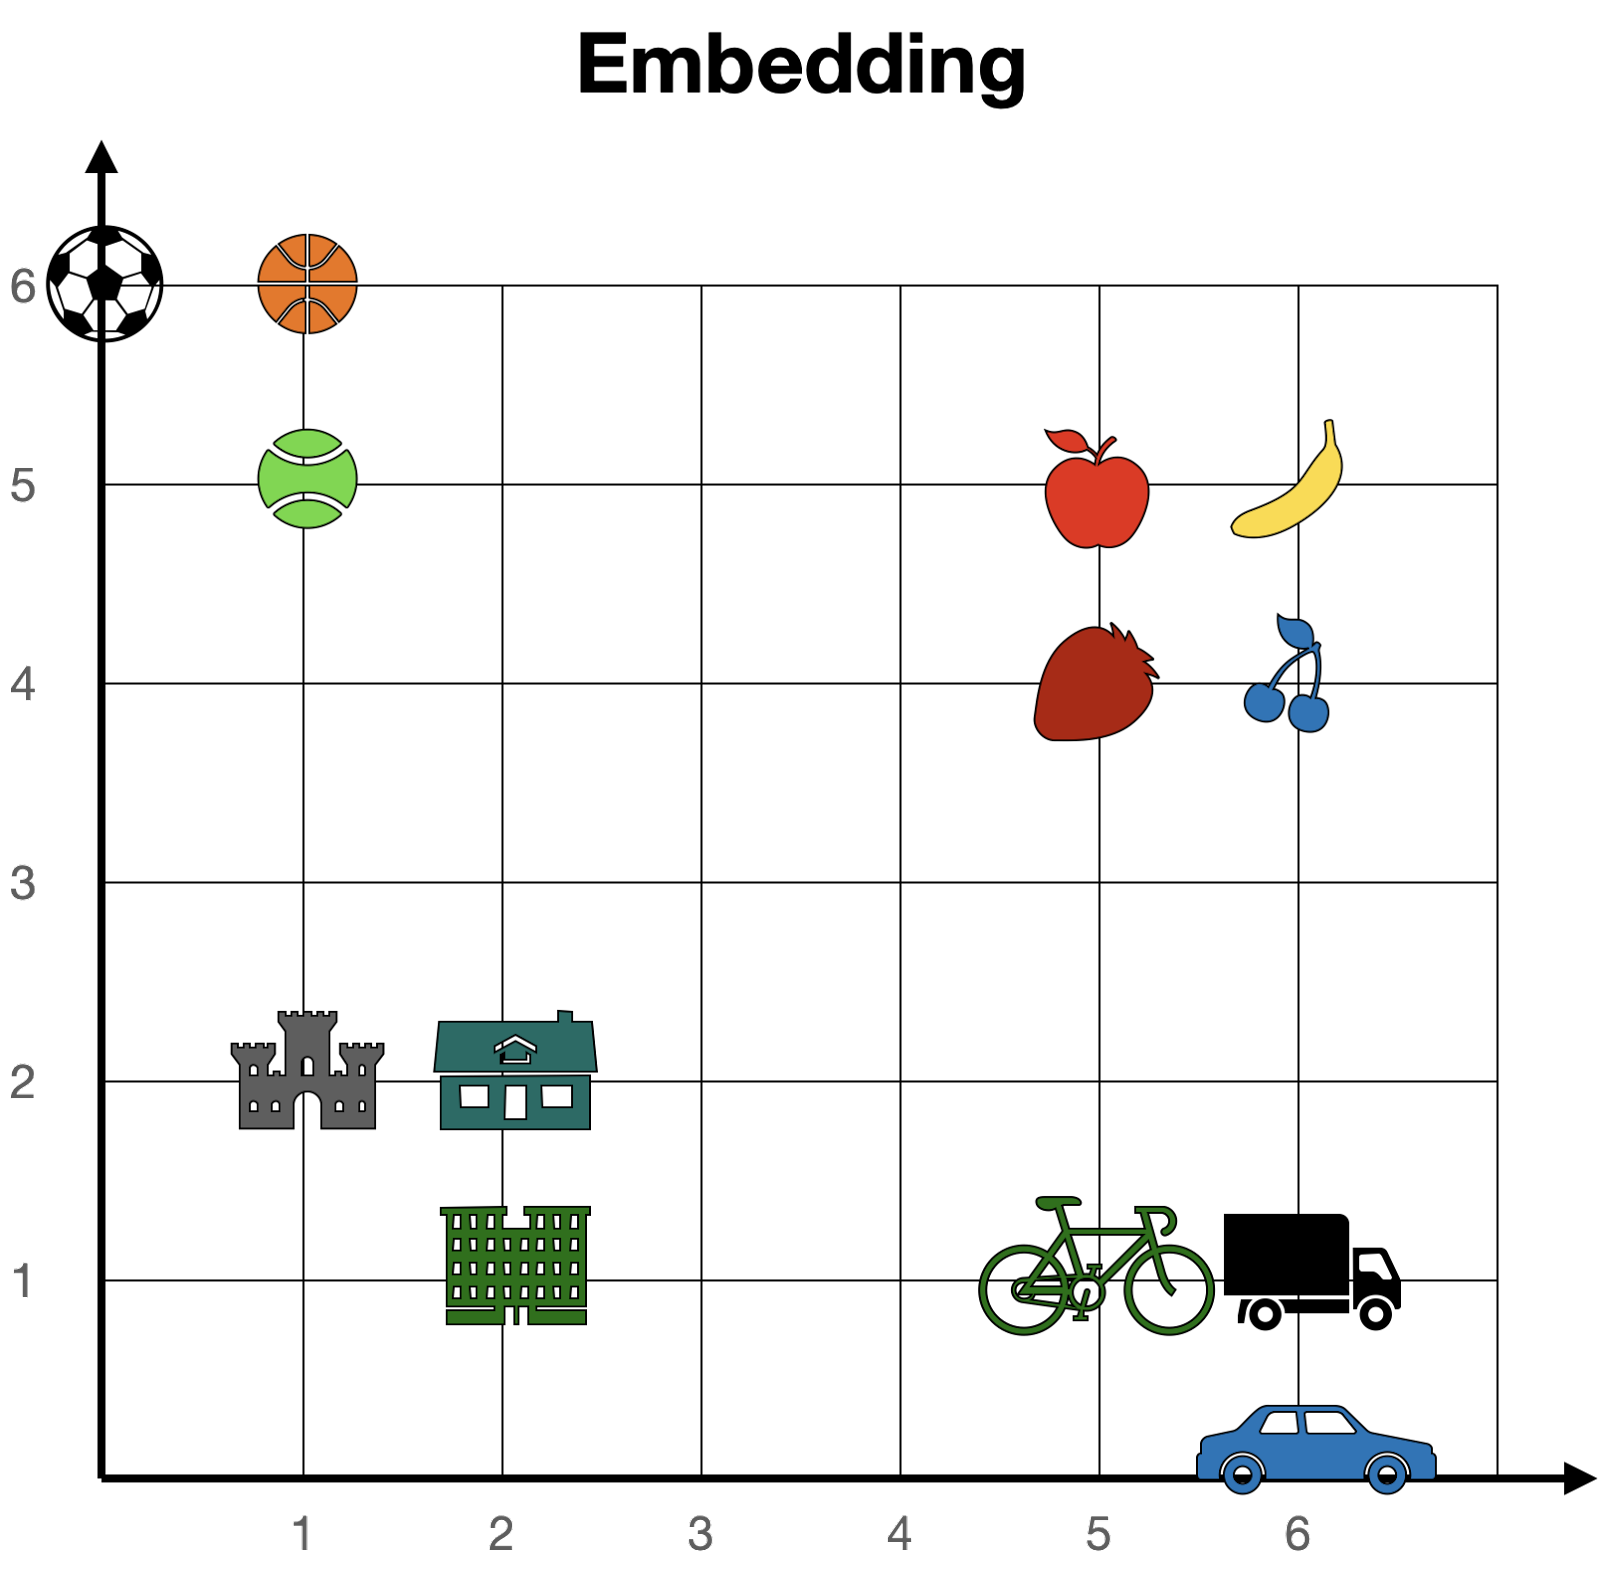
简而言之,注意力机制的作用是将句子(或文本片段)中的单词在词嵌入中靠近。这样,在句子“Money in the bank”中,“bank”一词将被移动到“money”的附近。同样,在句子“The bank of the river”中,“bank”一词将被移动到“river”的附近。这样,两个句子中修改后的单词“bank”都会携带周围单词的某些信息,为其添加上下文。
Hello fromHello from another thread! another This is my threthreadHello fromthread id: ThreadId! ( the main thread. 2)This is my thread id: ThreadId(3)
error[E0499]: cannot borrow `numbers` as mutable more than once at a time --> example.rs:7:13 | 4 | s.spawn(|| { | -- first mutable borrow occurs here 5 | numbers.push(1); | ------- first borrow occurs due to use of `numbers` in closure | 7 | s.spawn(|| { | ^^ second mutable borrow occurs here 8 | numbers.push(2); | ------- second borrow occurs due to use of `numbers` in closure
| let a = Arc::new([1, 2, 3]); let b = a.clone(); thread::spawn(move || { dbg!(b); }); dbg!(a); The clone of the Arc lives in the same scope. Each thread gets its own clone with a different name. | let a = Arc::new([1, 2, 3]); thread::spawn({ let a = a.clone(); move || { dbg!(a); } }); dbg!(a);The clone of the Arc lives in a different scope. We can use the same name in each thread. | | ———————————————————— | ———————————————————— | | | |
fnf(a: &i32, b: &muti32) { letbefore = *a; *b += 1; letafter = *a; if before != after { x(); // never happens } }
在这里,我们获得了一个不可变的整数引用,并存储了 b 所引用的整数在增加之前和之后的值。编译器可以自由地假设借用和数据竞争方面的基本规则得到遵守,这意味着 b 不可能指向与 a 相同的整数。实际上,在 a 借用该整数期间,程序中没有任何东西可以对其进行可变借用。因此,编译器可以轻松地推断出 *a 不会改变,并且 if 语句条件永远不会为真,并完全将调用 x 的代码作为优化从程序中删除。 除非使用 unsafe 块禁止一些编译器安全检查,否则无法编写破坏 Rust 编译器假设的程序。
一旦涉及到具有内部可变类型,则调用引用为“不可变”或“可变”的术语将会令人困惑和不准确,因为某些东西可以通过两者进行改动。更准确地说,“共享”和“独占”才是更精确的术语:共享引用(&T)可以复制并与其他人分享,而独占引用(&mut T)则保证它是该 T 的唯一 独占借用。对于大多数类型,共享引用不允许修改,但也有例外情况。由于在本书中我们将主要使用这些异常情况,因此在本书的其余部分中我们将使用更准确的术语。
fnf(v: &Cell<Vec<i32>>) { letmut v2 = v.take(); // Replaces the contents of the Cell with an empty Vec v2.push(1); v.set(v2); // Put the modified Vec back }
error[E0277]: `Rc<i32>` cannot be sent between threads safely --> src/main.rs:3:5 | 3 | thread::spawn(move || { | ^^^^^^^^^^^^^ `Rc<i32>` cannot be sent between threads safely | = help: within `[closure]`, the trait `Send` is not implemented for `Rc<i32>` note: required because it's used within this closure --> src/main.rs:3:19 | 3 | thread::spawn(move || { | ^^^^^^^ note: required by a bound in `spawn`
如果我们的意图是锁定列表、弹出一个项目、解锁列表,然后在解锁列表之后处理该项目,那么我们在这里犯了一个微妙但重要的错误。临时保护程序直到整个 if let 语句结束才会被释放,这意味着我们在处理该项时不必要地持有锁。
令人惊讶的是,在类似于此示例中的类似 if 语句中不会发生这种情况:
1 2 3
if list.lock().unwrap().pop() == Some(1) { do_something(); }
这里,在执行 if 语句体之前,临时守卫确实会被删除。原因是常规 if 语句的条件始终是一个普通布尔值,不能借用任何东西。没有理由将从条件到语句末尾的临时变量寿命延长。然而,对于 if let 语句可能不是这种情况。例如,如果我们使用了 front() 而不是 pop() ,则 item 将从列表中借用,这使得必须保留守卫。由于借用检查器只是一个检查,并不影响事物何时以及以什么顺序被删除,即使我们使用了 pop() ,同样也会发生这种情况。
我们可以通过将弹出操作移动到单独的 let 语句中来避免这种情况。然后在该声明结束之前放弃 guard,在 if let 中: